MySQL数据库
从今天开始,我们将进入系列课程的 第四模块 的学习,这个模块就是给大家讲解MySQL数据库。
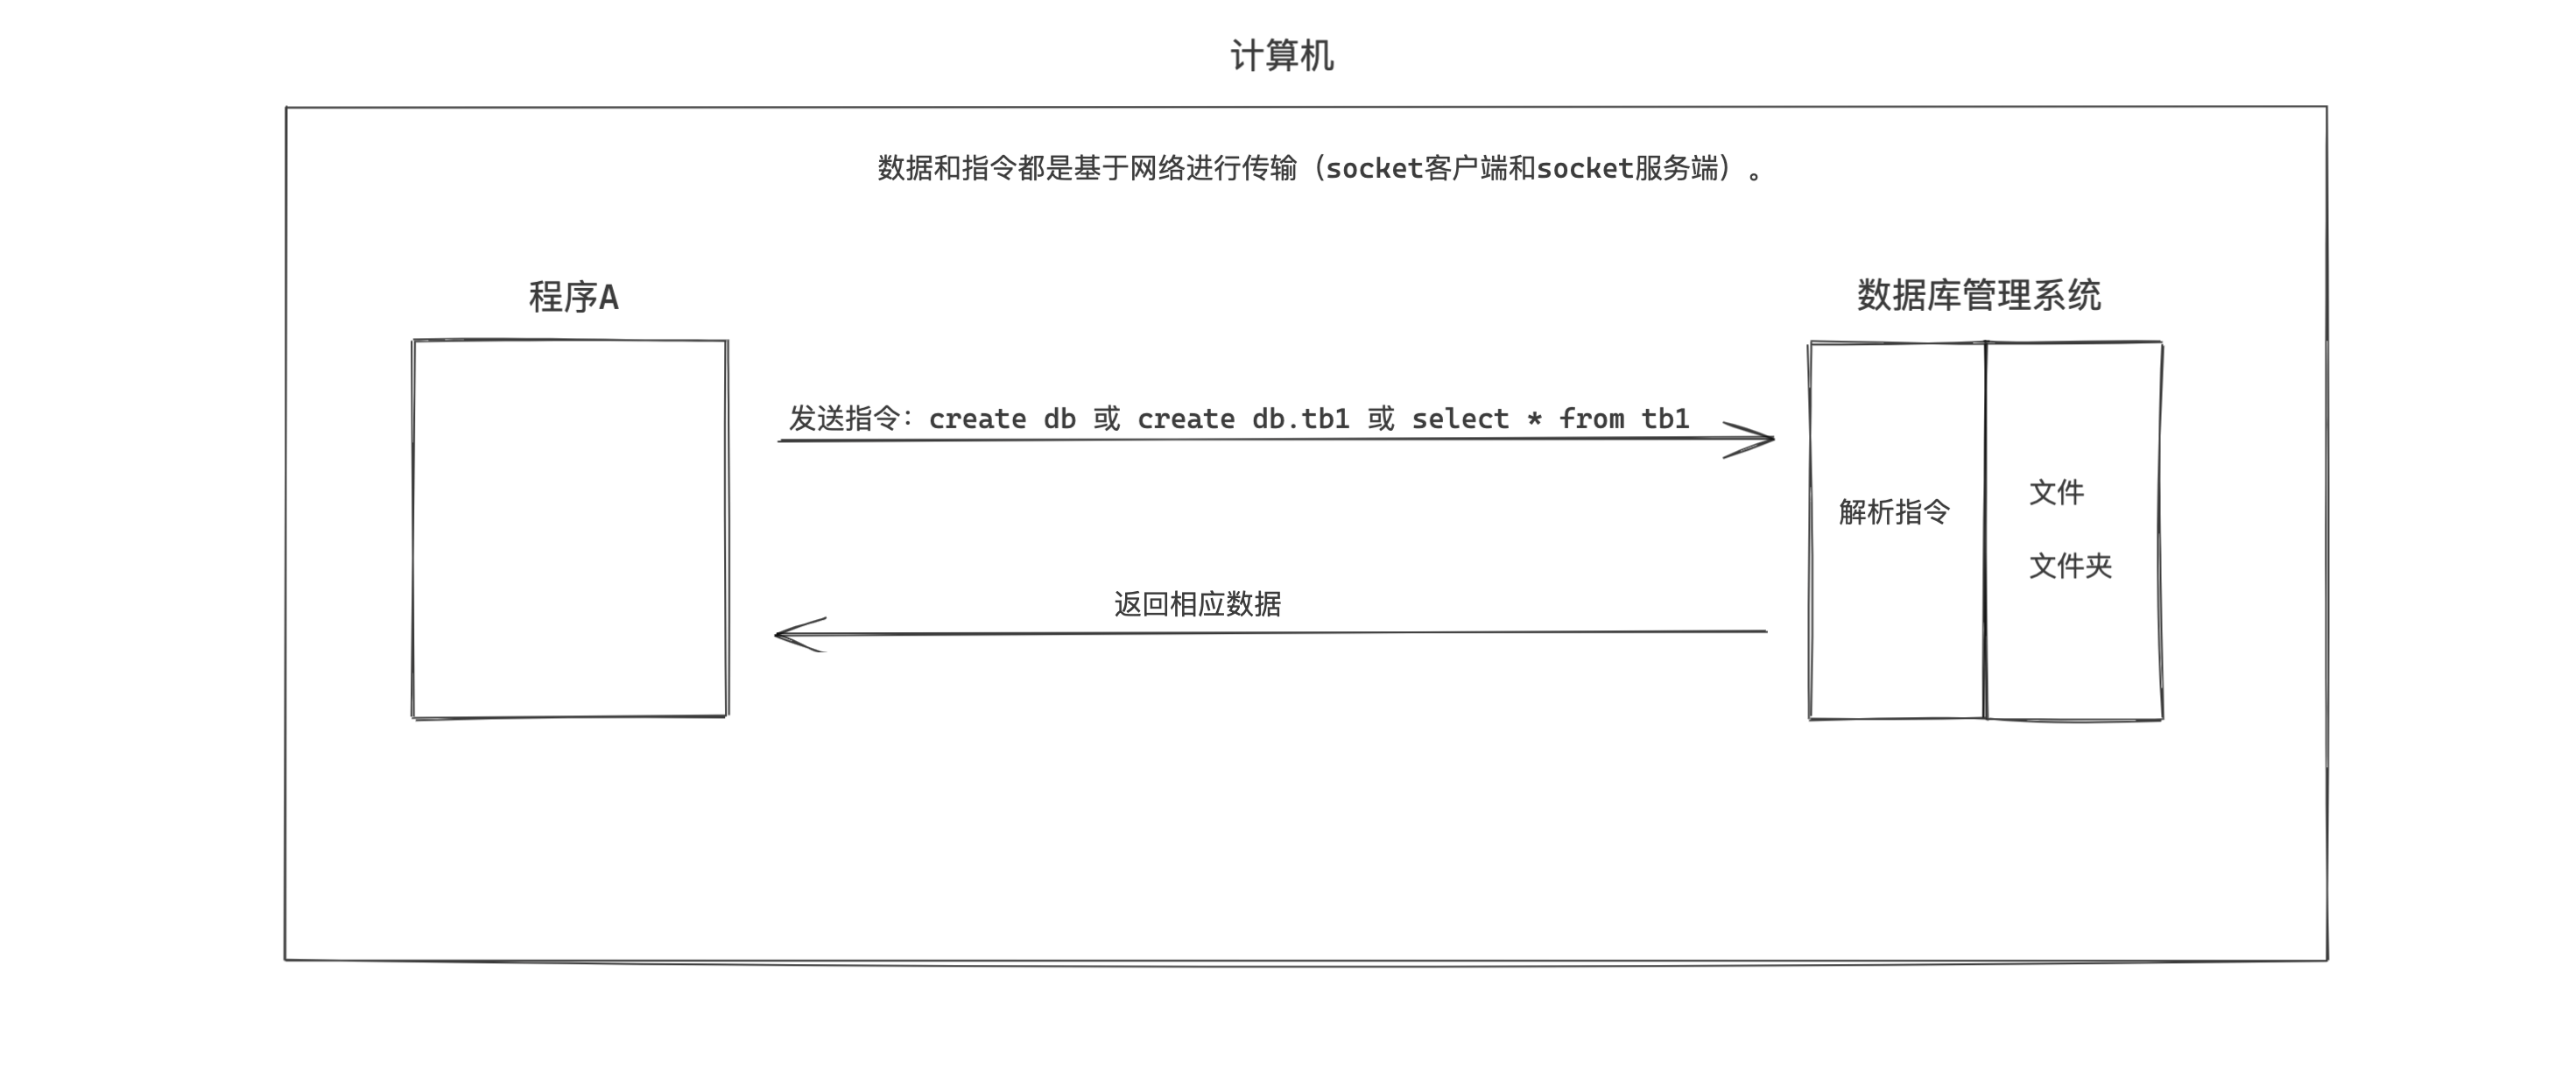
以前,在开发程序时,我们会把很多的数据和信息存储到某个文件夹中的文件中,例如:user.txt 、db.xlsx 等。
现在,有那么一个叫:数据库管理系统(DBMS,Database Management System)的软件,可以帮助我们实现对文件夹中的文件进行操作,而我们只要学习DBMS能识别的指令, 就能控制它去帮助我们实现的文件和文件夹的处理。例如:

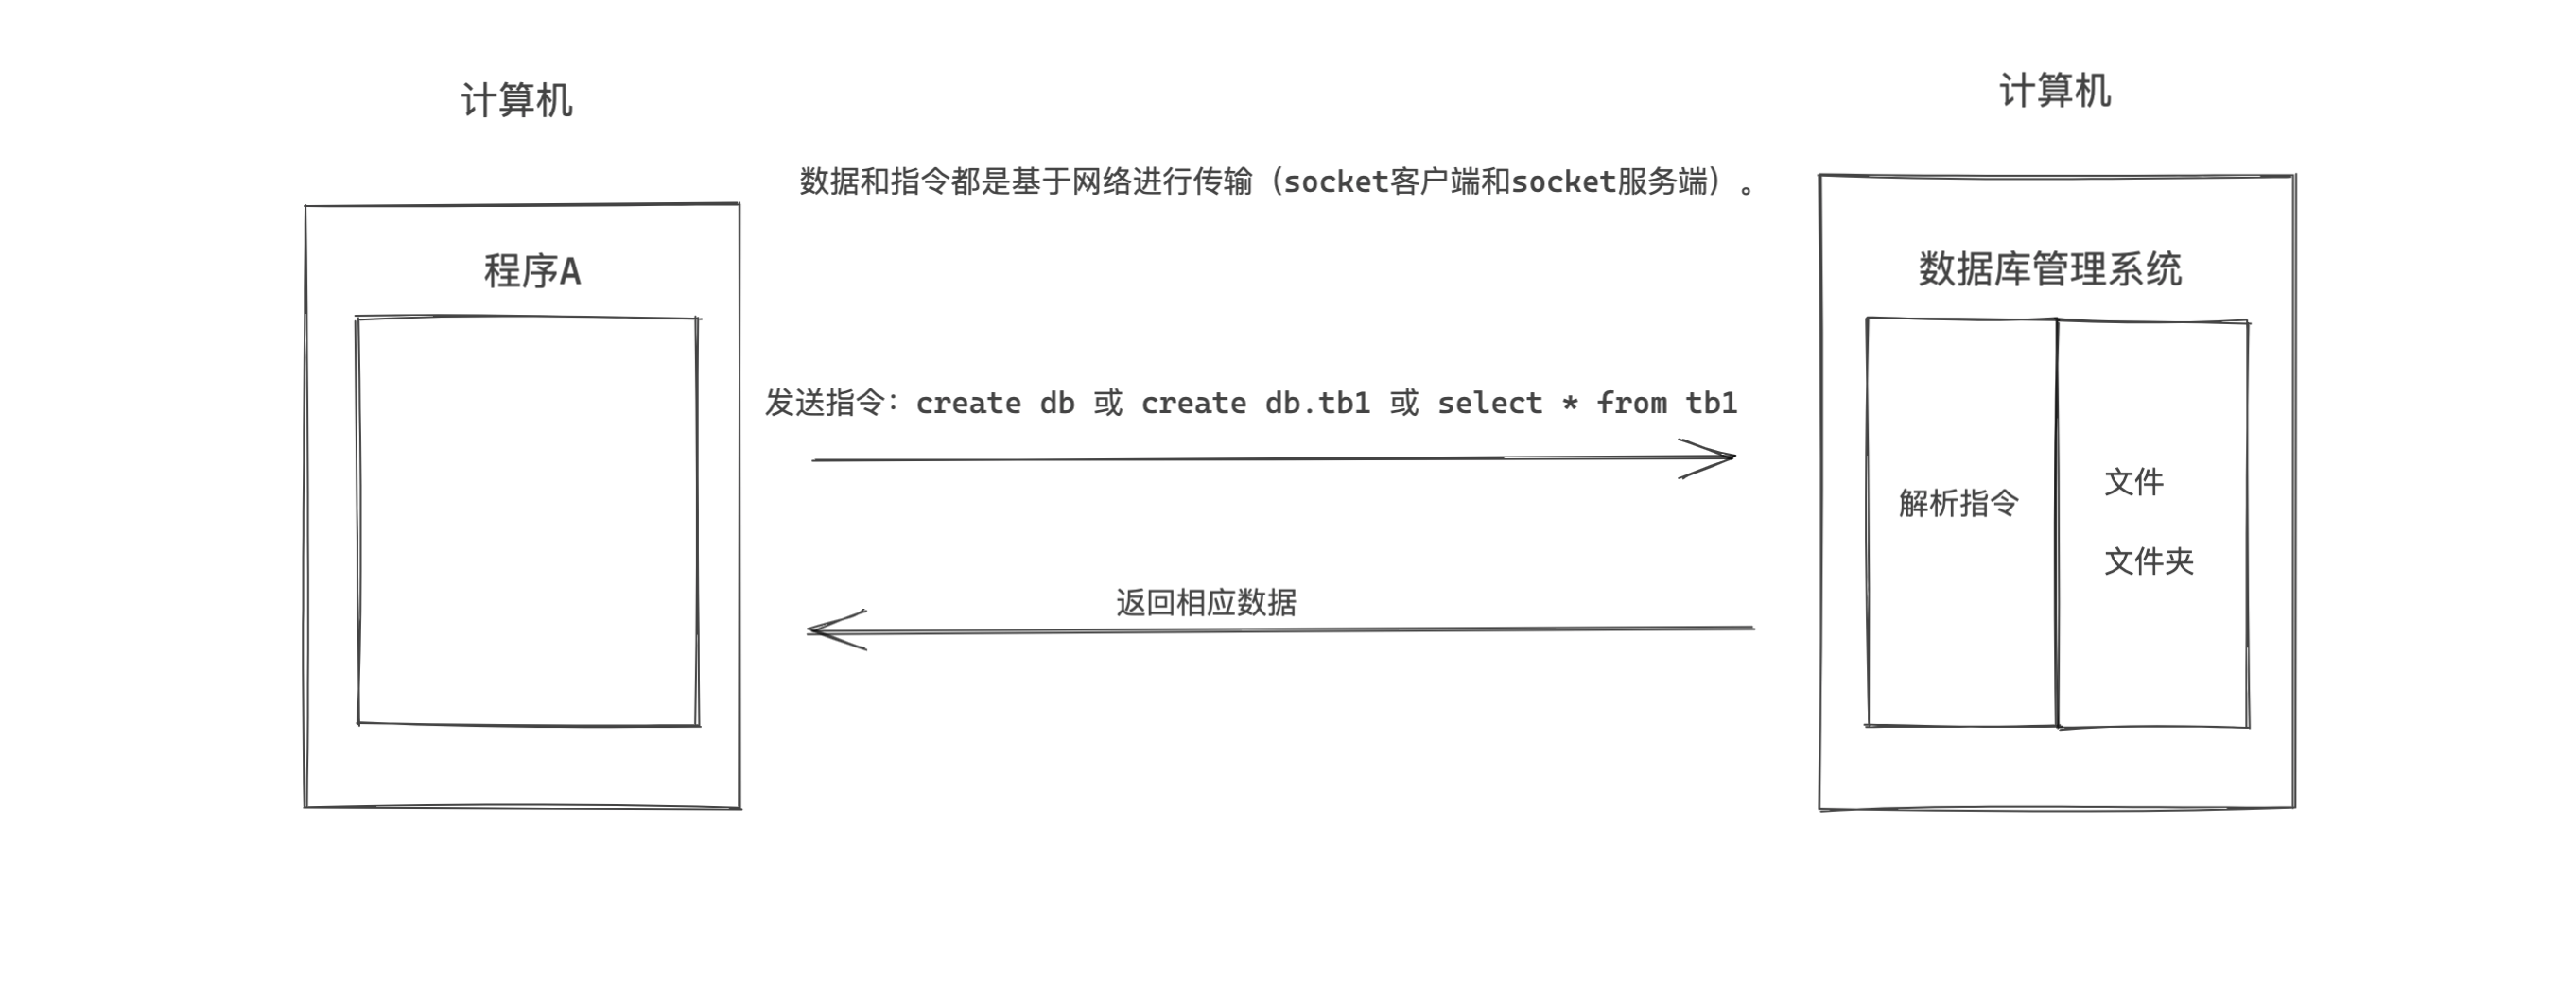
数据库管理系统(DBMS)专注于帮助开发者解决数据存储的问题,这样开发者就可以把主要精力放在实现业务功能上了。
业内有很多的的数据库管理系统产品,例如:
- MySQL,原来是sun公司,后来被甲骨文收购。现在互联网企业几乎都在使用。【免费 + 收费】
- Oracle,甲骨文。收费,一般国企、事业单位居多。【收费】
- Microsoft SQL Server,微软。【收费】
- DB2,IBM。【免费 + 收费】
- SQLite,D. Richard Hipp个人开发。【免费】
- Access, 微软。【收费】
- PostgreSQL,加州大学伯克利分校。【免费】
- 等众多..
由于各大公司都是使用MySQL,所以我们课程主要给大家讲解MySQL数据库。
在项目开发中想要基于MySQL来进行数据存储,大致应该怎么做呢?
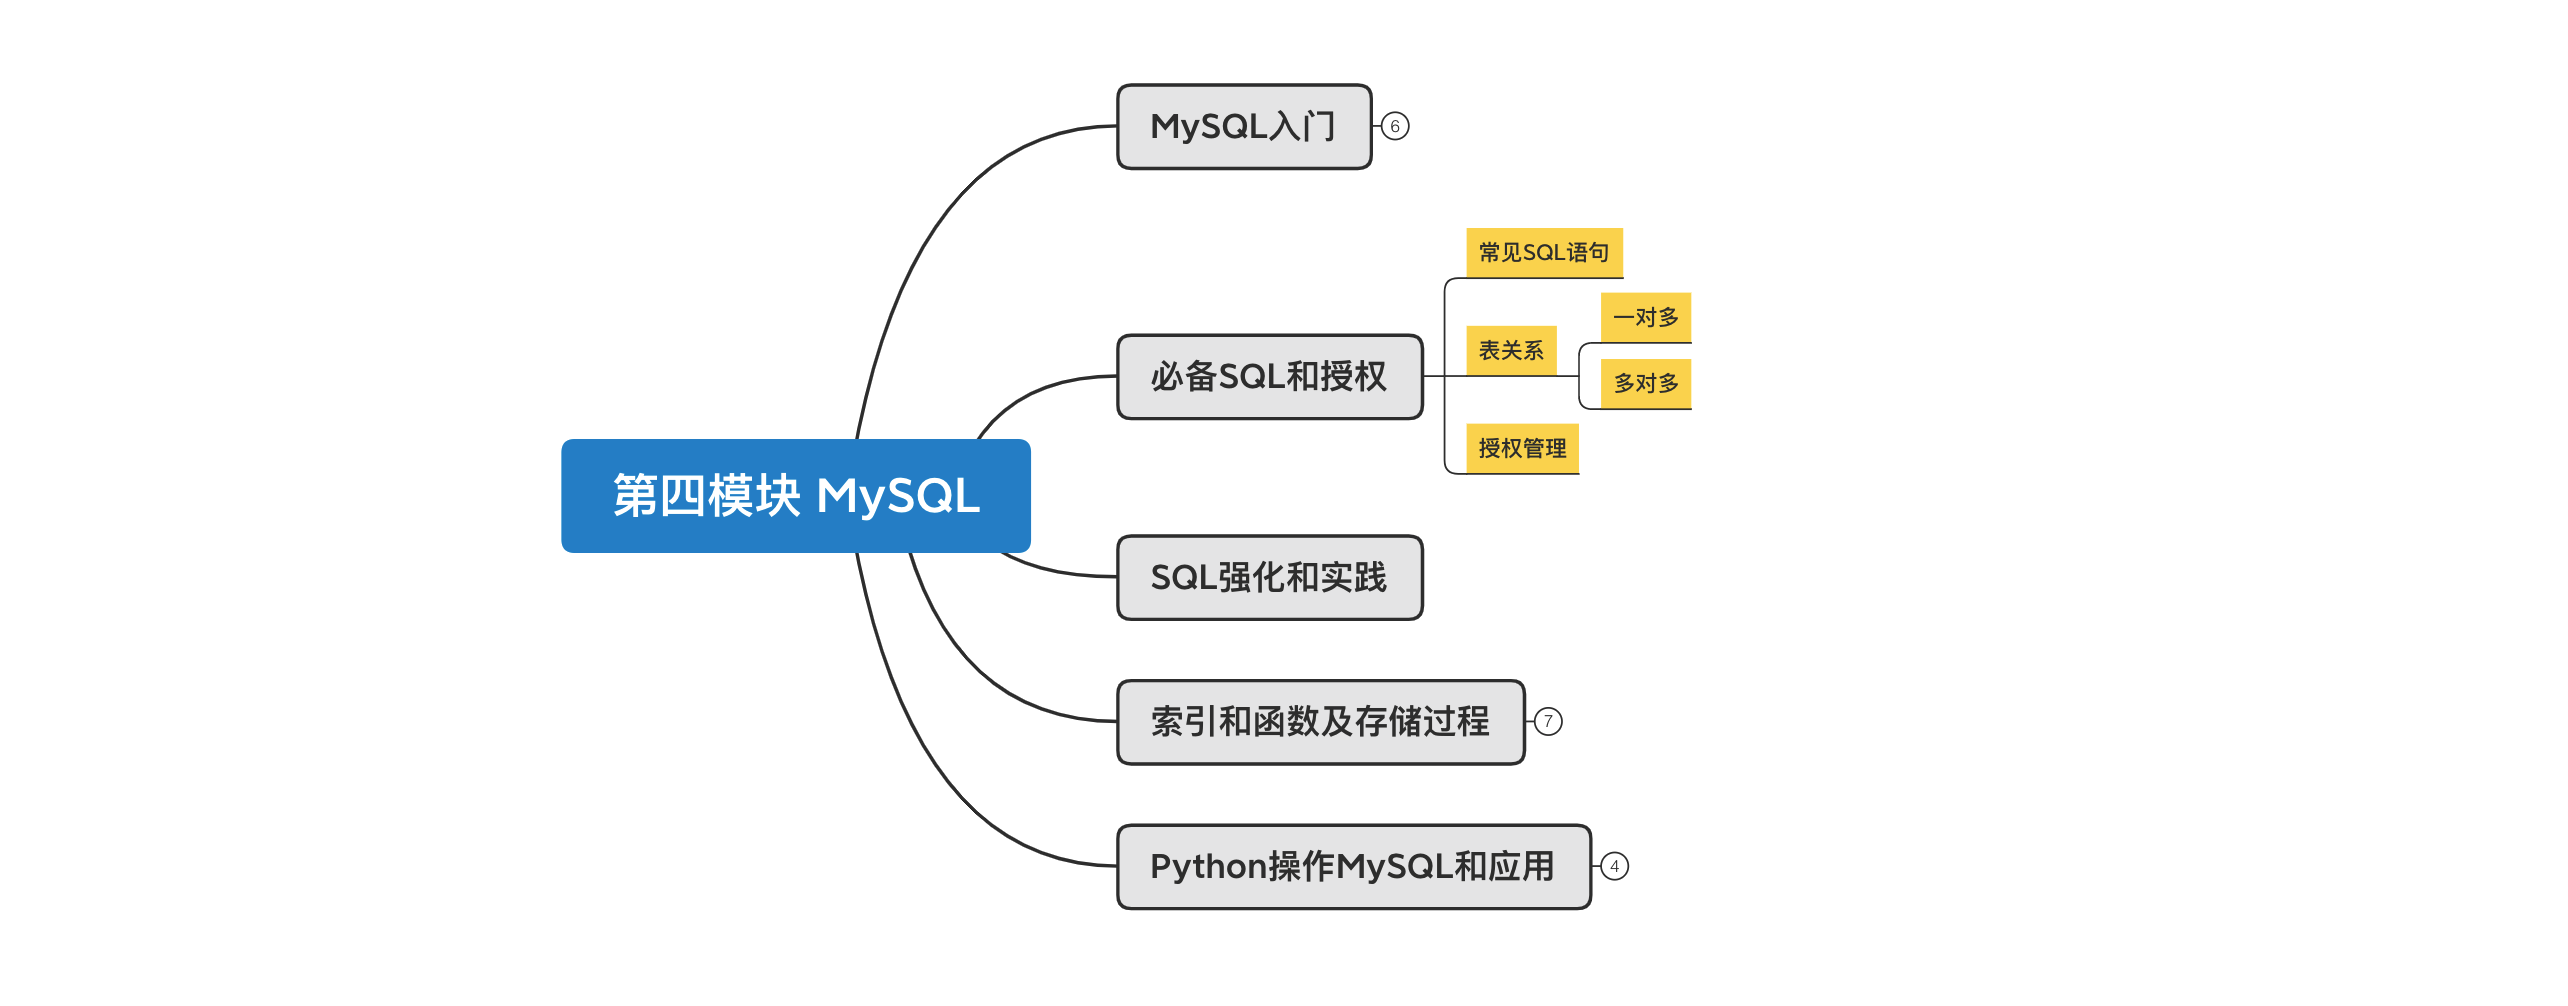
本系列的MySQL模块会分为5部分来讲解:
- MySQL入门,安装和快速应用Python实现数据库的操作。
- 必备SQL和授权,学习更多必备的指令让数据库实现更多业务场景。
- SQL强化和实践,强化练习必备”指令“(项目开发写的最多)。
- 索引和函数以及存储过程,掌握常见性能提升手段以及那些应用不是很频繁却又需了解的知识点。
- Python操作MySQL和应用,侧重点在于Python开发,让大家了解Python开发中必备的实战应用,例如:锁、事务、数据库连接池等。

入门

课程目标:学习安装和快速应用Python实现数据库的操作。
课程概要:
- 安装 & 配置 & 启动
- win
- mac
- 数据库 管理(类比文件夹)
- 表 管理 (类比文件夹下的Excel文件)
- 数据行 管理(类比Excel文件中的数据行)
- Python操作MySQL及相关安全的问题
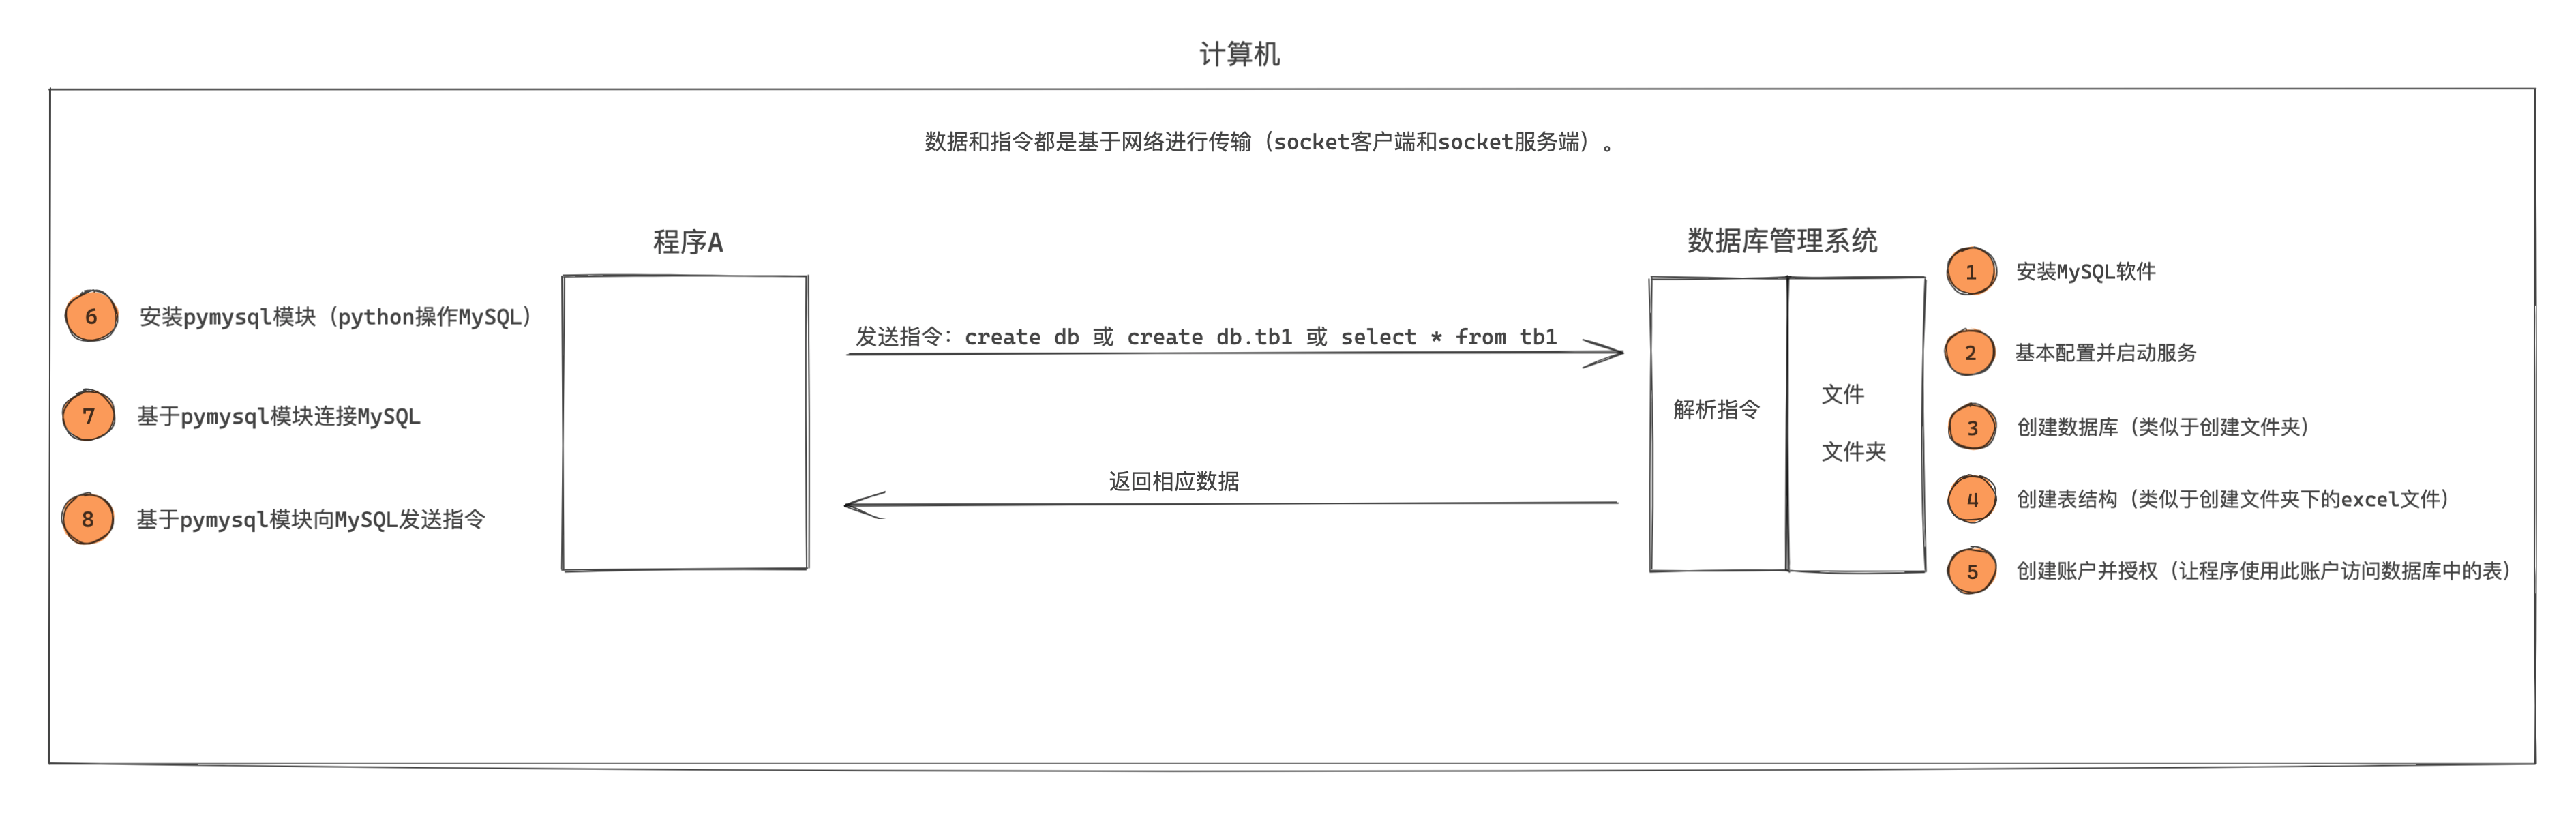
1. 安装 & 配置 & 启动
MySQL现在的版本主要分为:
- 5.x 版本,现在互联网企业中的主流版本,包括:头条、美图、百度、腾讯等互联网公司主流的版本。
- 8.x 版本,新增了一些了窗口函数、持久化配置、隐藏索引等其他功能。
所以,我们课程会以常用大版本中最新的版本为例来讲解,即:5.7.31 (依然有很多企业在用5.6.x,但新项目基本上都是5.7.x了)。
1.1 win系统
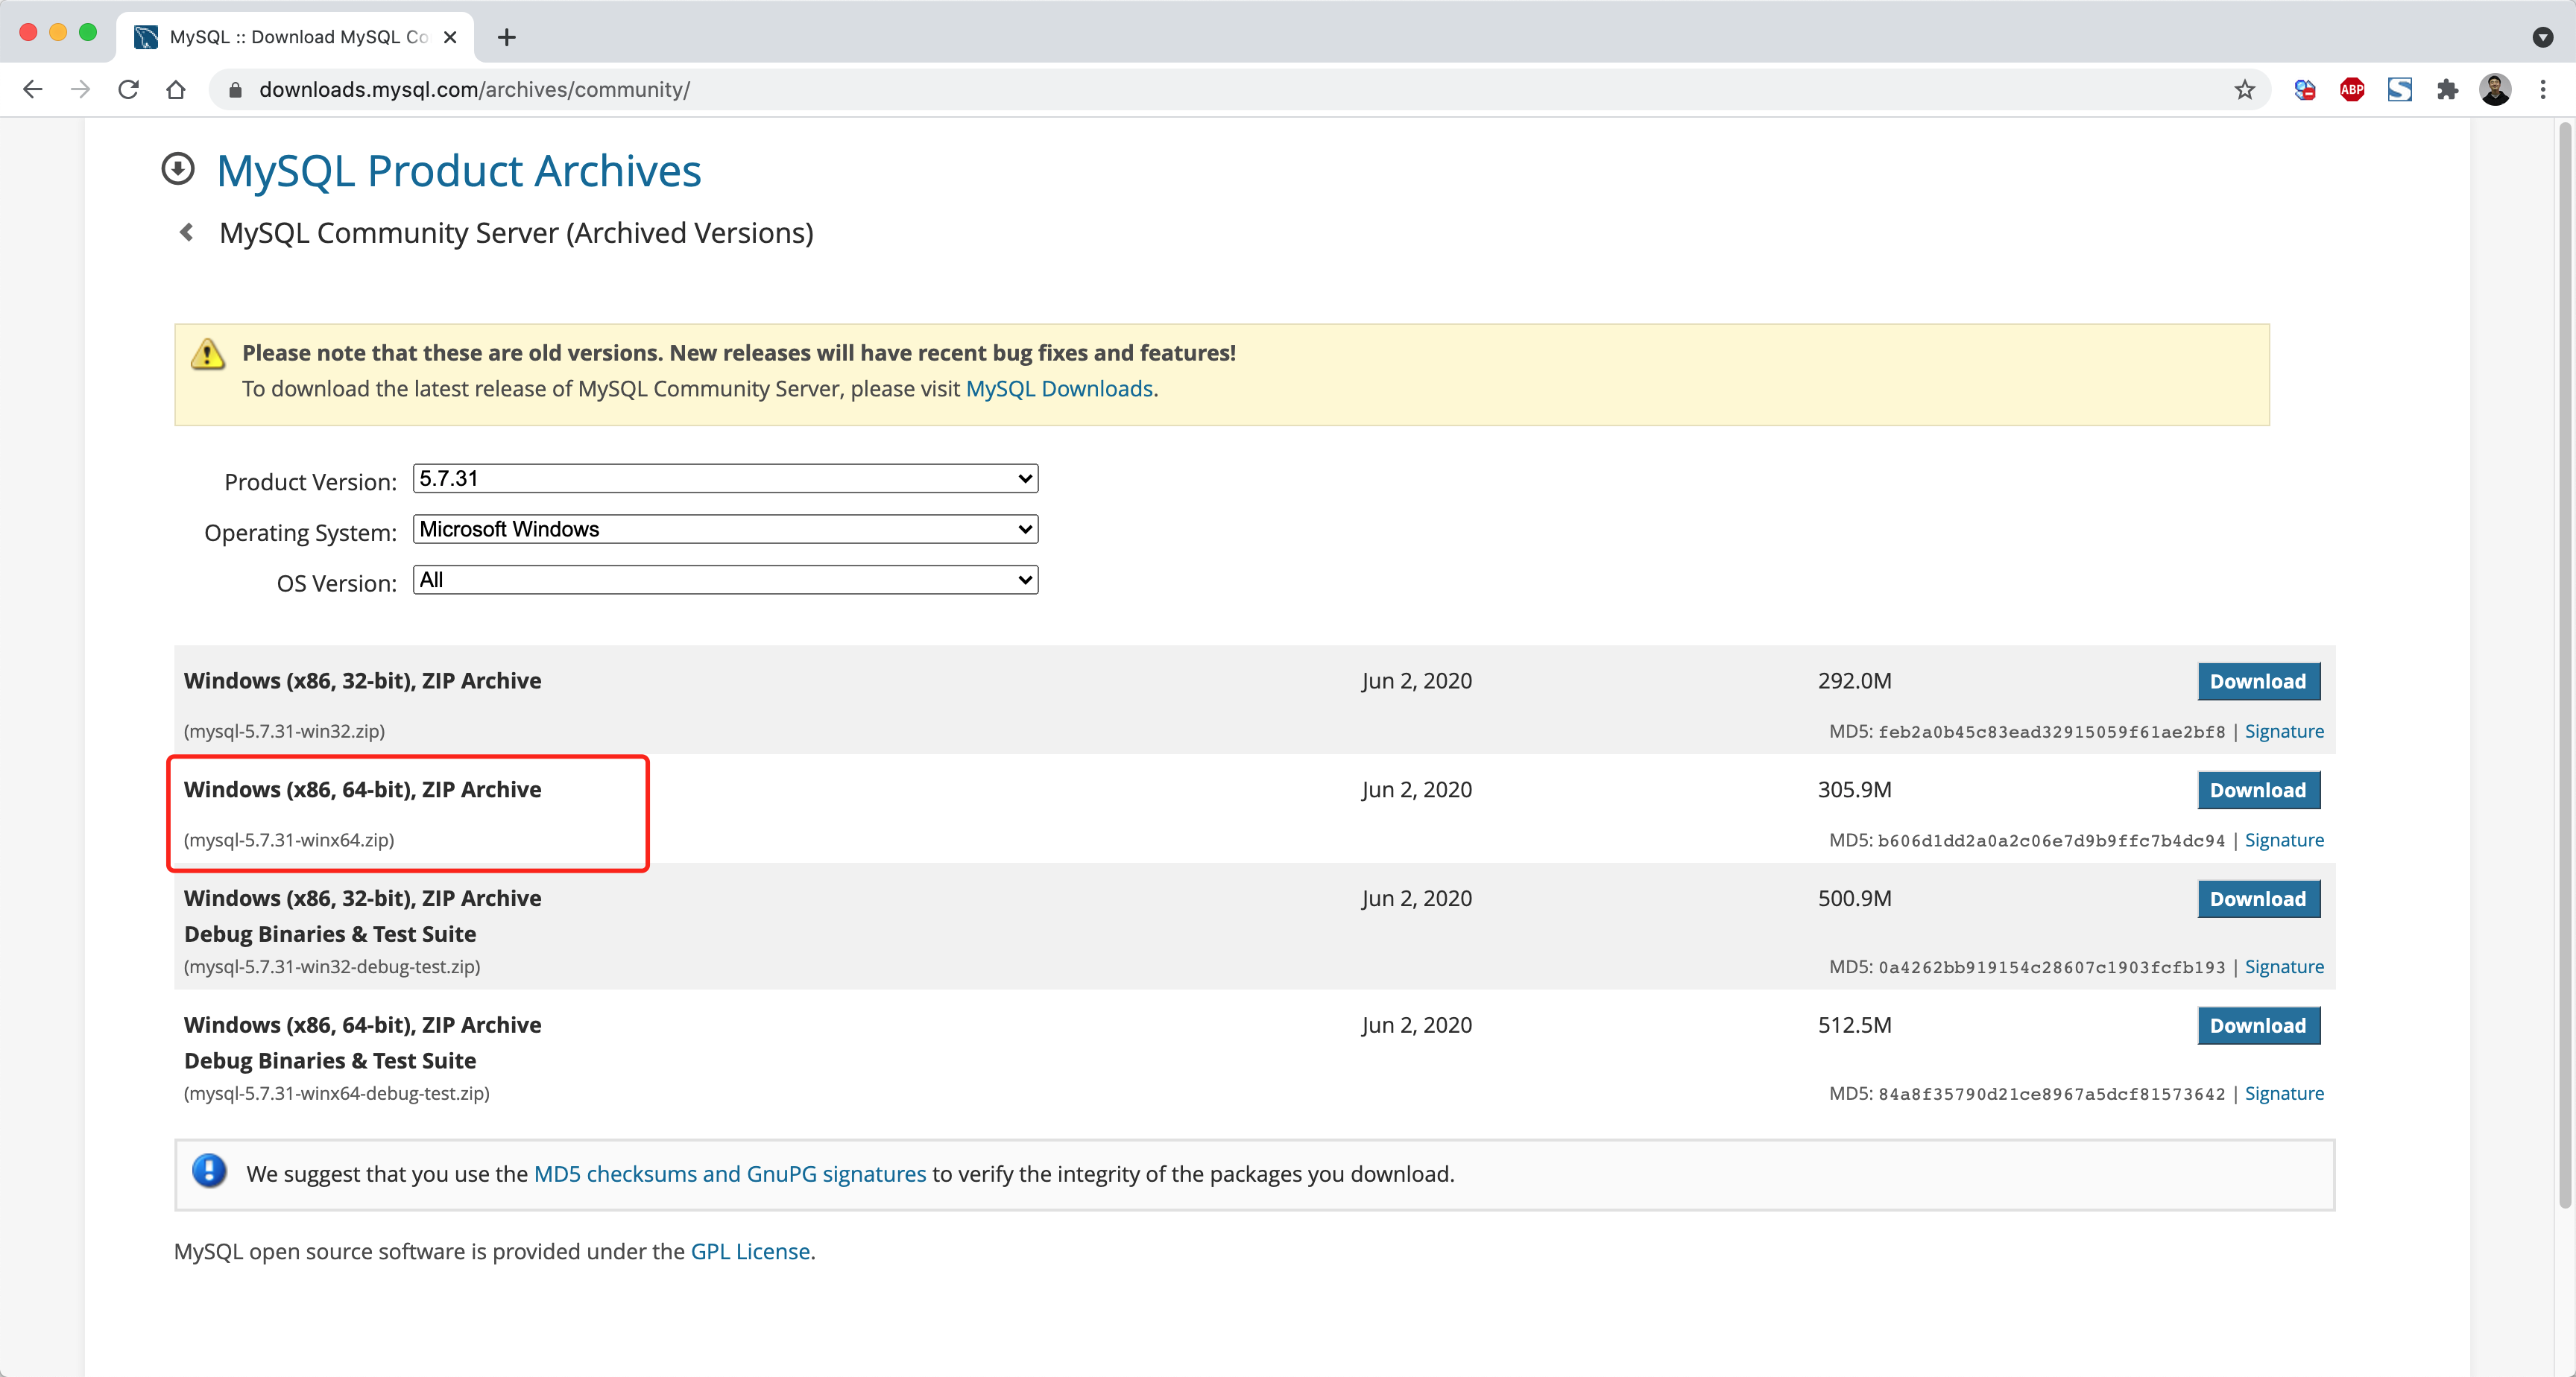
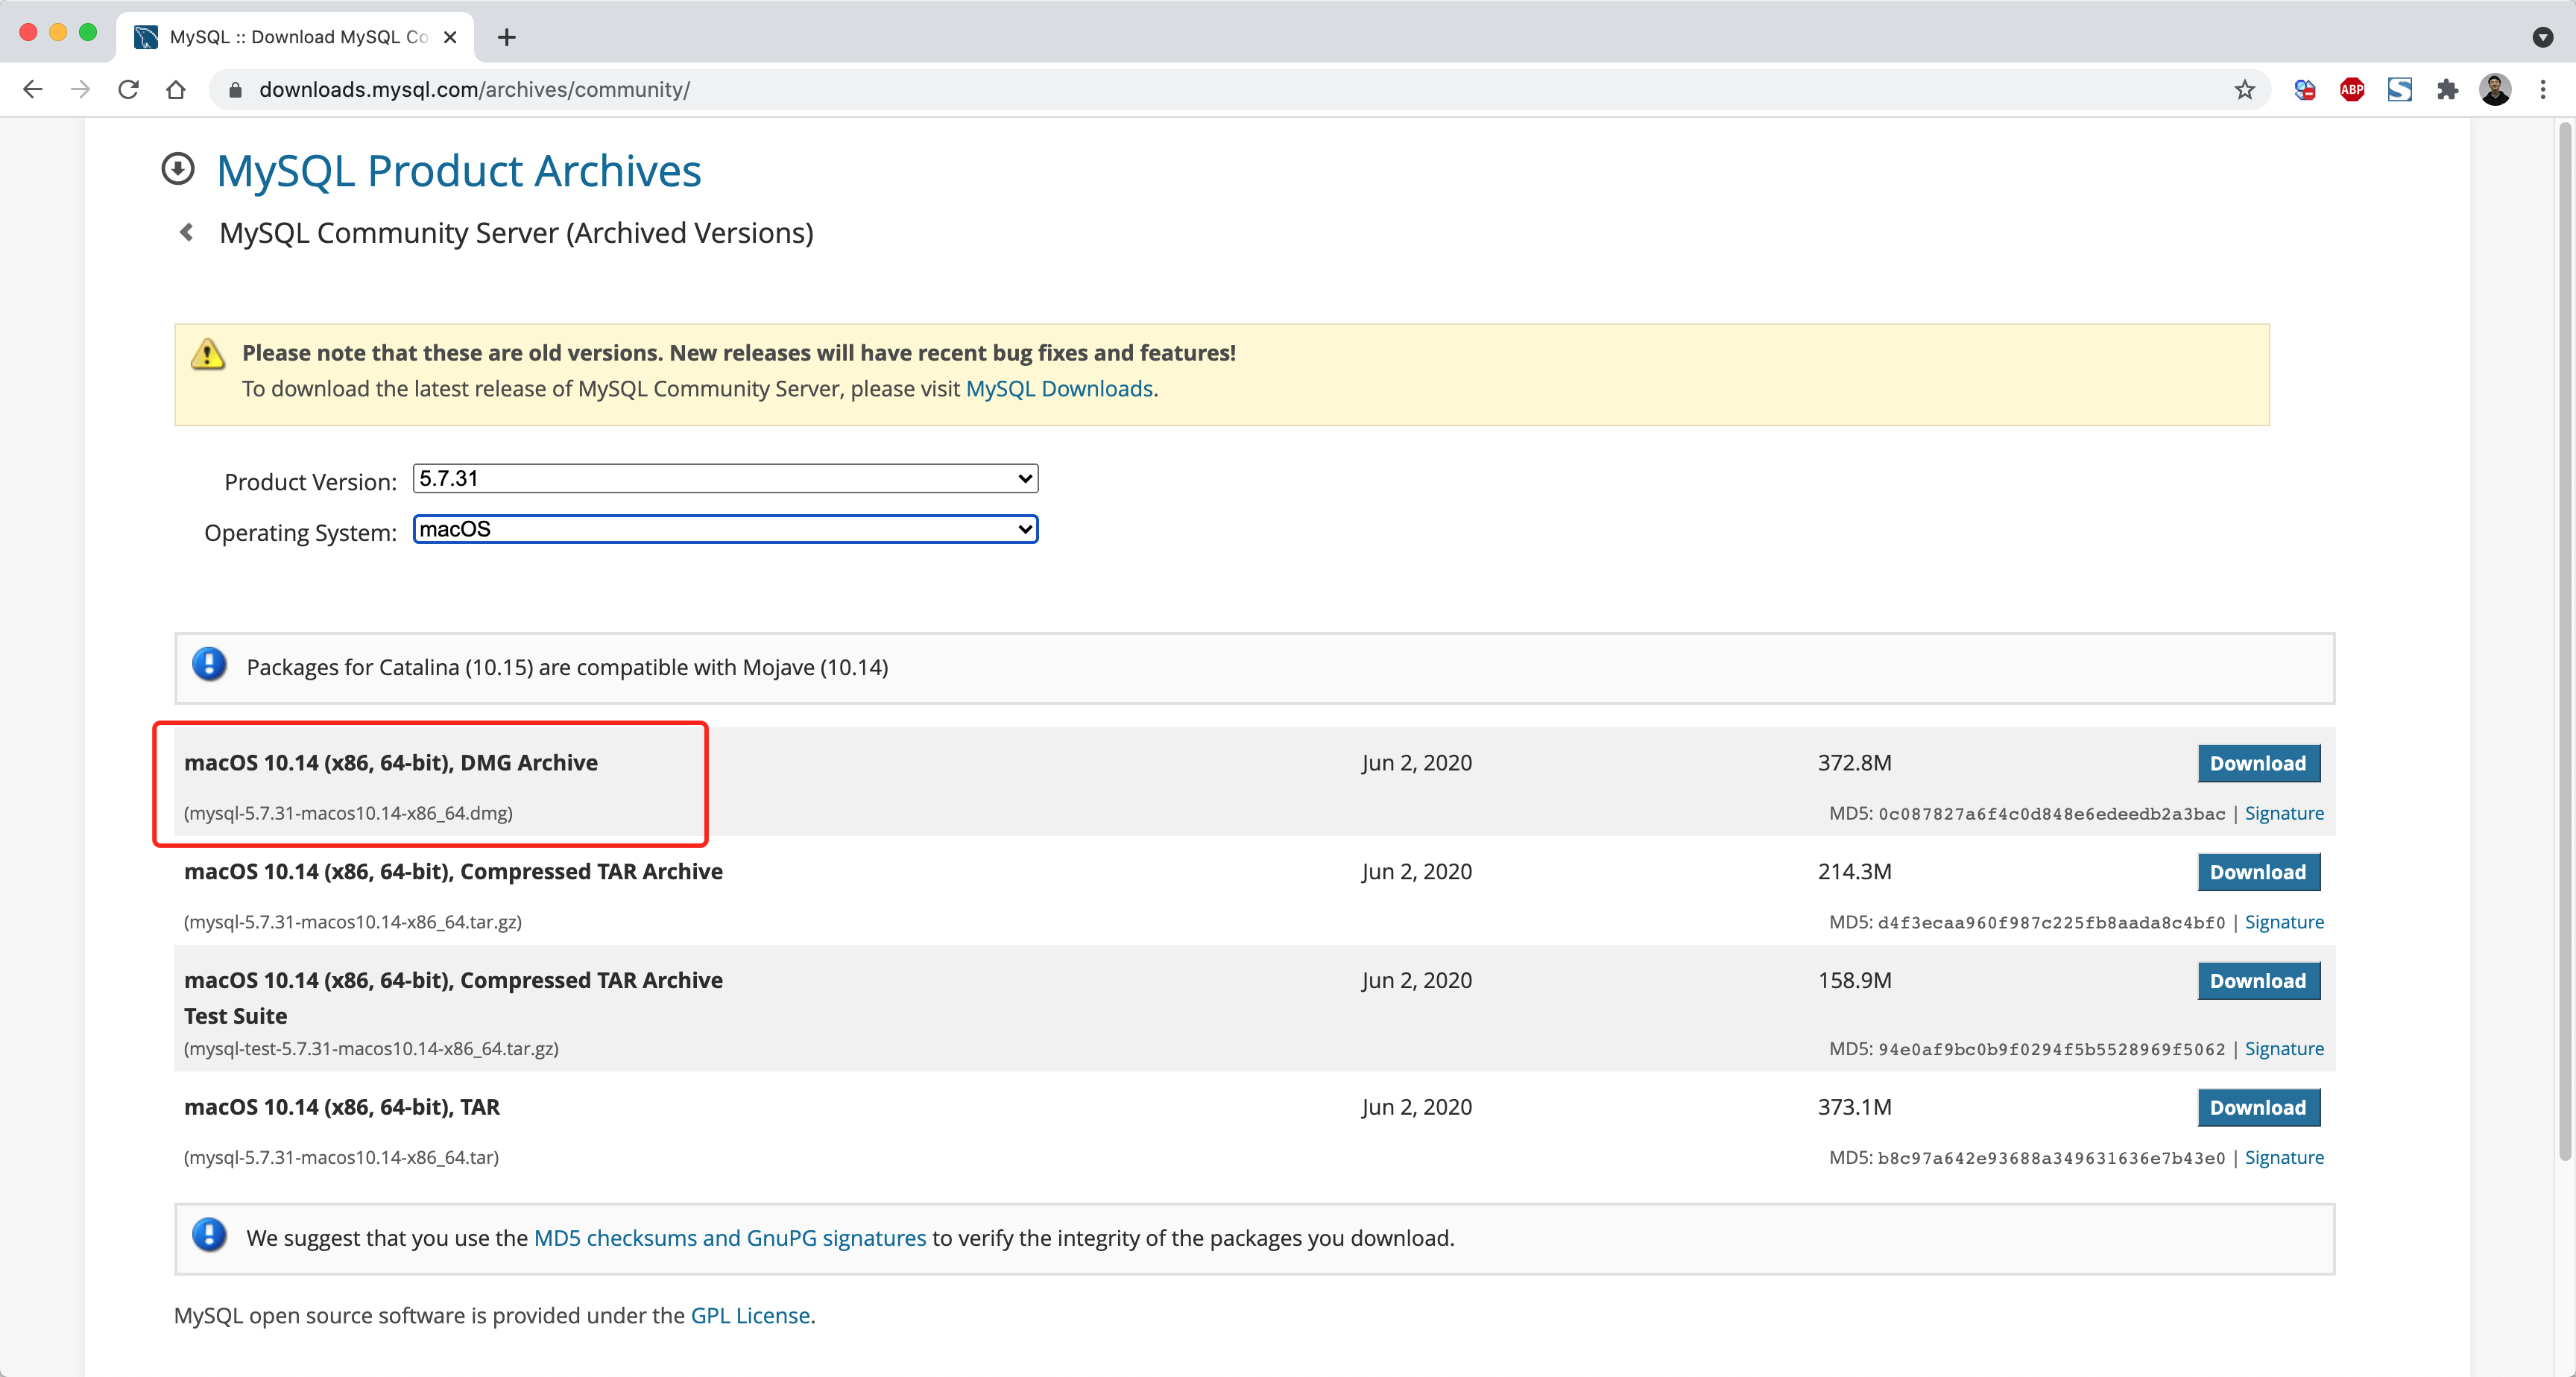
第1步:下载安装
https://downloads.mysql.com/archives/community/
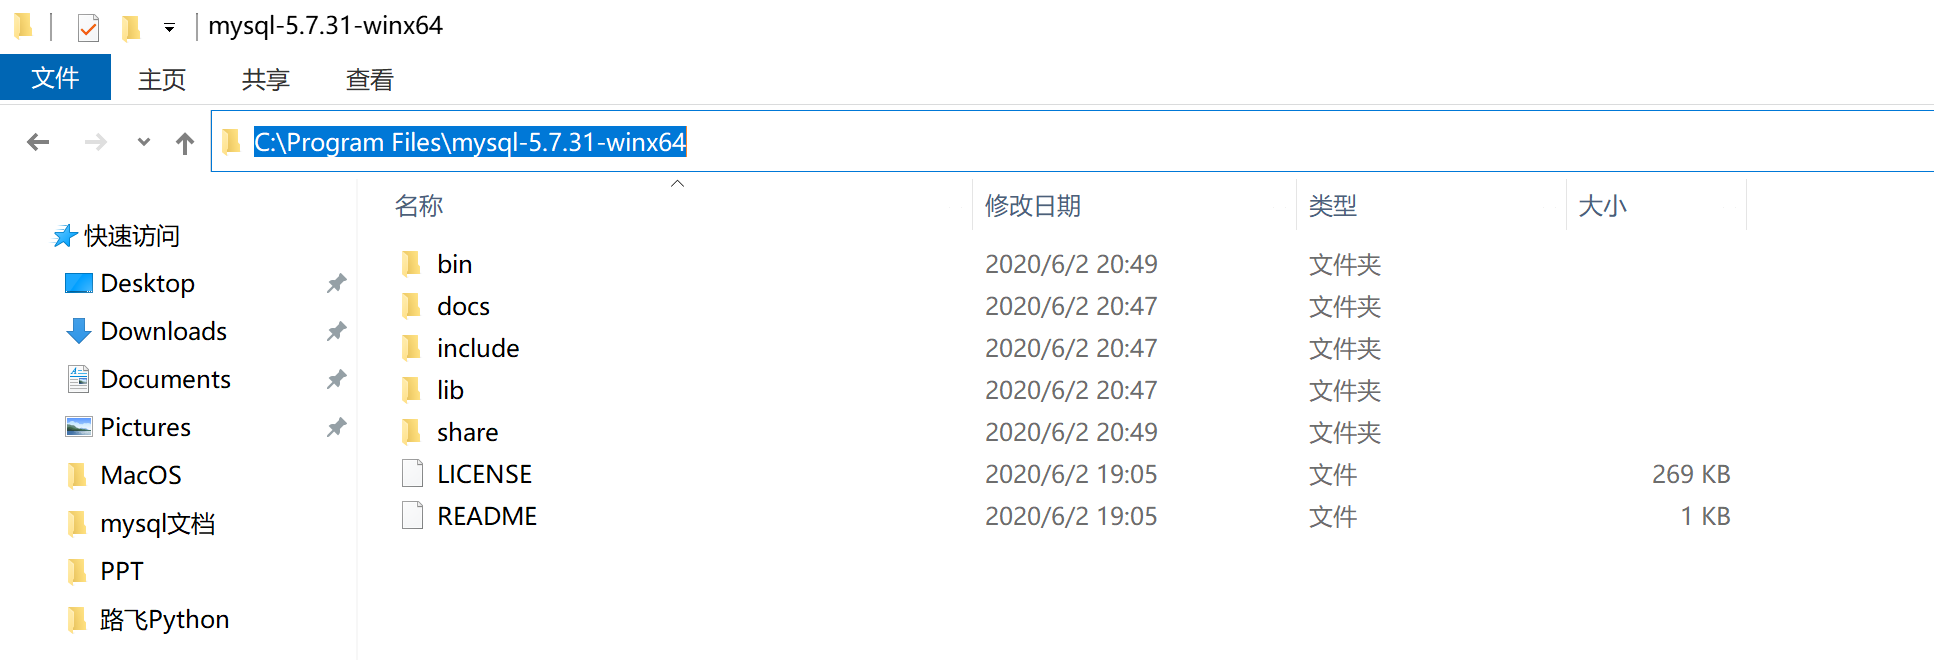
第2步:解压至任意文件夹
建议解压至软件安装目录,例如:
第3步:创建配置文件
在MySQL的安装目录下创建 my.ini 的文件,作为MySQL的配置文件。

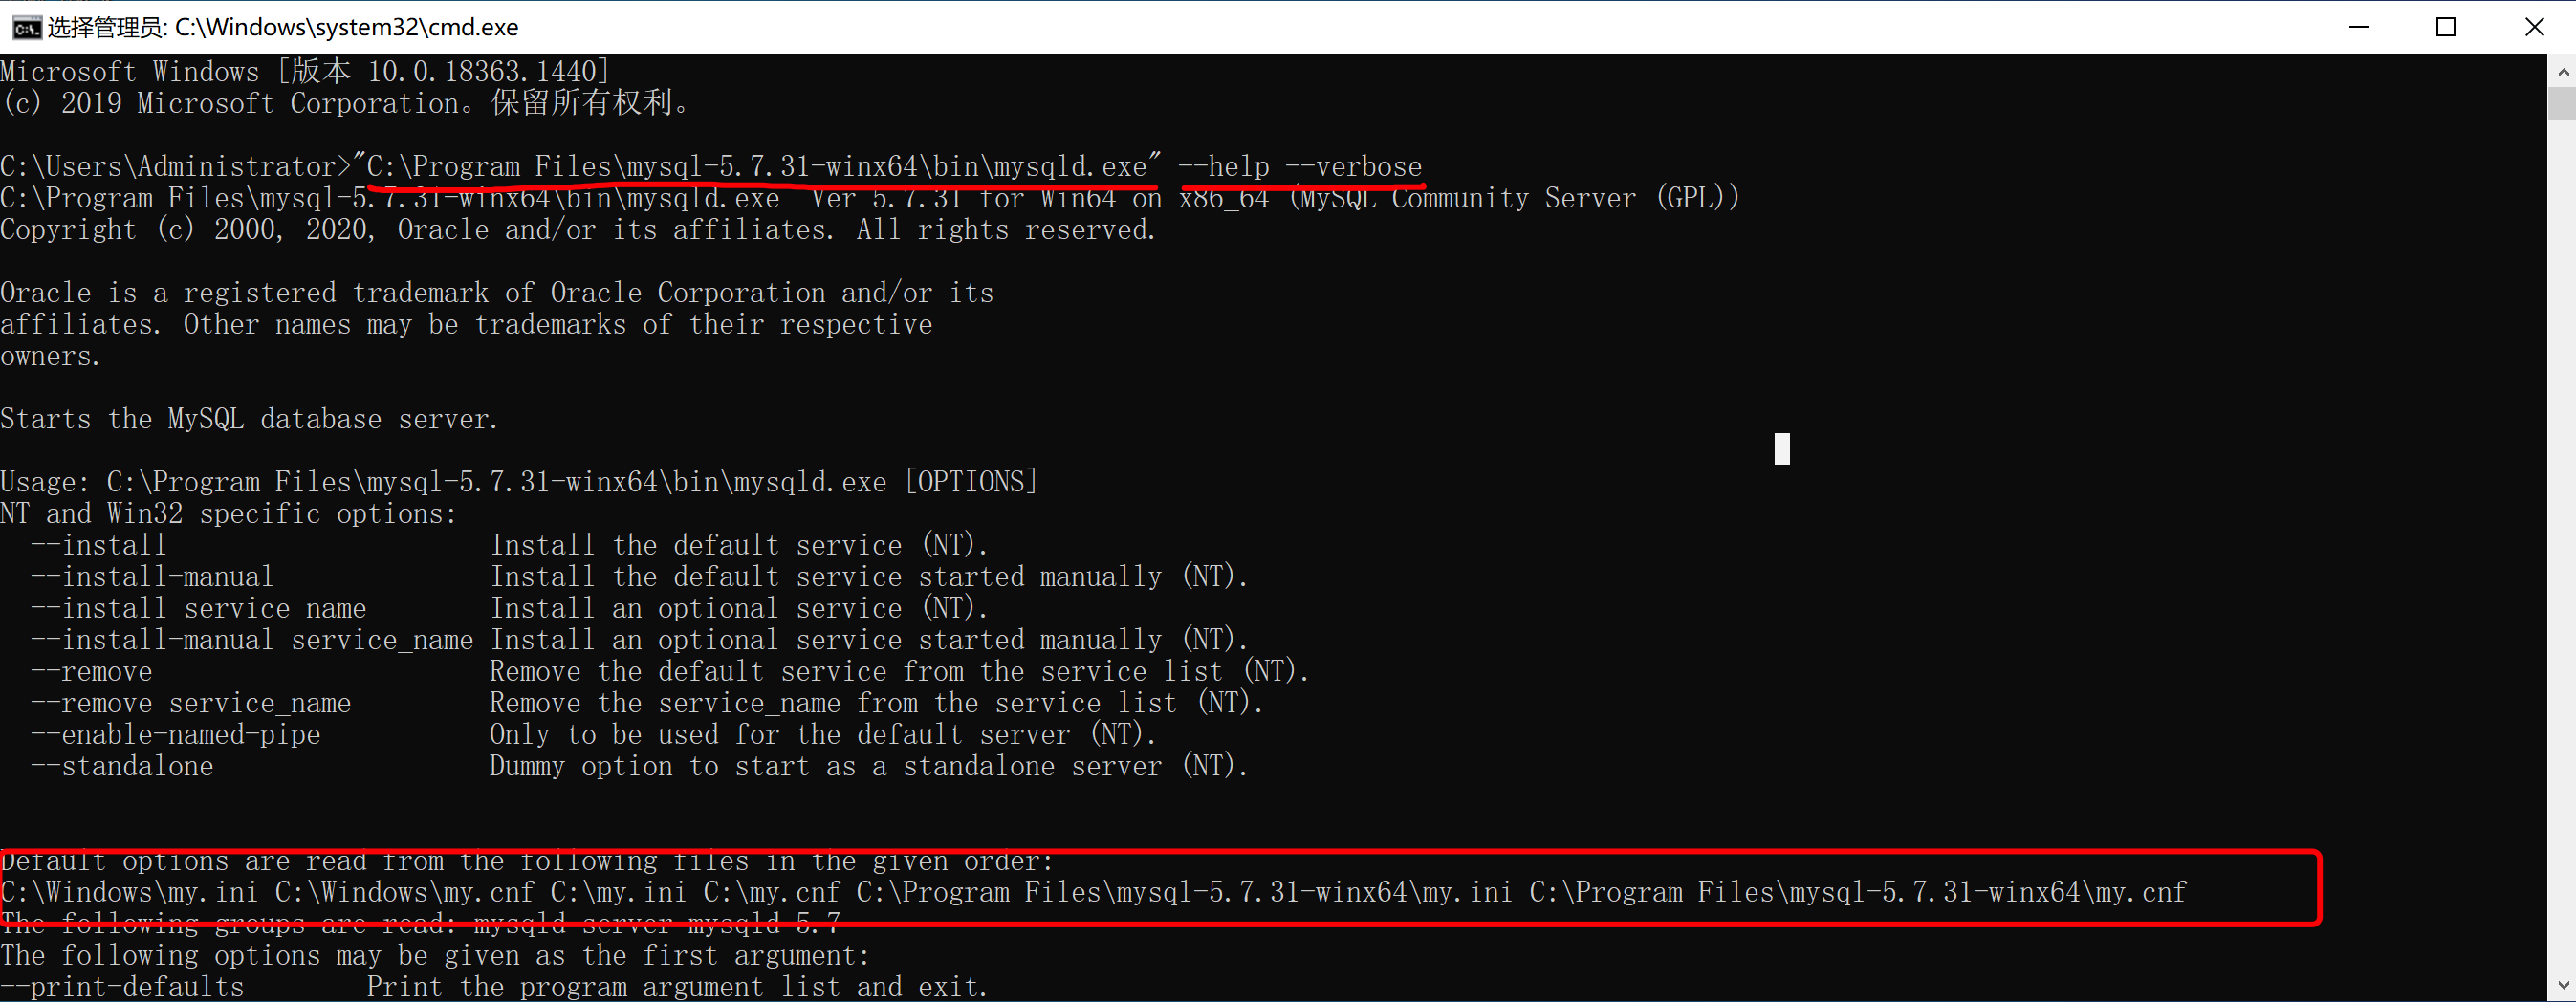
其实,MySQL的配置文件可以放在很多的目录,下图是配置文件的优先级(注意要使用管理员权限打开命令行窗口):
注意:后面需要操作命令行窗口的用管理员权限打开命令行窗口
注意:后面需要操作命令行窗口的用管理员权限打开命令行窗口
注意:后面需要操作命令行窗口的用管理员权限打开命令行窗口
注意:后面需要操作命令行窗口的用管理员权限打开命令行窗口
注意:后面需要操作命令行窗口的用管理员权限打开命令行窗口
强烈,建议大家还是把配置文件放在MySQL安装目录下,这样以后电脑上想要安装多个版本的MySQL时,配置文件可以相互独立不影响。
注意:如果你电脑的上述其他目录存在MySQL配置文件,建议删除,否则可能会影响MySQL的启动。
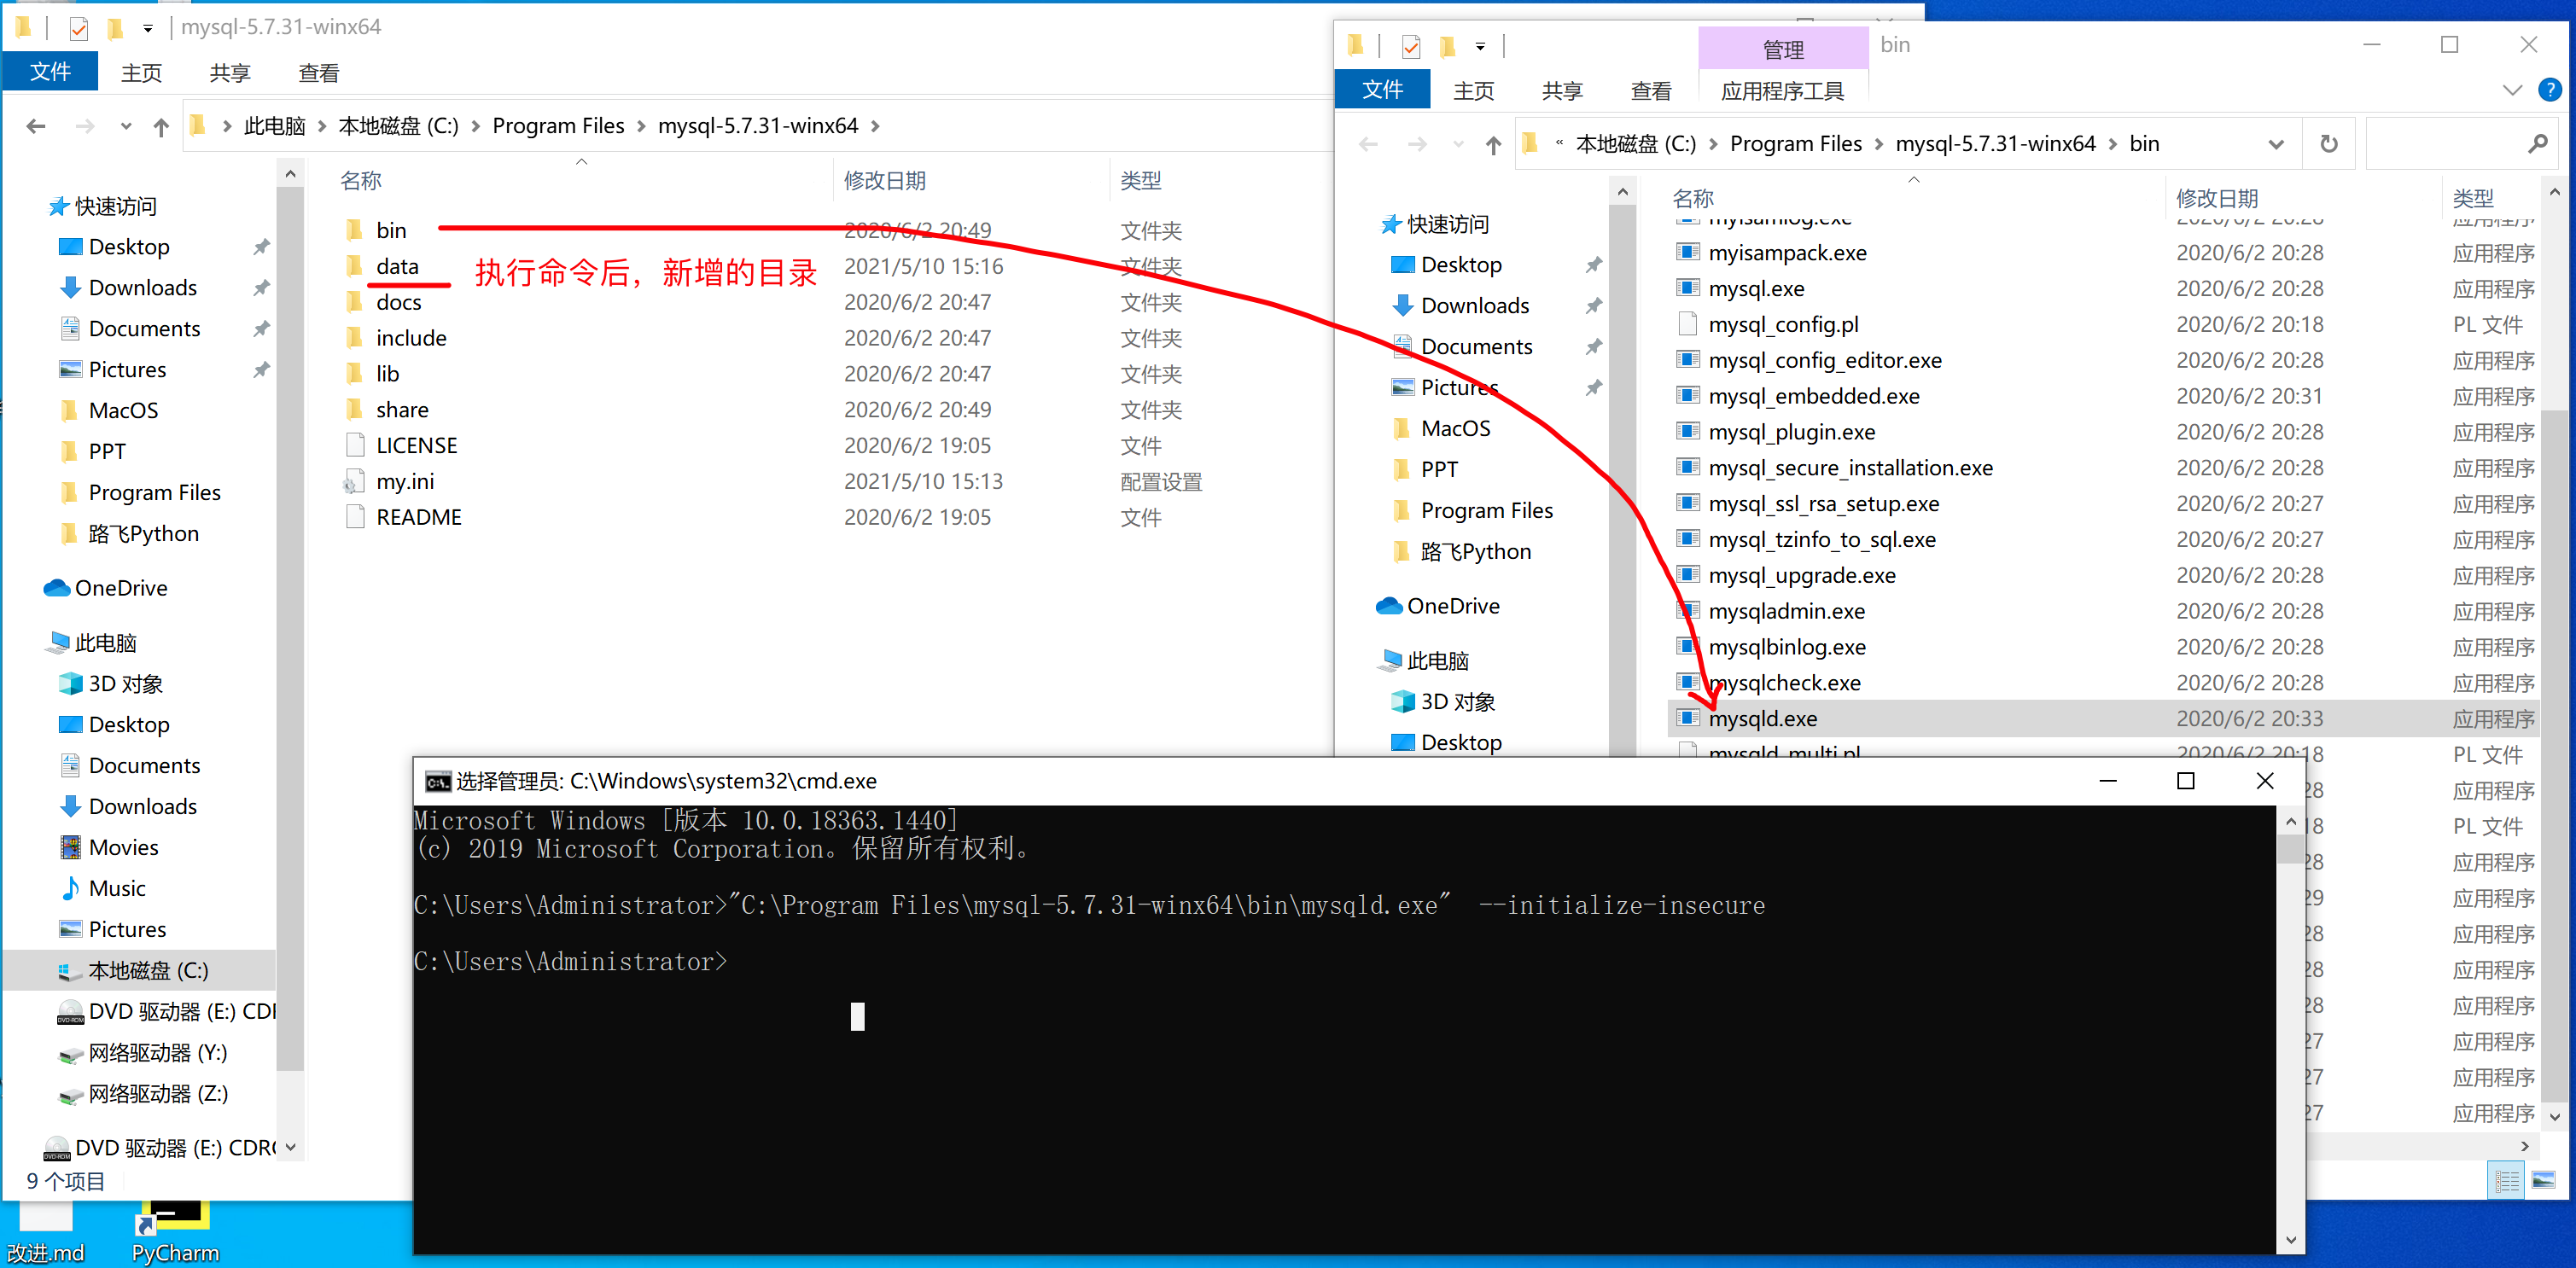
第4步:初始化
>>> "C:\Program Files\mysql-5.7.31-winx64\bin\mysqld.exe" --initialize-insecure初始化命令在执行时,会自动读取配置文件并执行初始化,此过程主要会做两件事:
- 自动创建data目录,以后我们的数据都会存放在这个目录。
- 同时创建建必备一些的数据,例如默认账户 root (无密码),用于登录MySQL并通过指令操作MySQL。
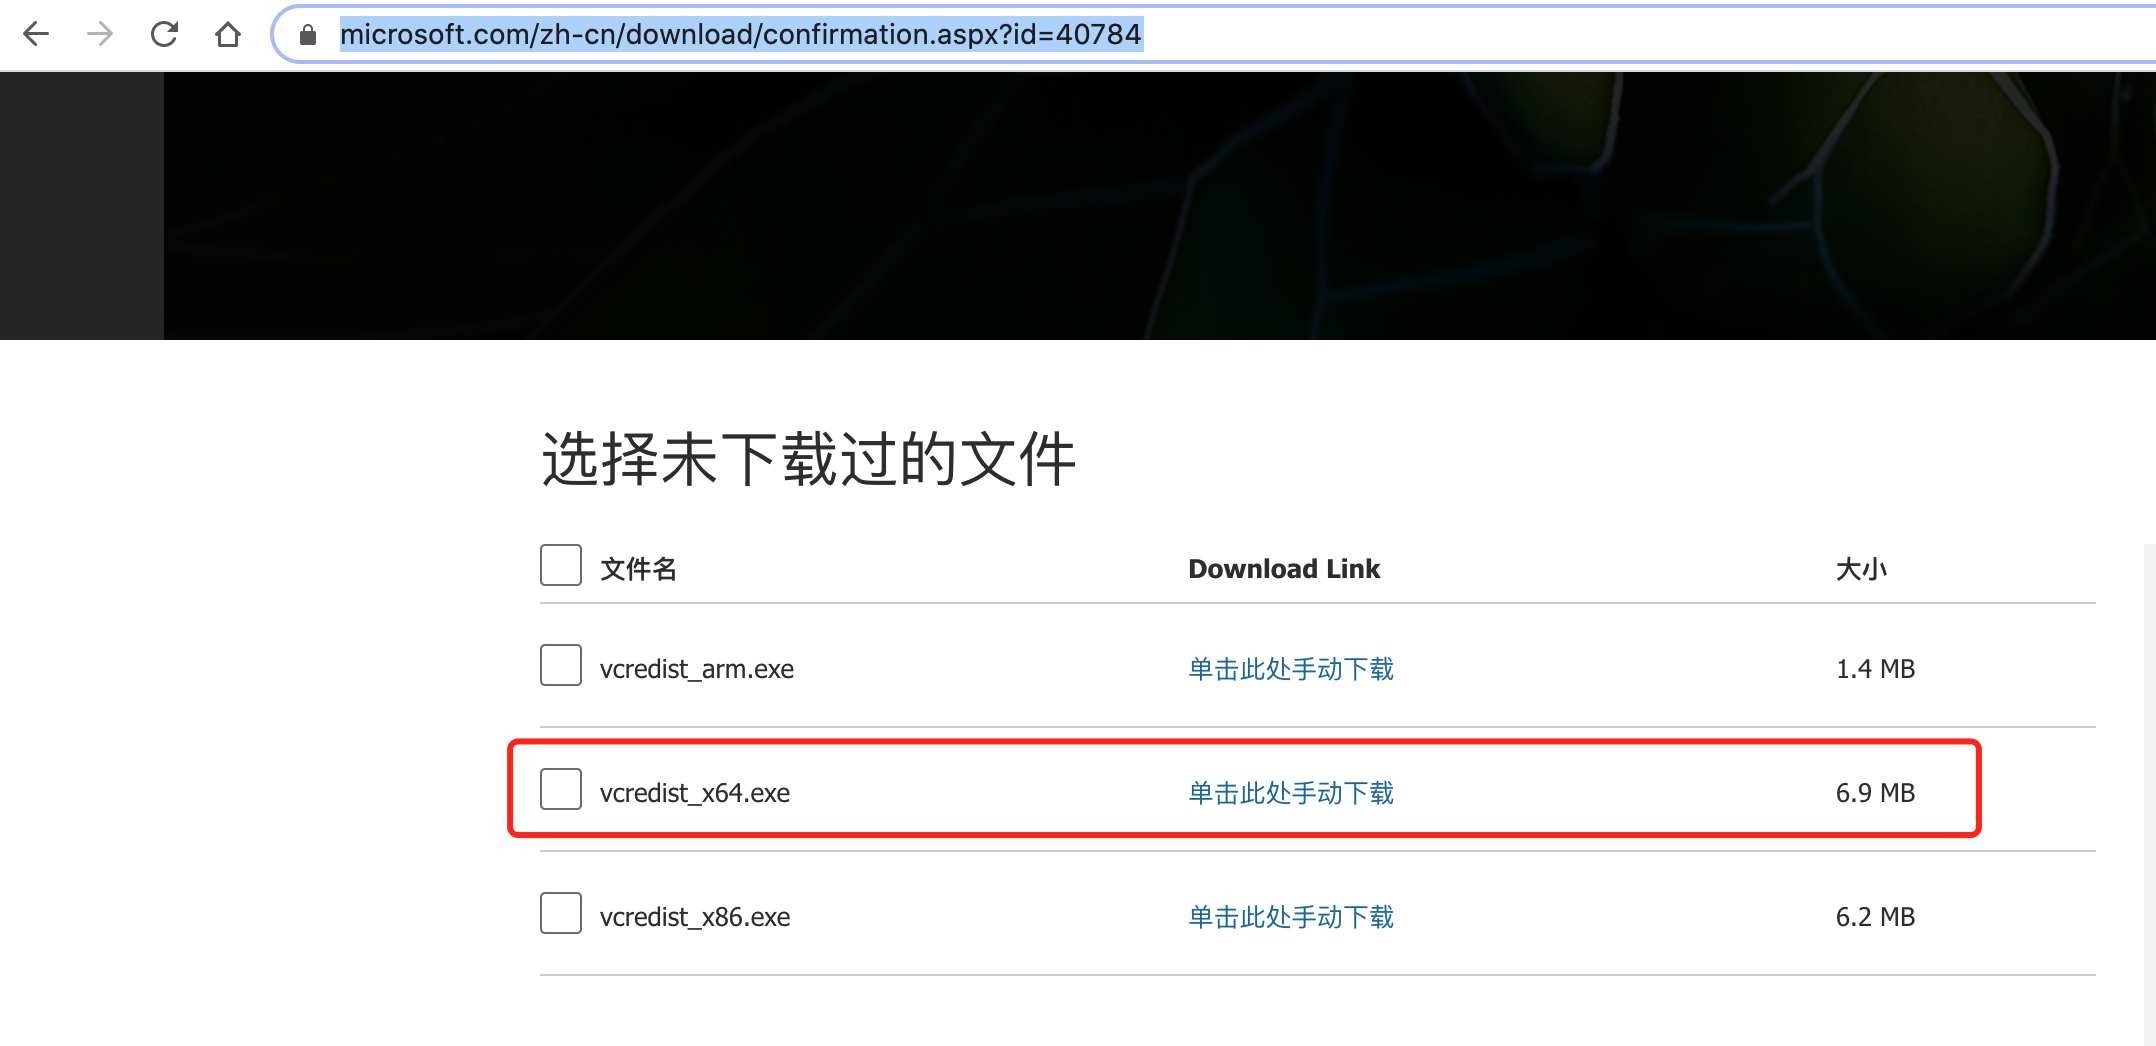
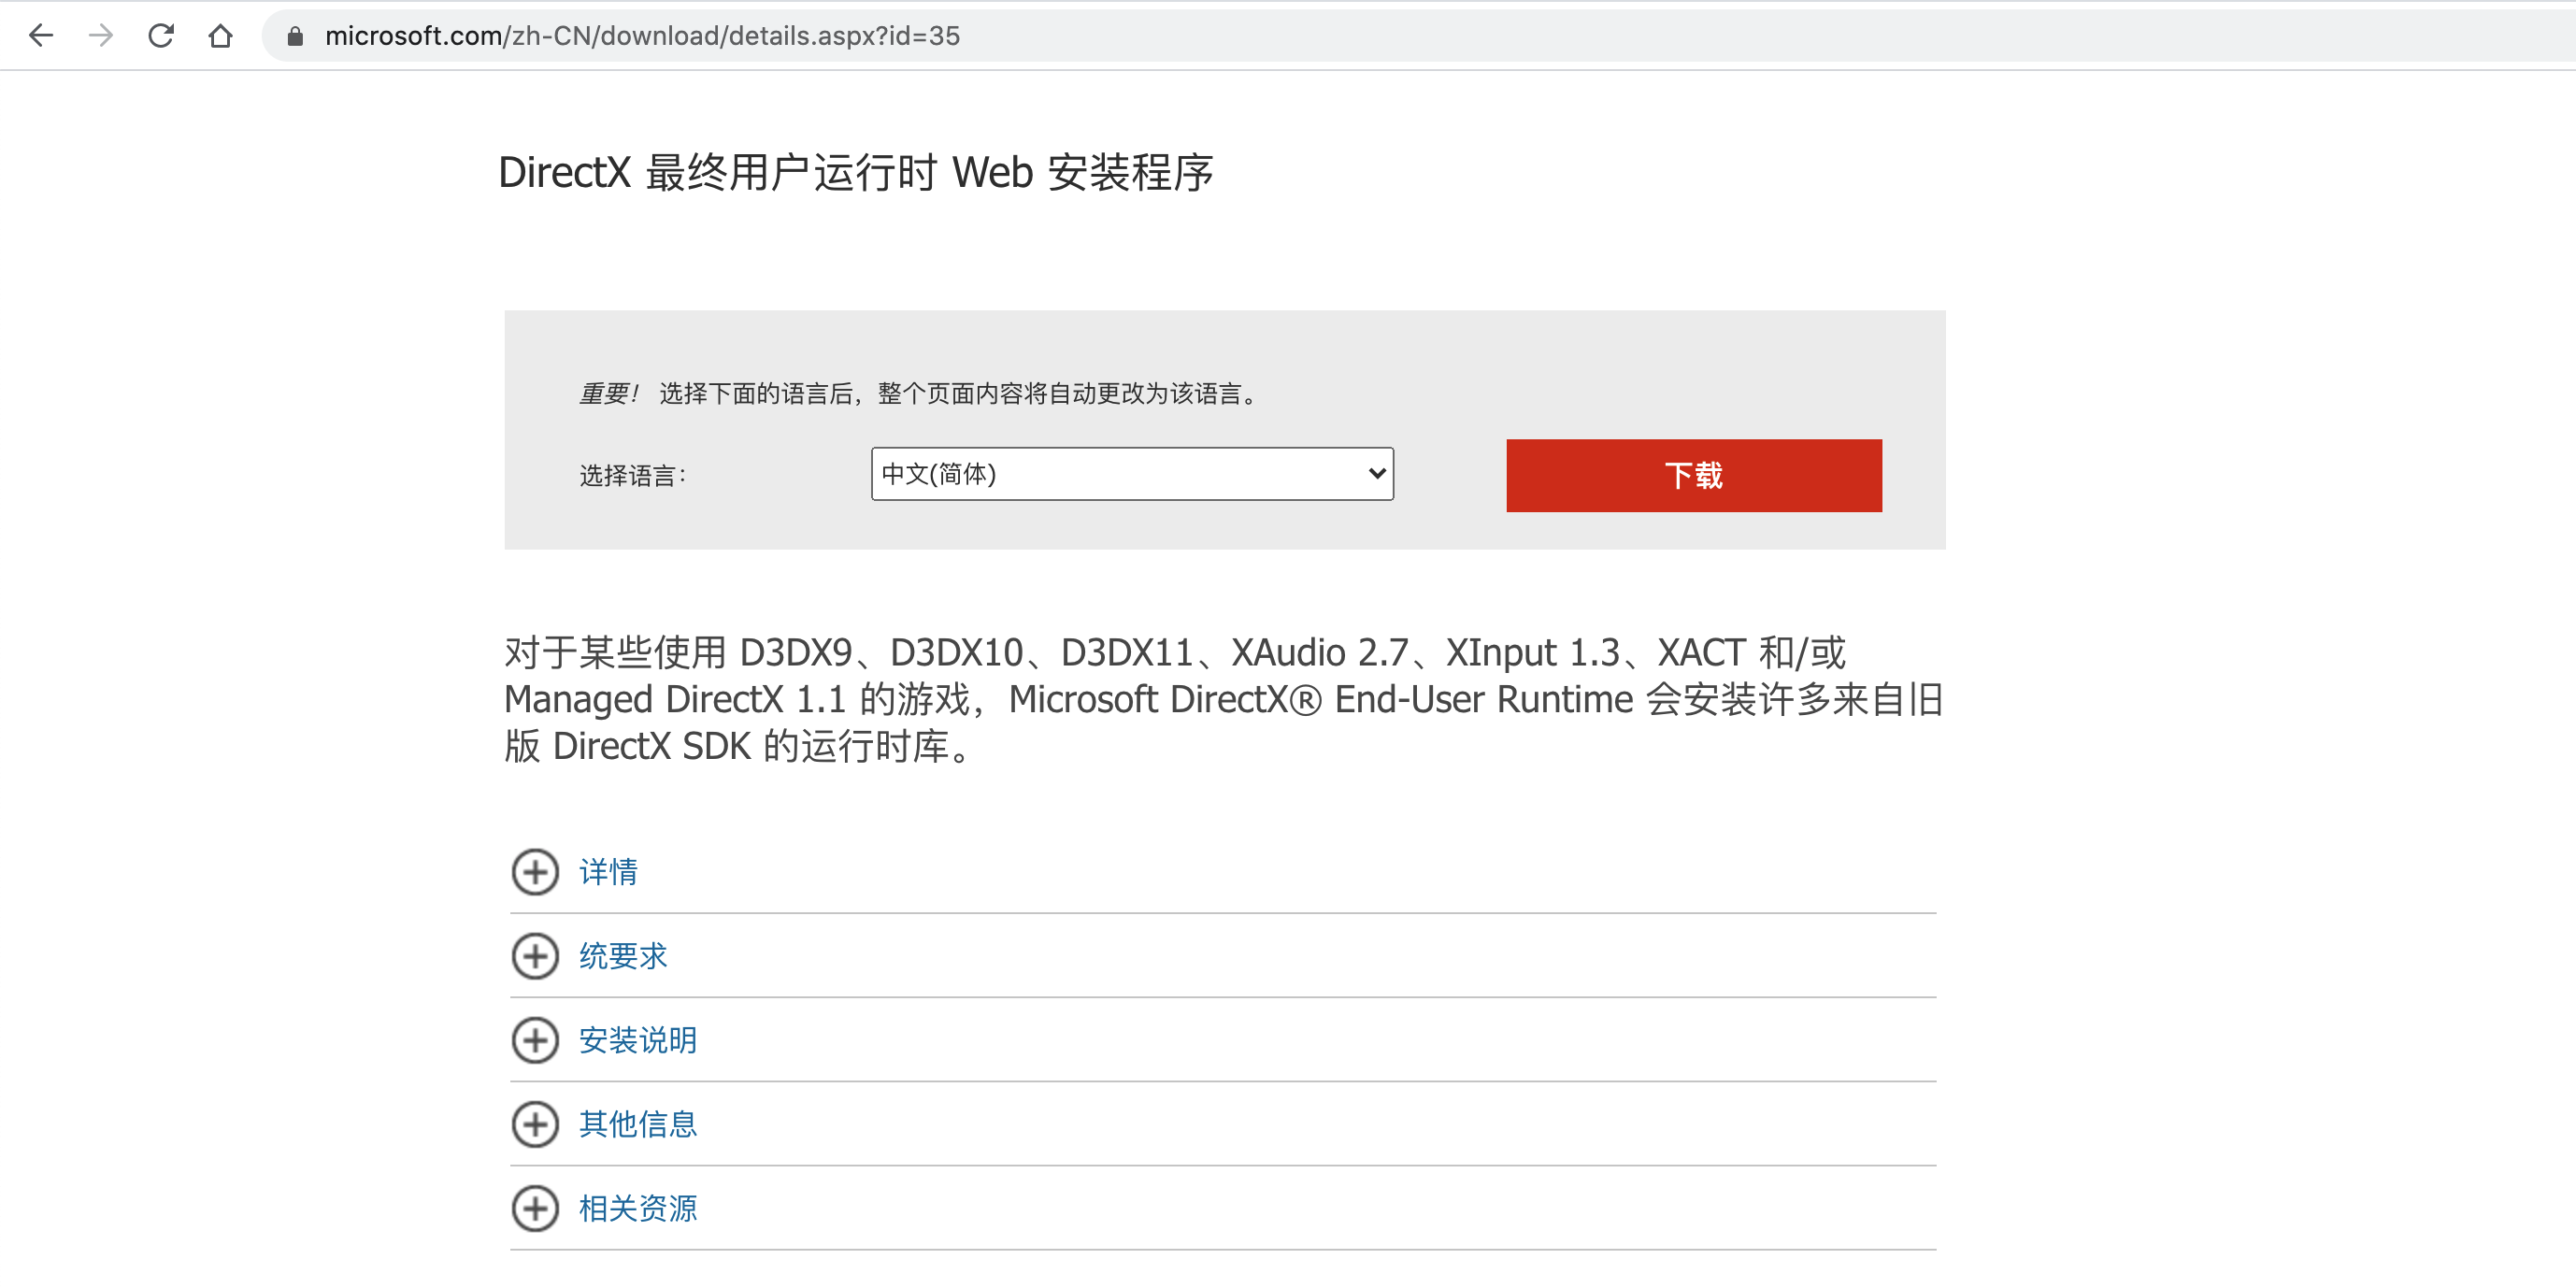
在windowns安装过程中如果有报错 ( msvcr120.dll不存在 ),请下载并安装下面的两个补丁:
1vcredist:https://www.microsoft.com/zh-cn/download/confirmation.aspx?id=40784 (主要)
dirctx:https://www.microsoft.com/zh-CN/download/details.aspx?id=35
第5步:启动
启动MySQL常见的有两种方式:
临时启动
bash>>> "C:\Program Files\mysql-5.7.31-winx64\bin\mysqld.exe"
注意:此时程序会挂起,内部就是可以接收客户端发来的MySQL指令,关闭窗口或Ctrl+c 就可以停止运行。
这种启动方式每次开机或想要开启都需要手动执行一遍命令比较麻烦。
制作windows服务,基于windows服务管理。
bash>>>"C:\Program Files\mysql-5.7.31-winx64\bin\mysqld.exe" --install mysql57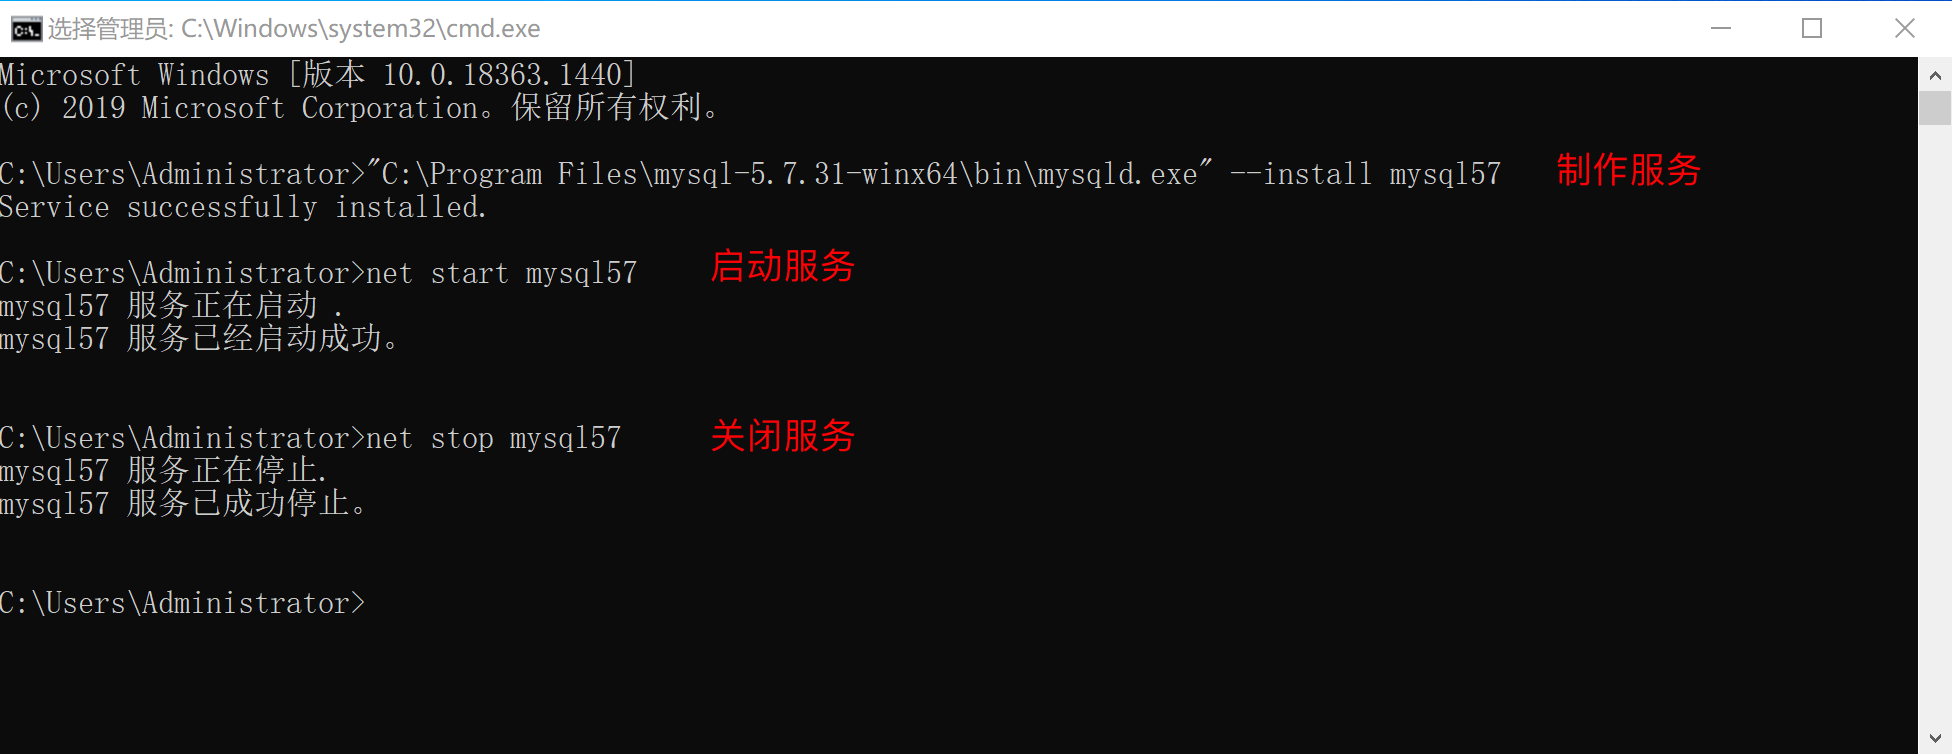
创建好服务之后,可以通过命令 启动和关闭服务,例如:
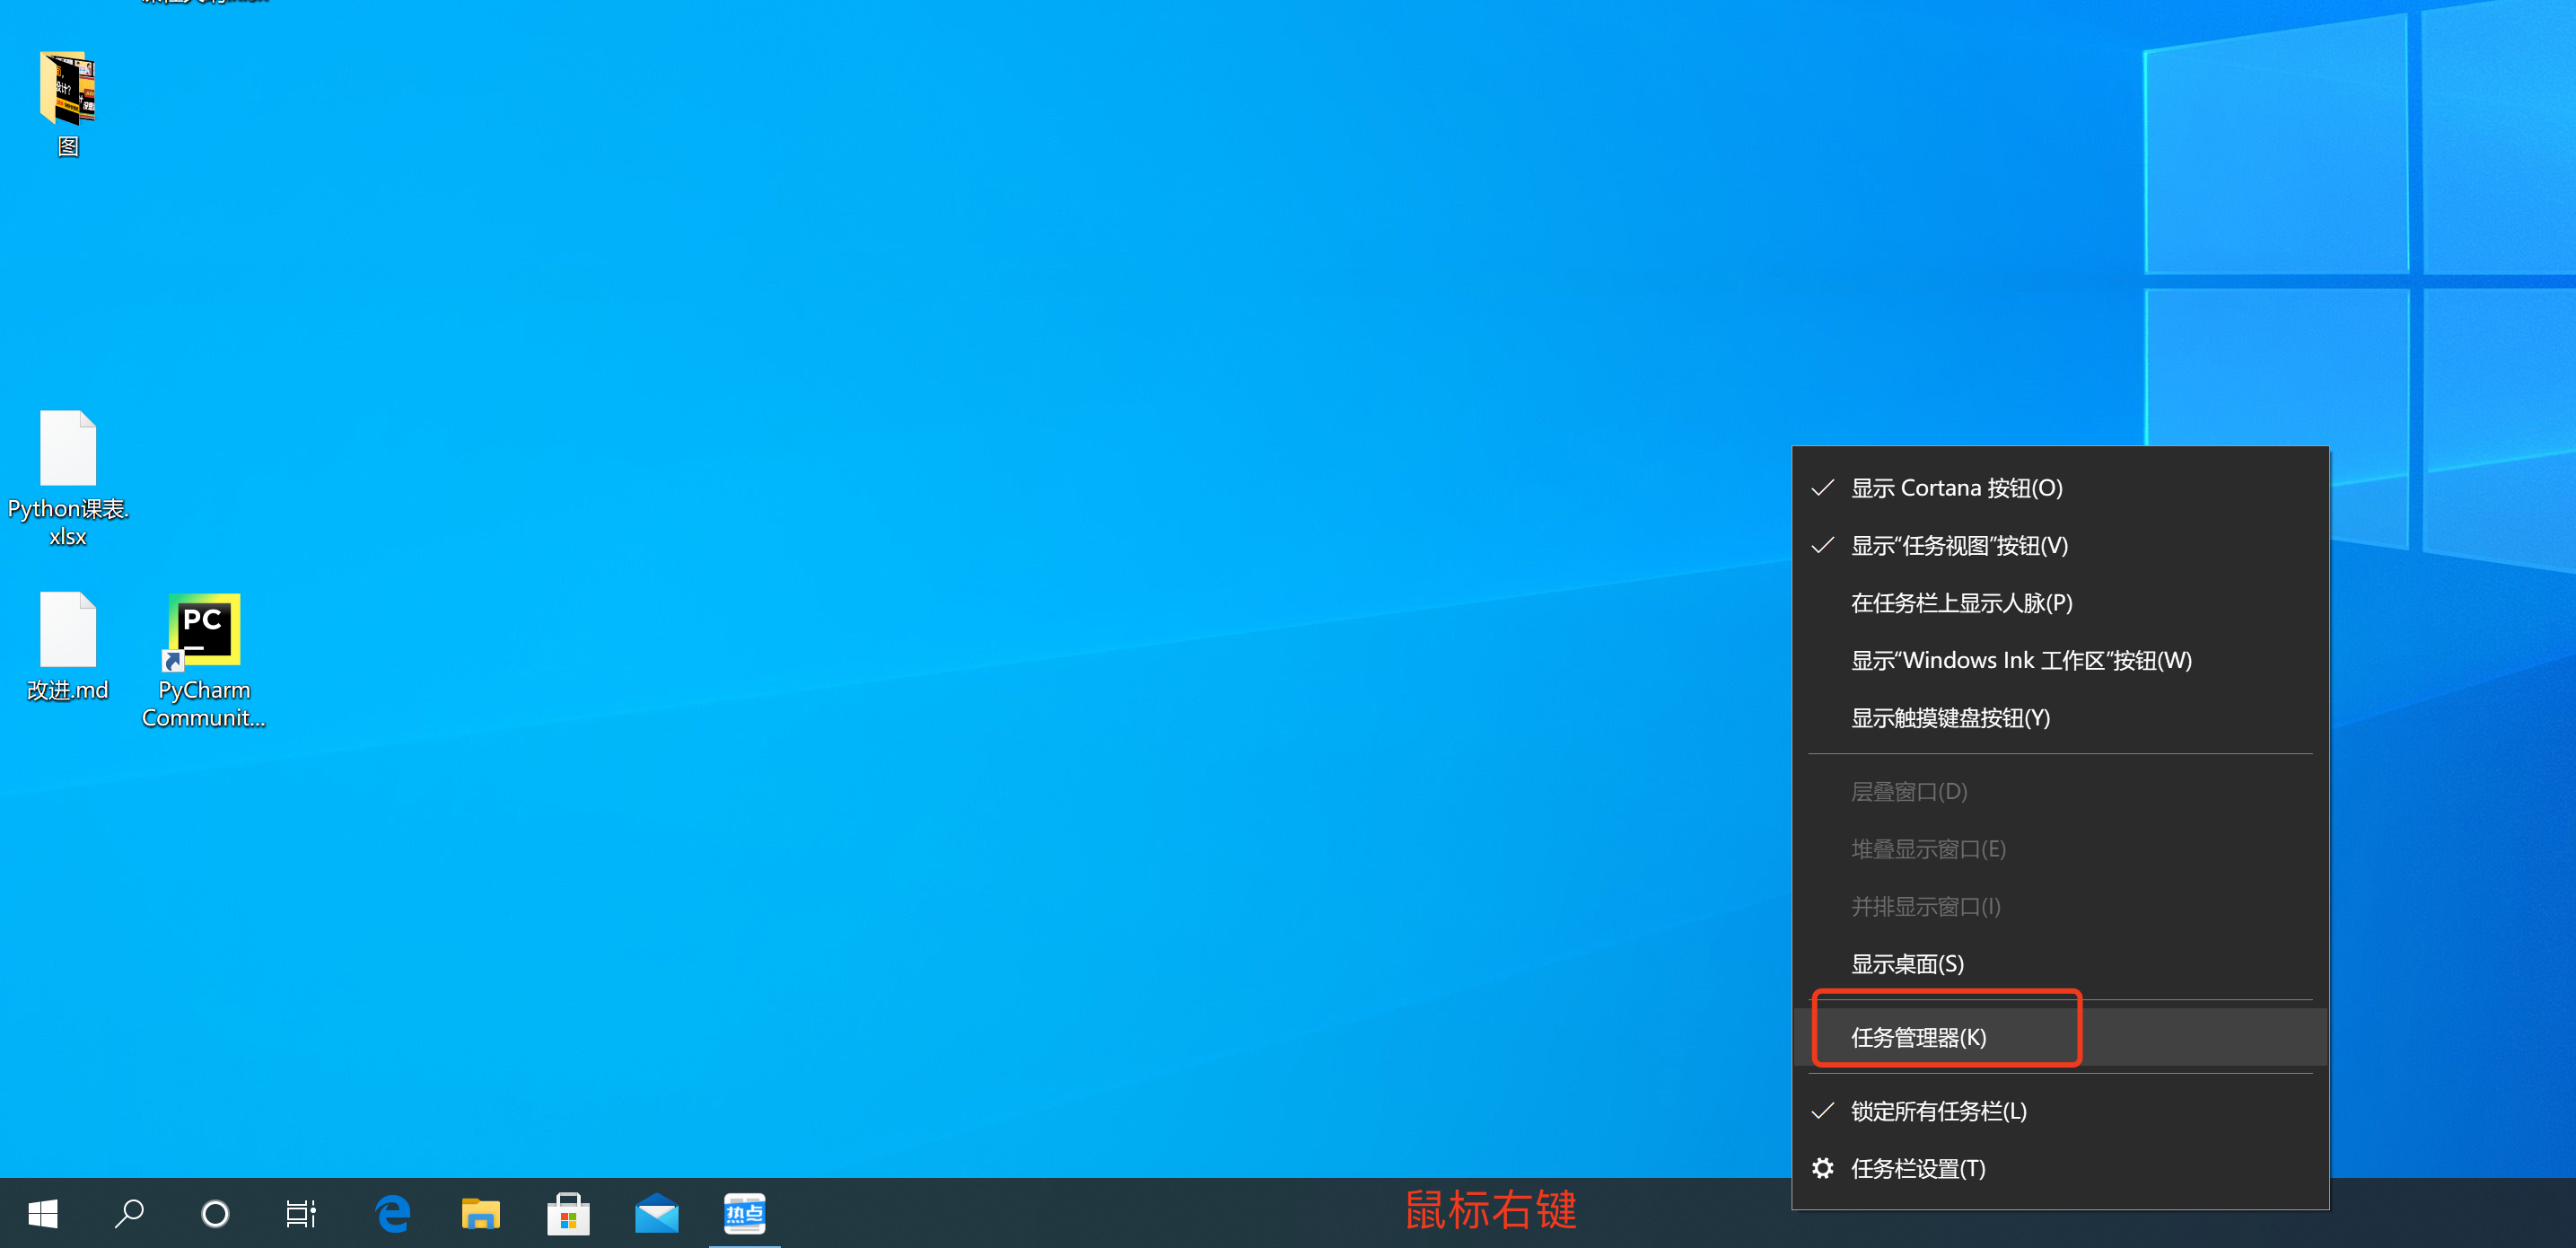
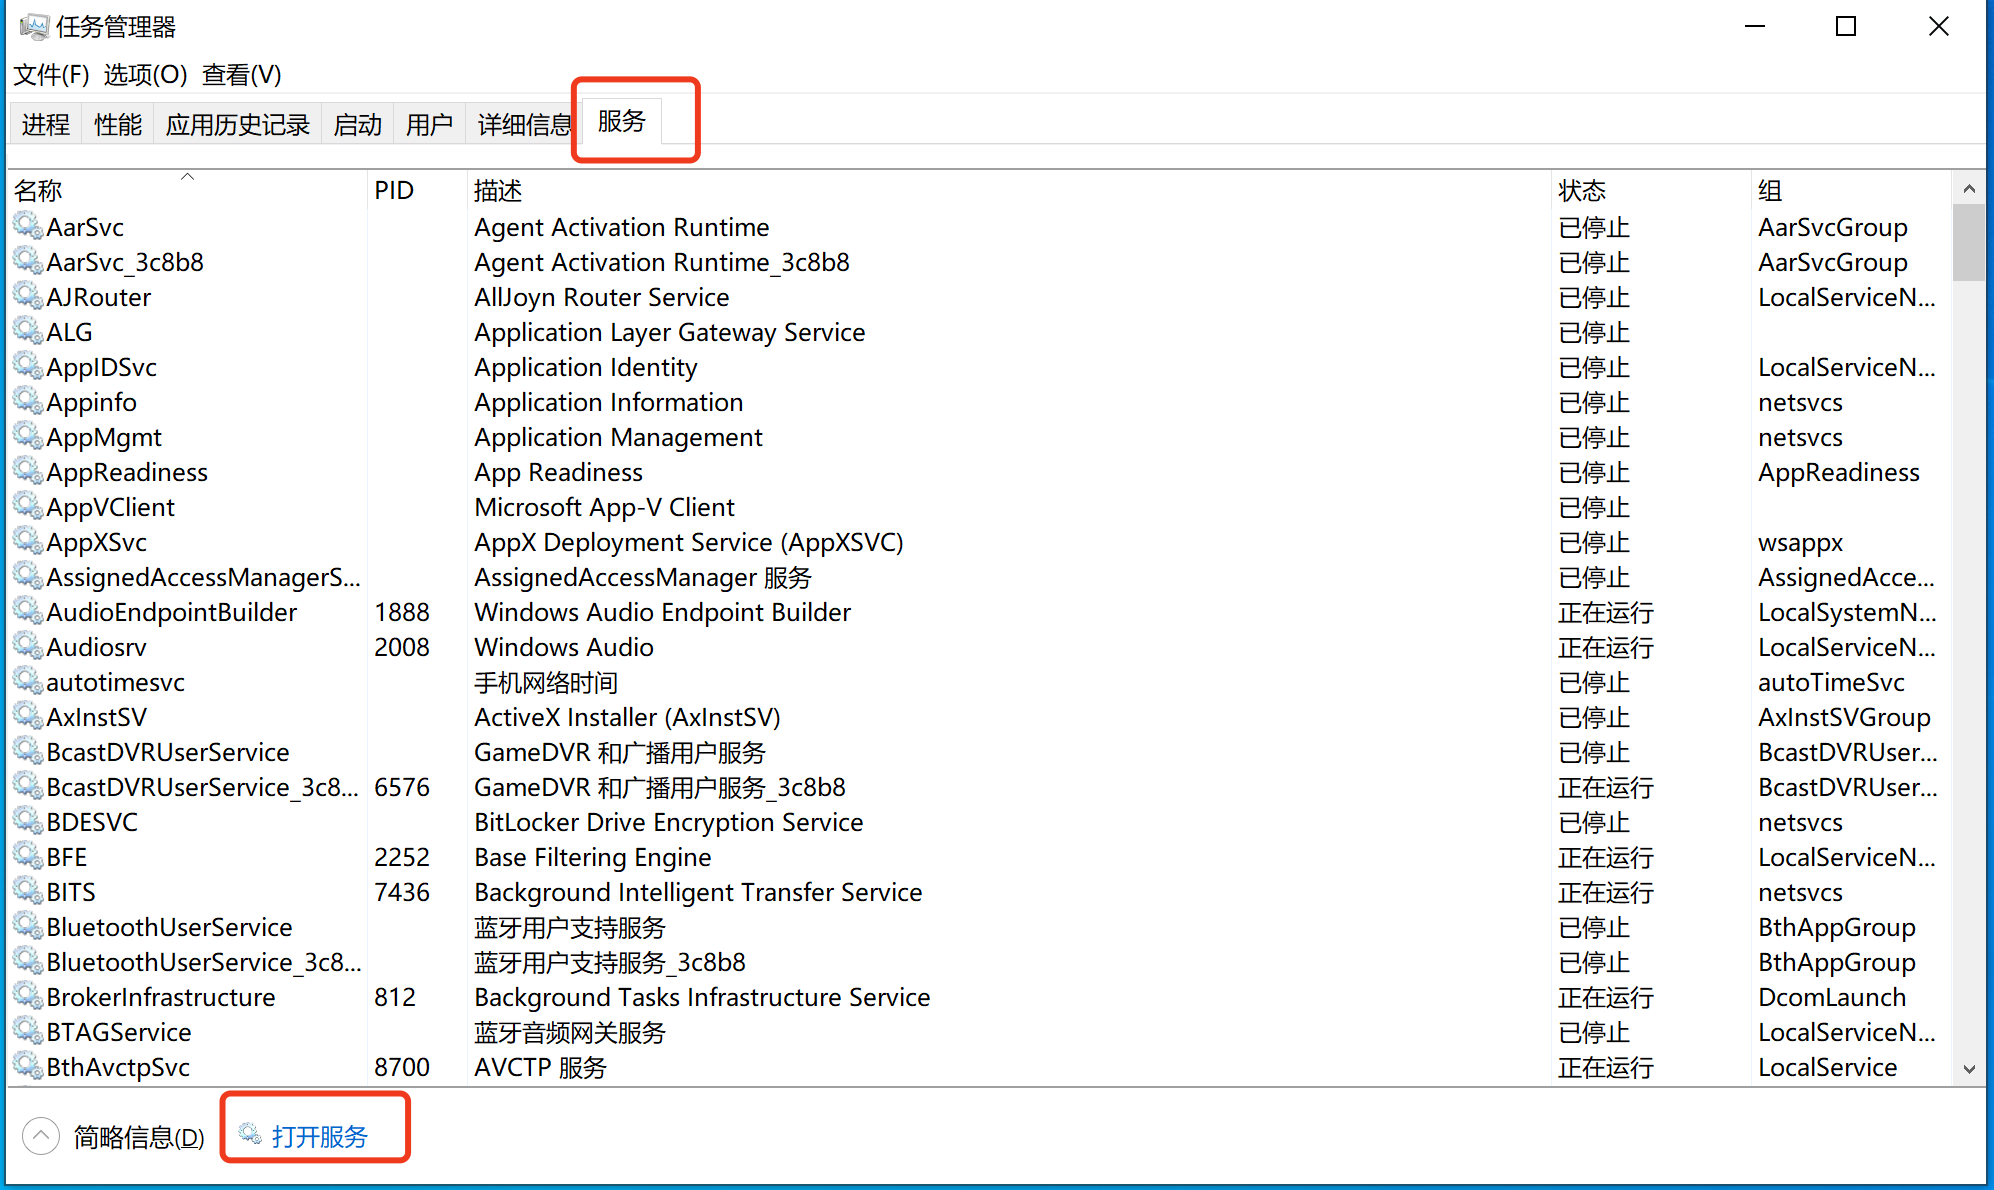
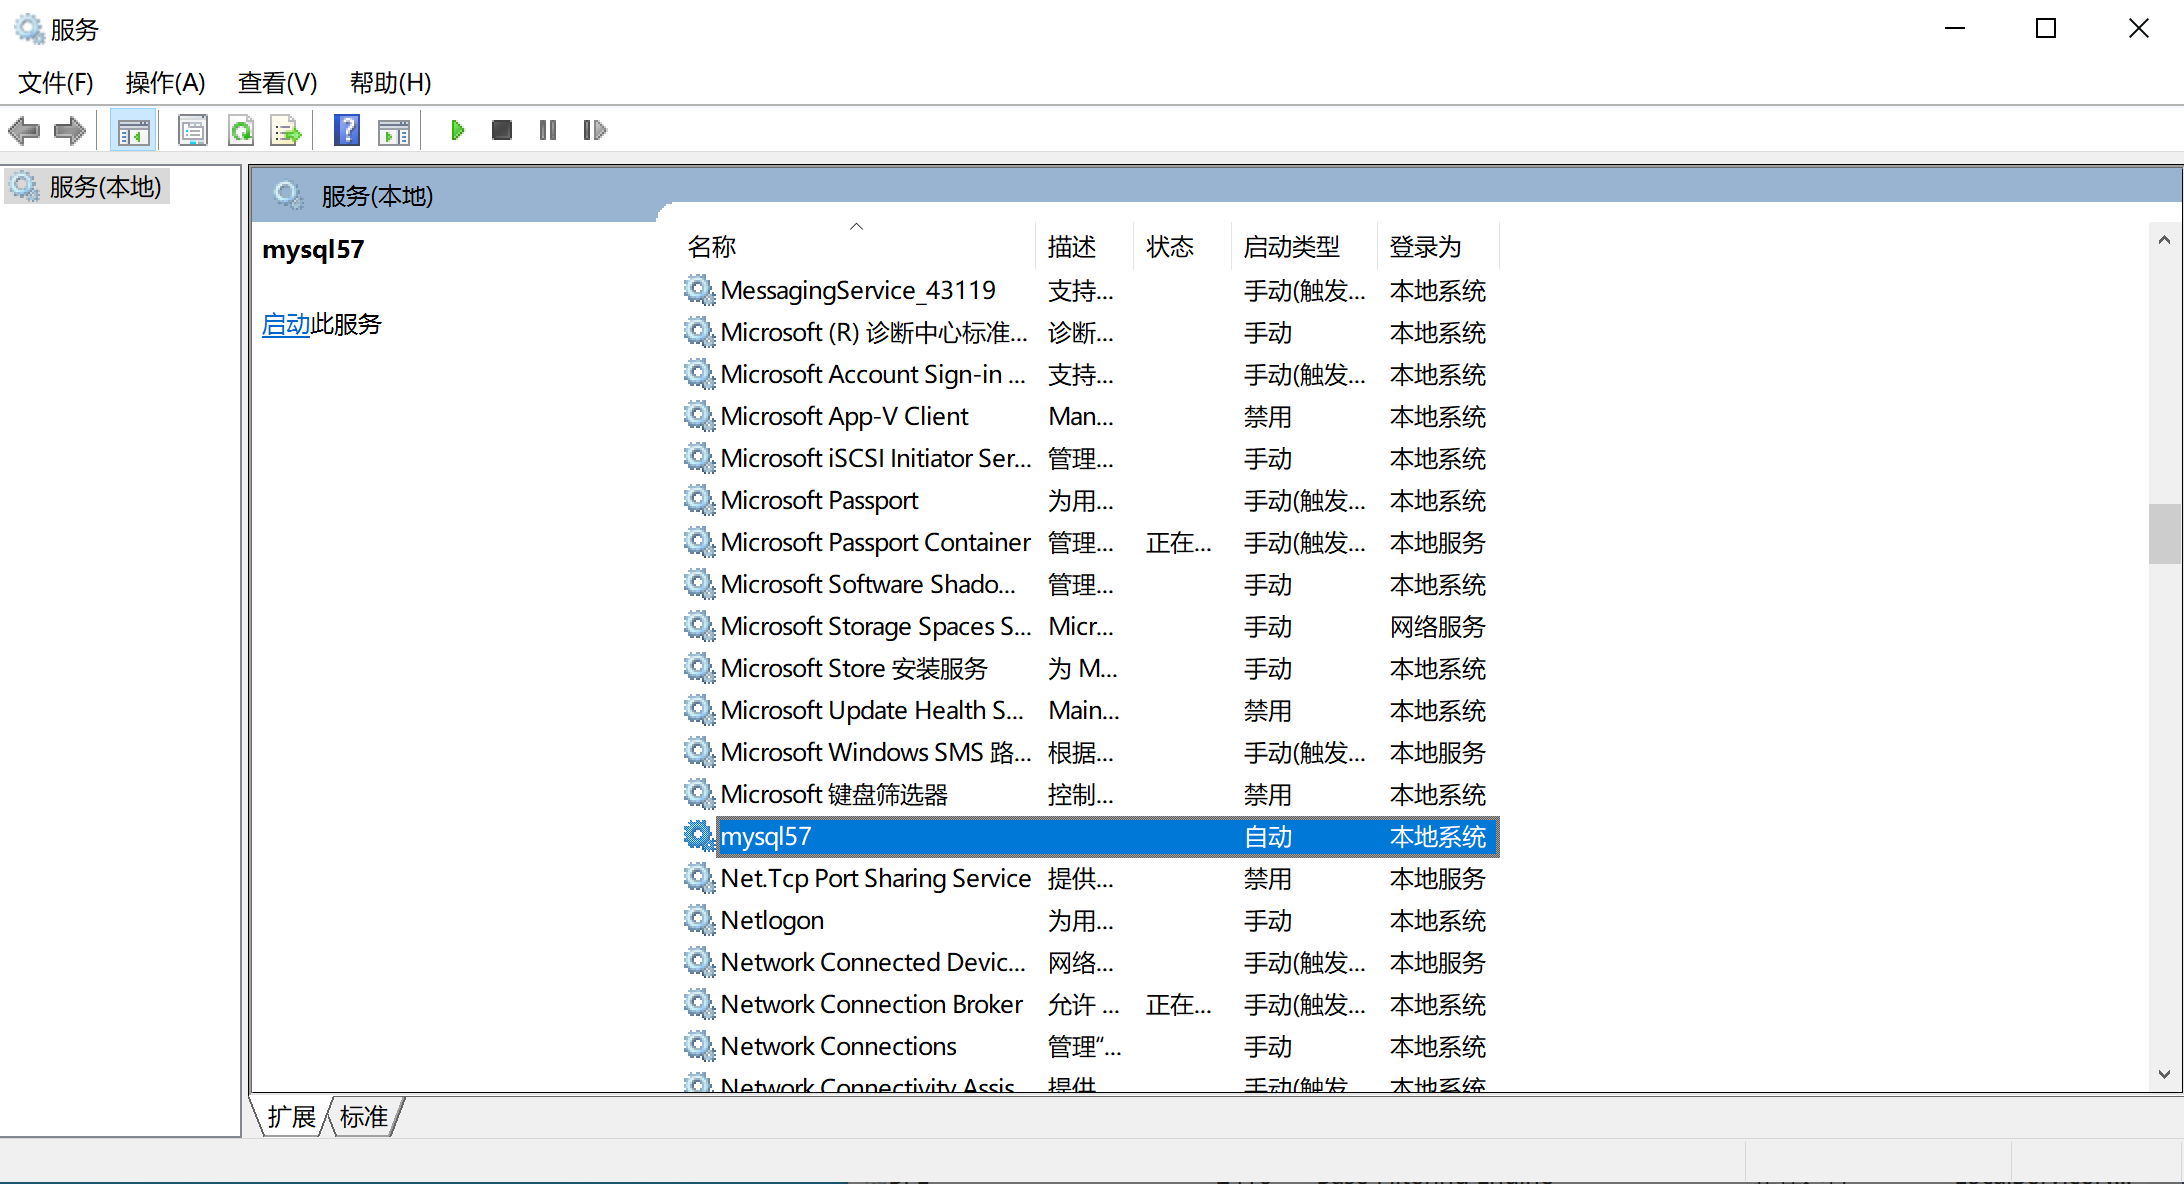
bash>>> net start mysql57 >>> net stop mysql57也可以在window的服务管理中点击按钮启动和关闭服务。例如:
以后不再想要使用window服务了,也可以将制作的这个MySQL服务删除。
>>>"C:\Program Files\mysql-5.7.31-winx64\bin\mysqld.exe" --remove mysql57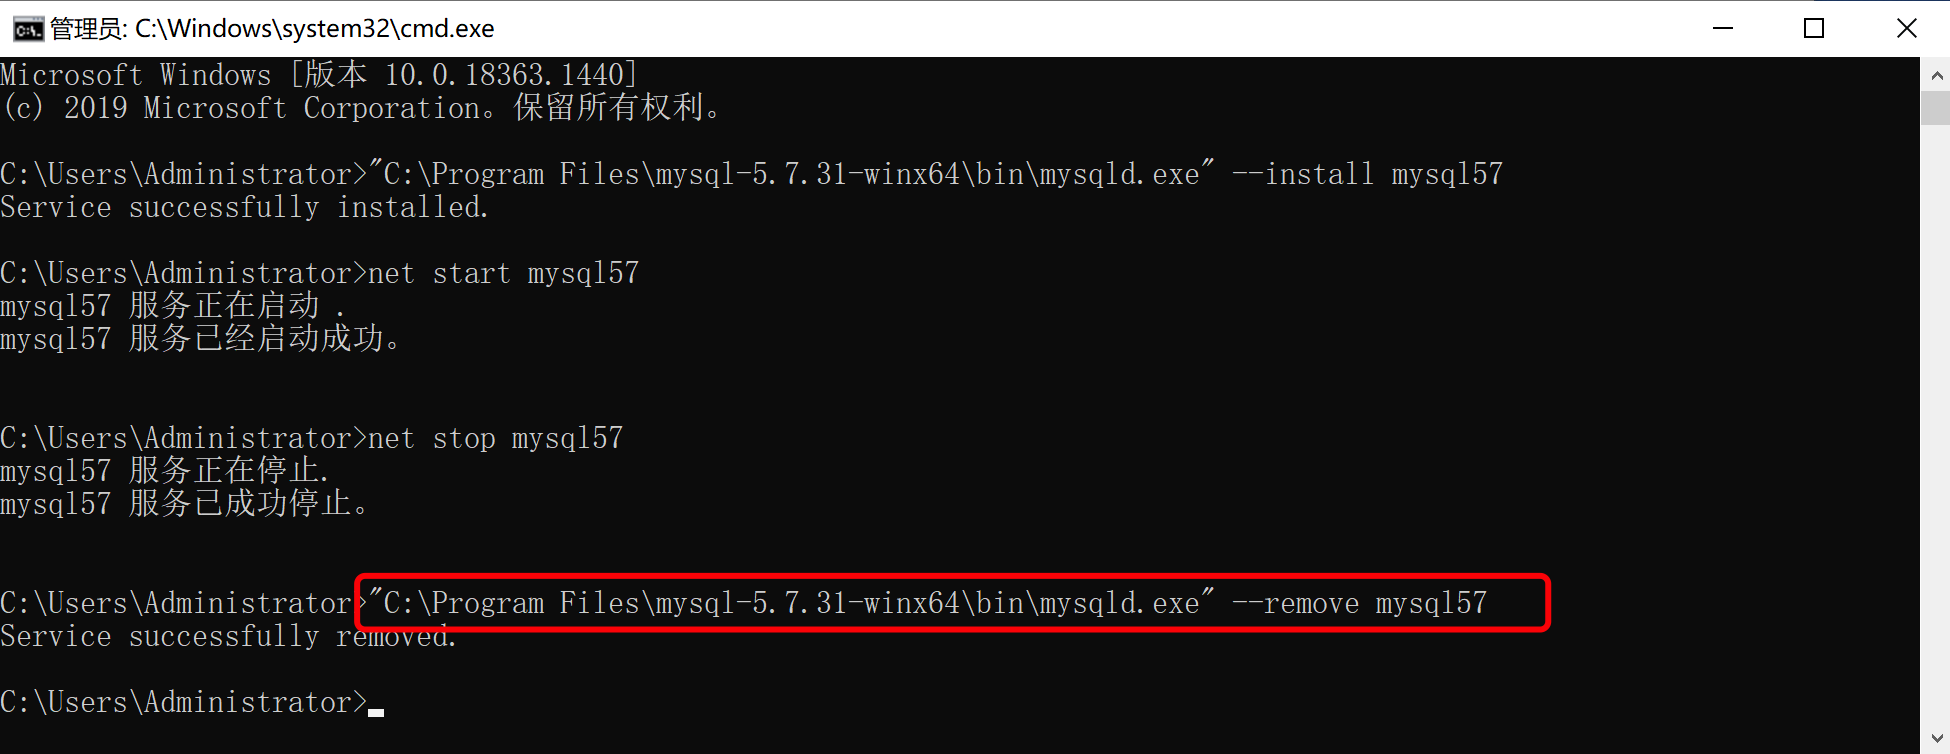
第6步:测试连接MySQL
安装并启动MySQL之后,就可以连接MySQL来测试是否已正确安装并启动成功。
以后在开发时,肯定是要用Python代码来连接MySQL并且进行数据操作(后面讲)。
在安装MySQL时,其实也自动安装了一个工具(客户端),让我们快速实现连接MySQL并发送指令。
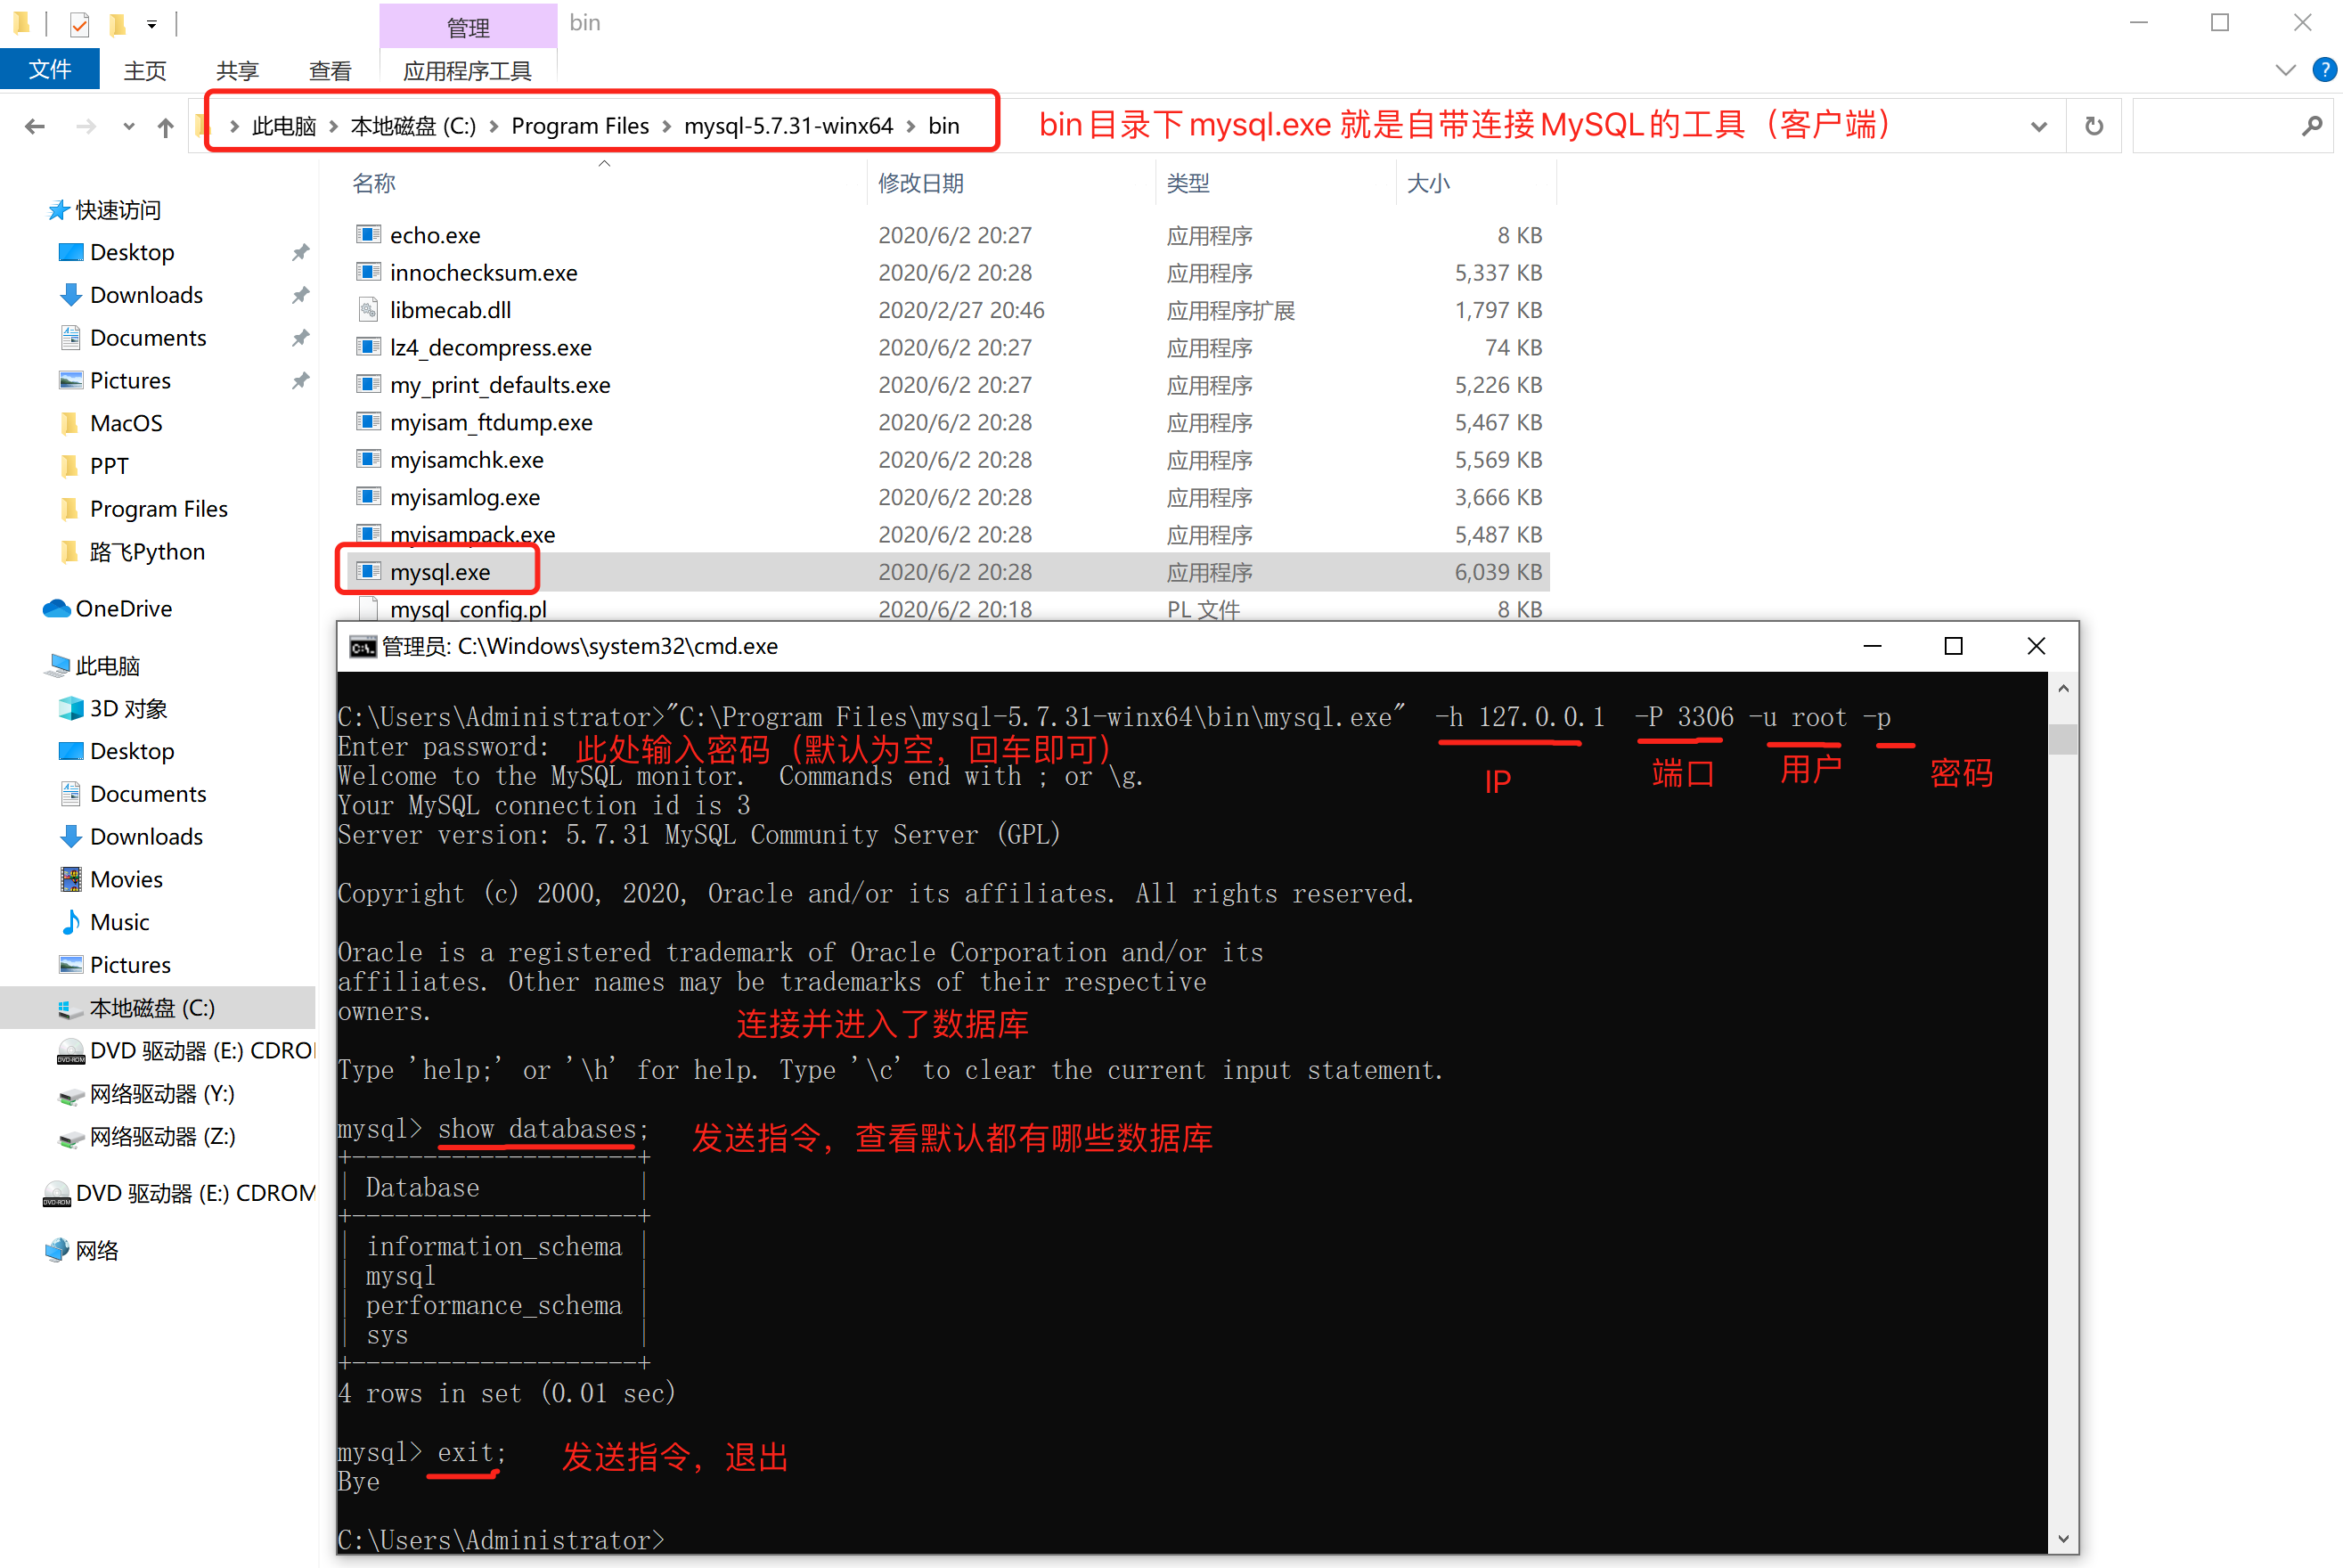
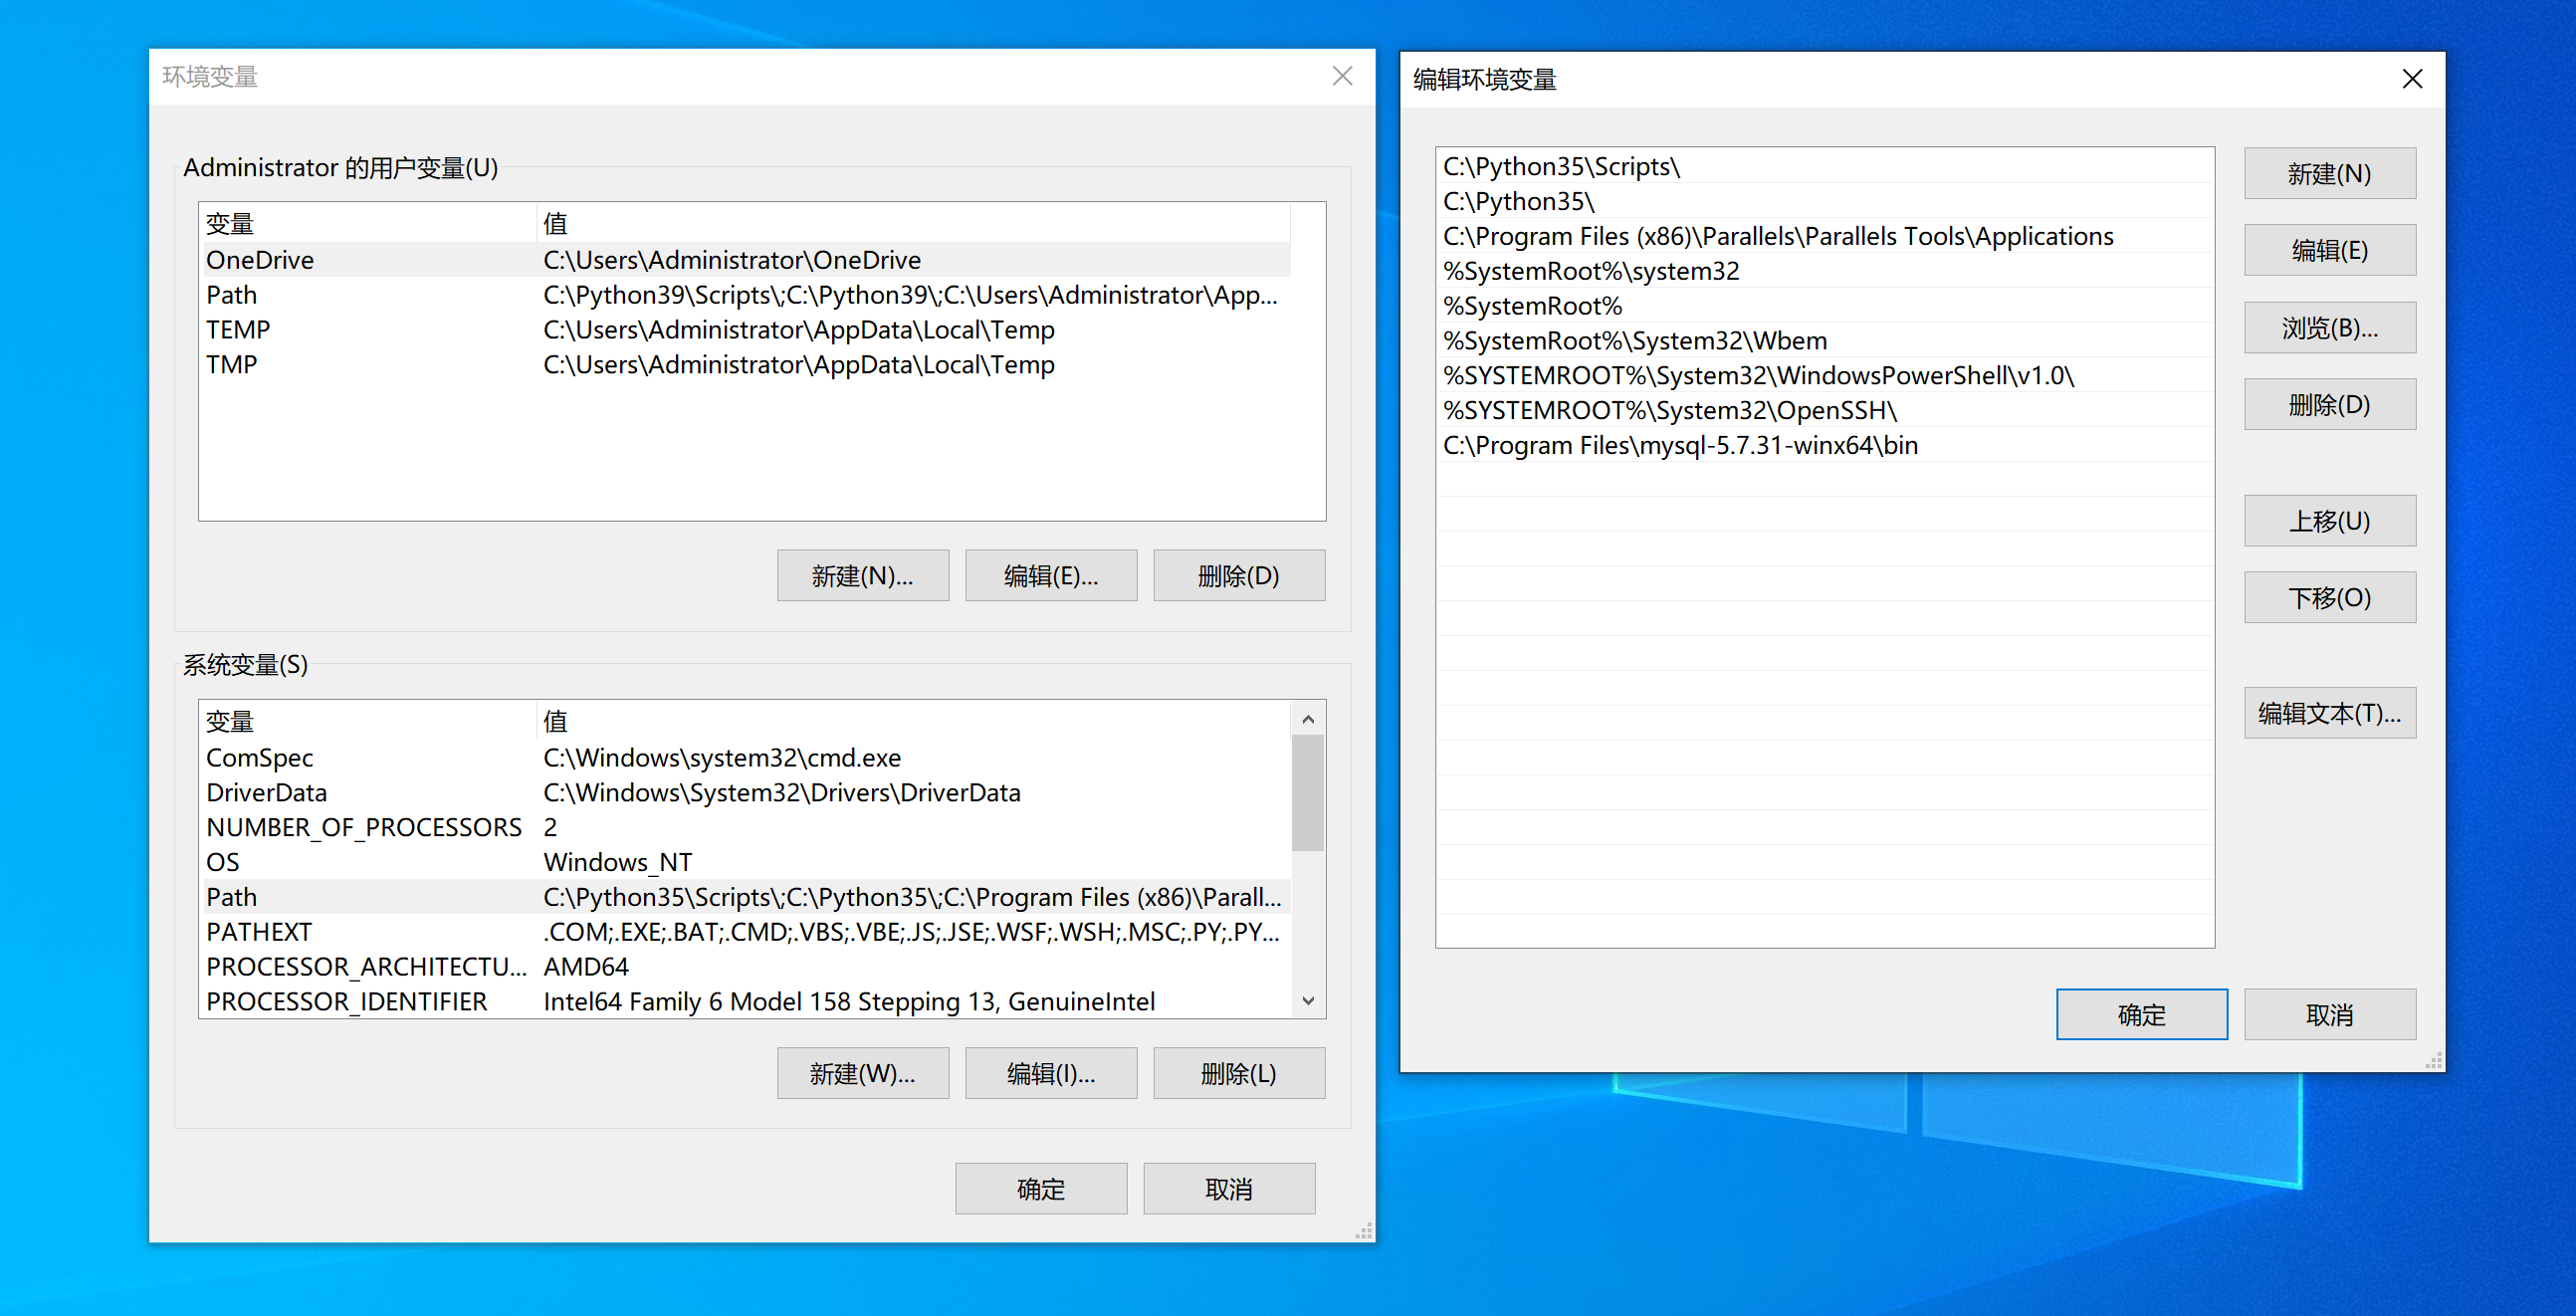
注意:如果把bin目录加入环境变量,每次在运行命令时,就不用再重新输入绝对路径了。
上述过程如果操作完成之后,证明你的安装和启动过程就搞定了。
1.2 mac系统
sql8.0密码:Smh99500
sql5.7密码:root23
嗅嗅安装
嗅嗅笔记:https://www.cnblogs.com/Neeo/articles/13047344.html#install-2
mac系统和win不同,MySQL为他提供了非常方便的一站式安装程序,只要点击、next就可以安装、初始化完成。
第1步:安装和初始化
https://downloads.mysql.com/archives/community/

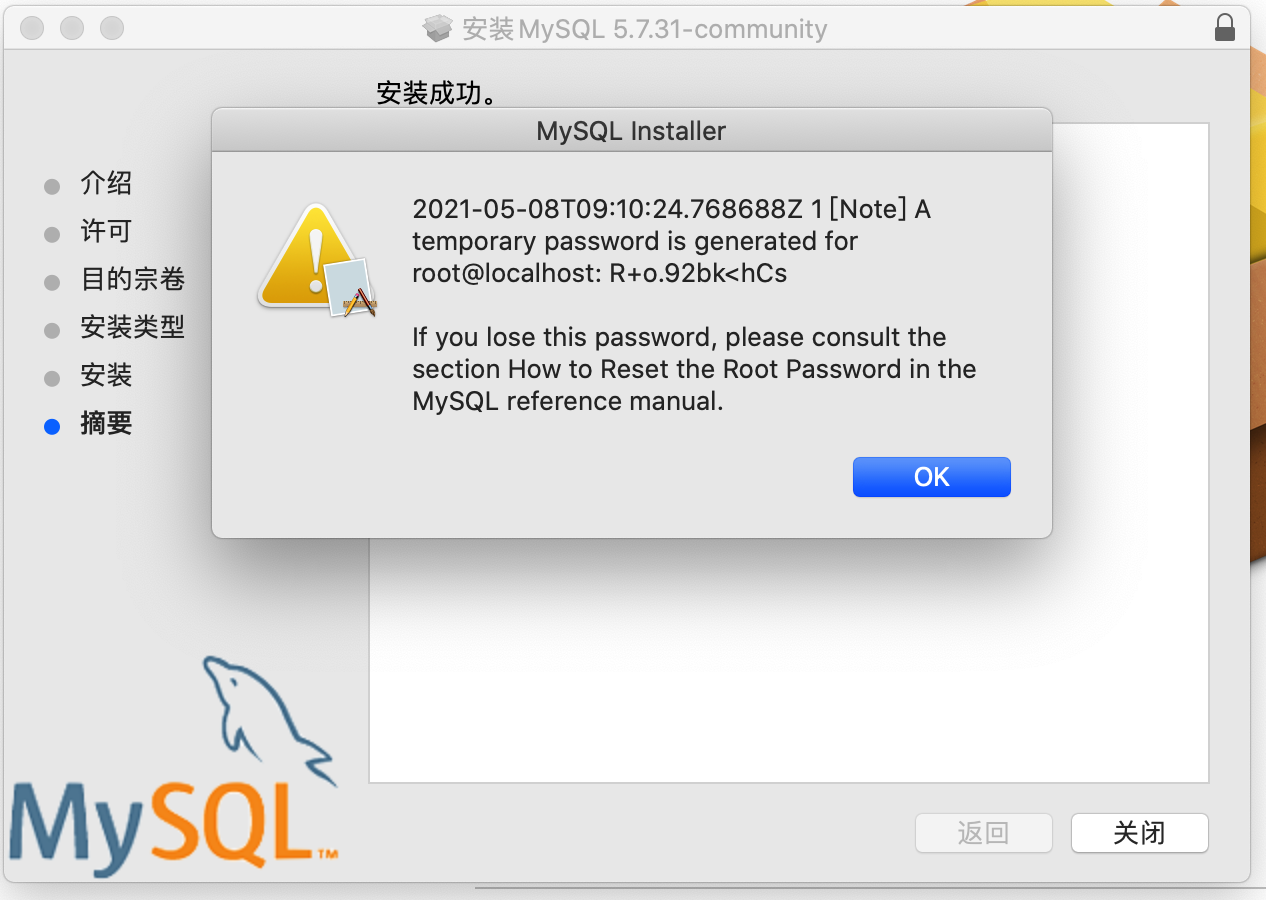
这个基于dmg文件的安装过程,其实包含了:
- 安装,默认安装在了
/usr/local/mysql-5.7.31-macos10.14-x86_64/目录。 - 初始化,在安装目录下创建data目录用于存放数据; 初始化模块数据库以及账户相关等,例如: 账cd

第2步:创建配置文件
建议在MySQL安装目录下创建 etc/my.cnf 作为MySQL的配置文件。
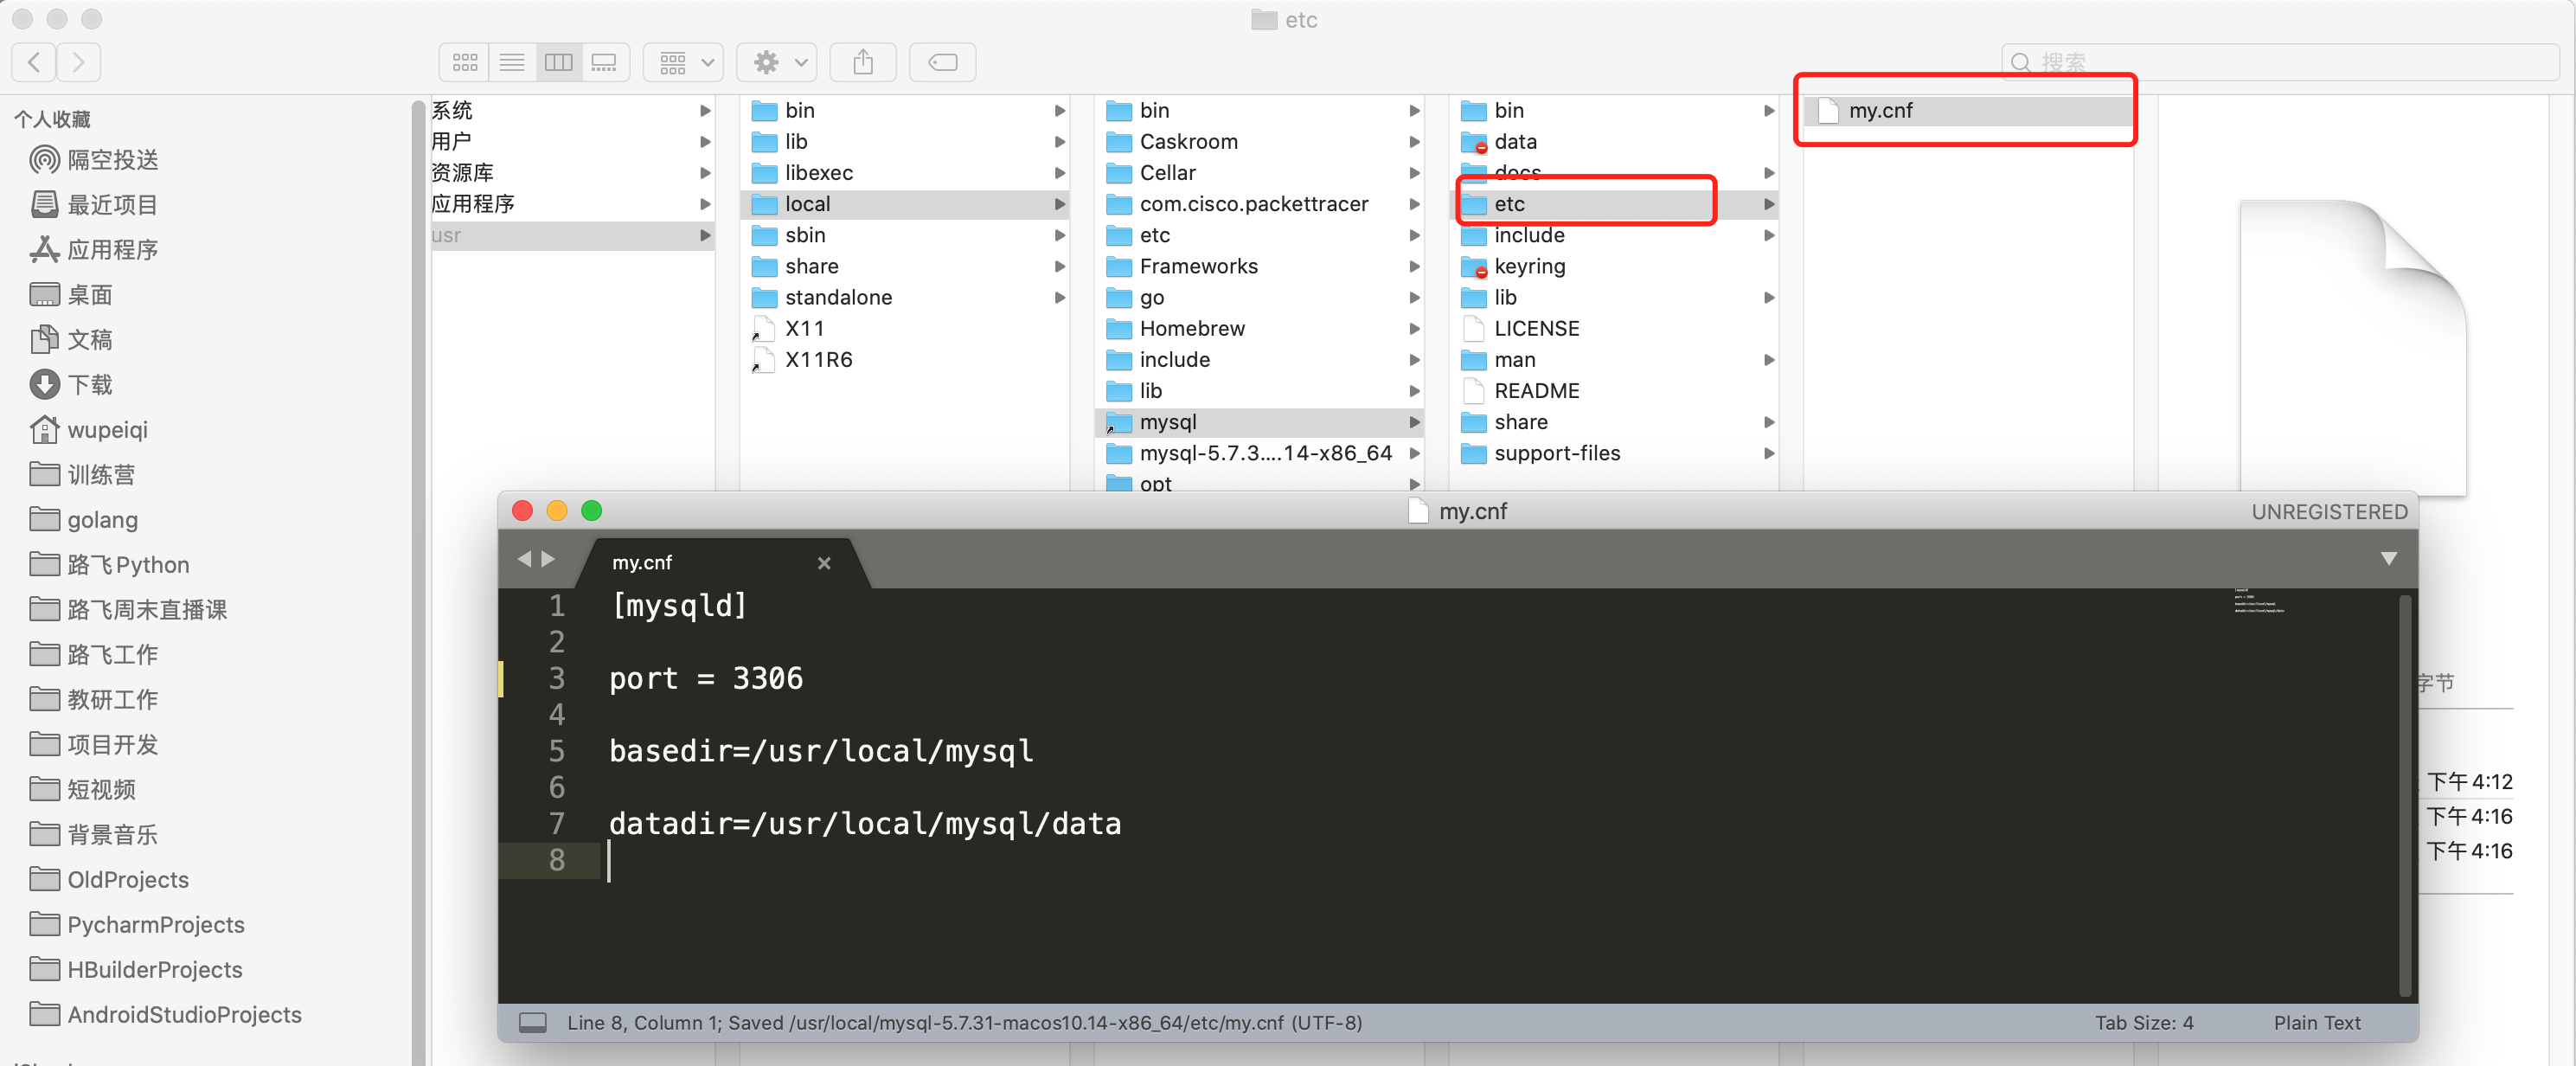
MySQL的配置文件按照优先级,会在以下目录中寻找:

为了避免多个版本共存时,配置文件混乱的问题,建议大家还是把配置文件放在当前MySQL的安装目录下。
第3步:启动
在Mac系统中启动MySQL常见的有2种方式:
安装目录中自带
mysql.server脚本(建议)pythonsudo /usr/local/mysql/support-files/mysql.server start # 输入电脑密码 sudo mysql.server start # 输入电脑密码sudo /usr/local/mysql/support-files/mysql.server stop
为了避免每次执行命令都需要些路径,可以将路径
/usr/local/mysql/support-files加入到环境变量中。
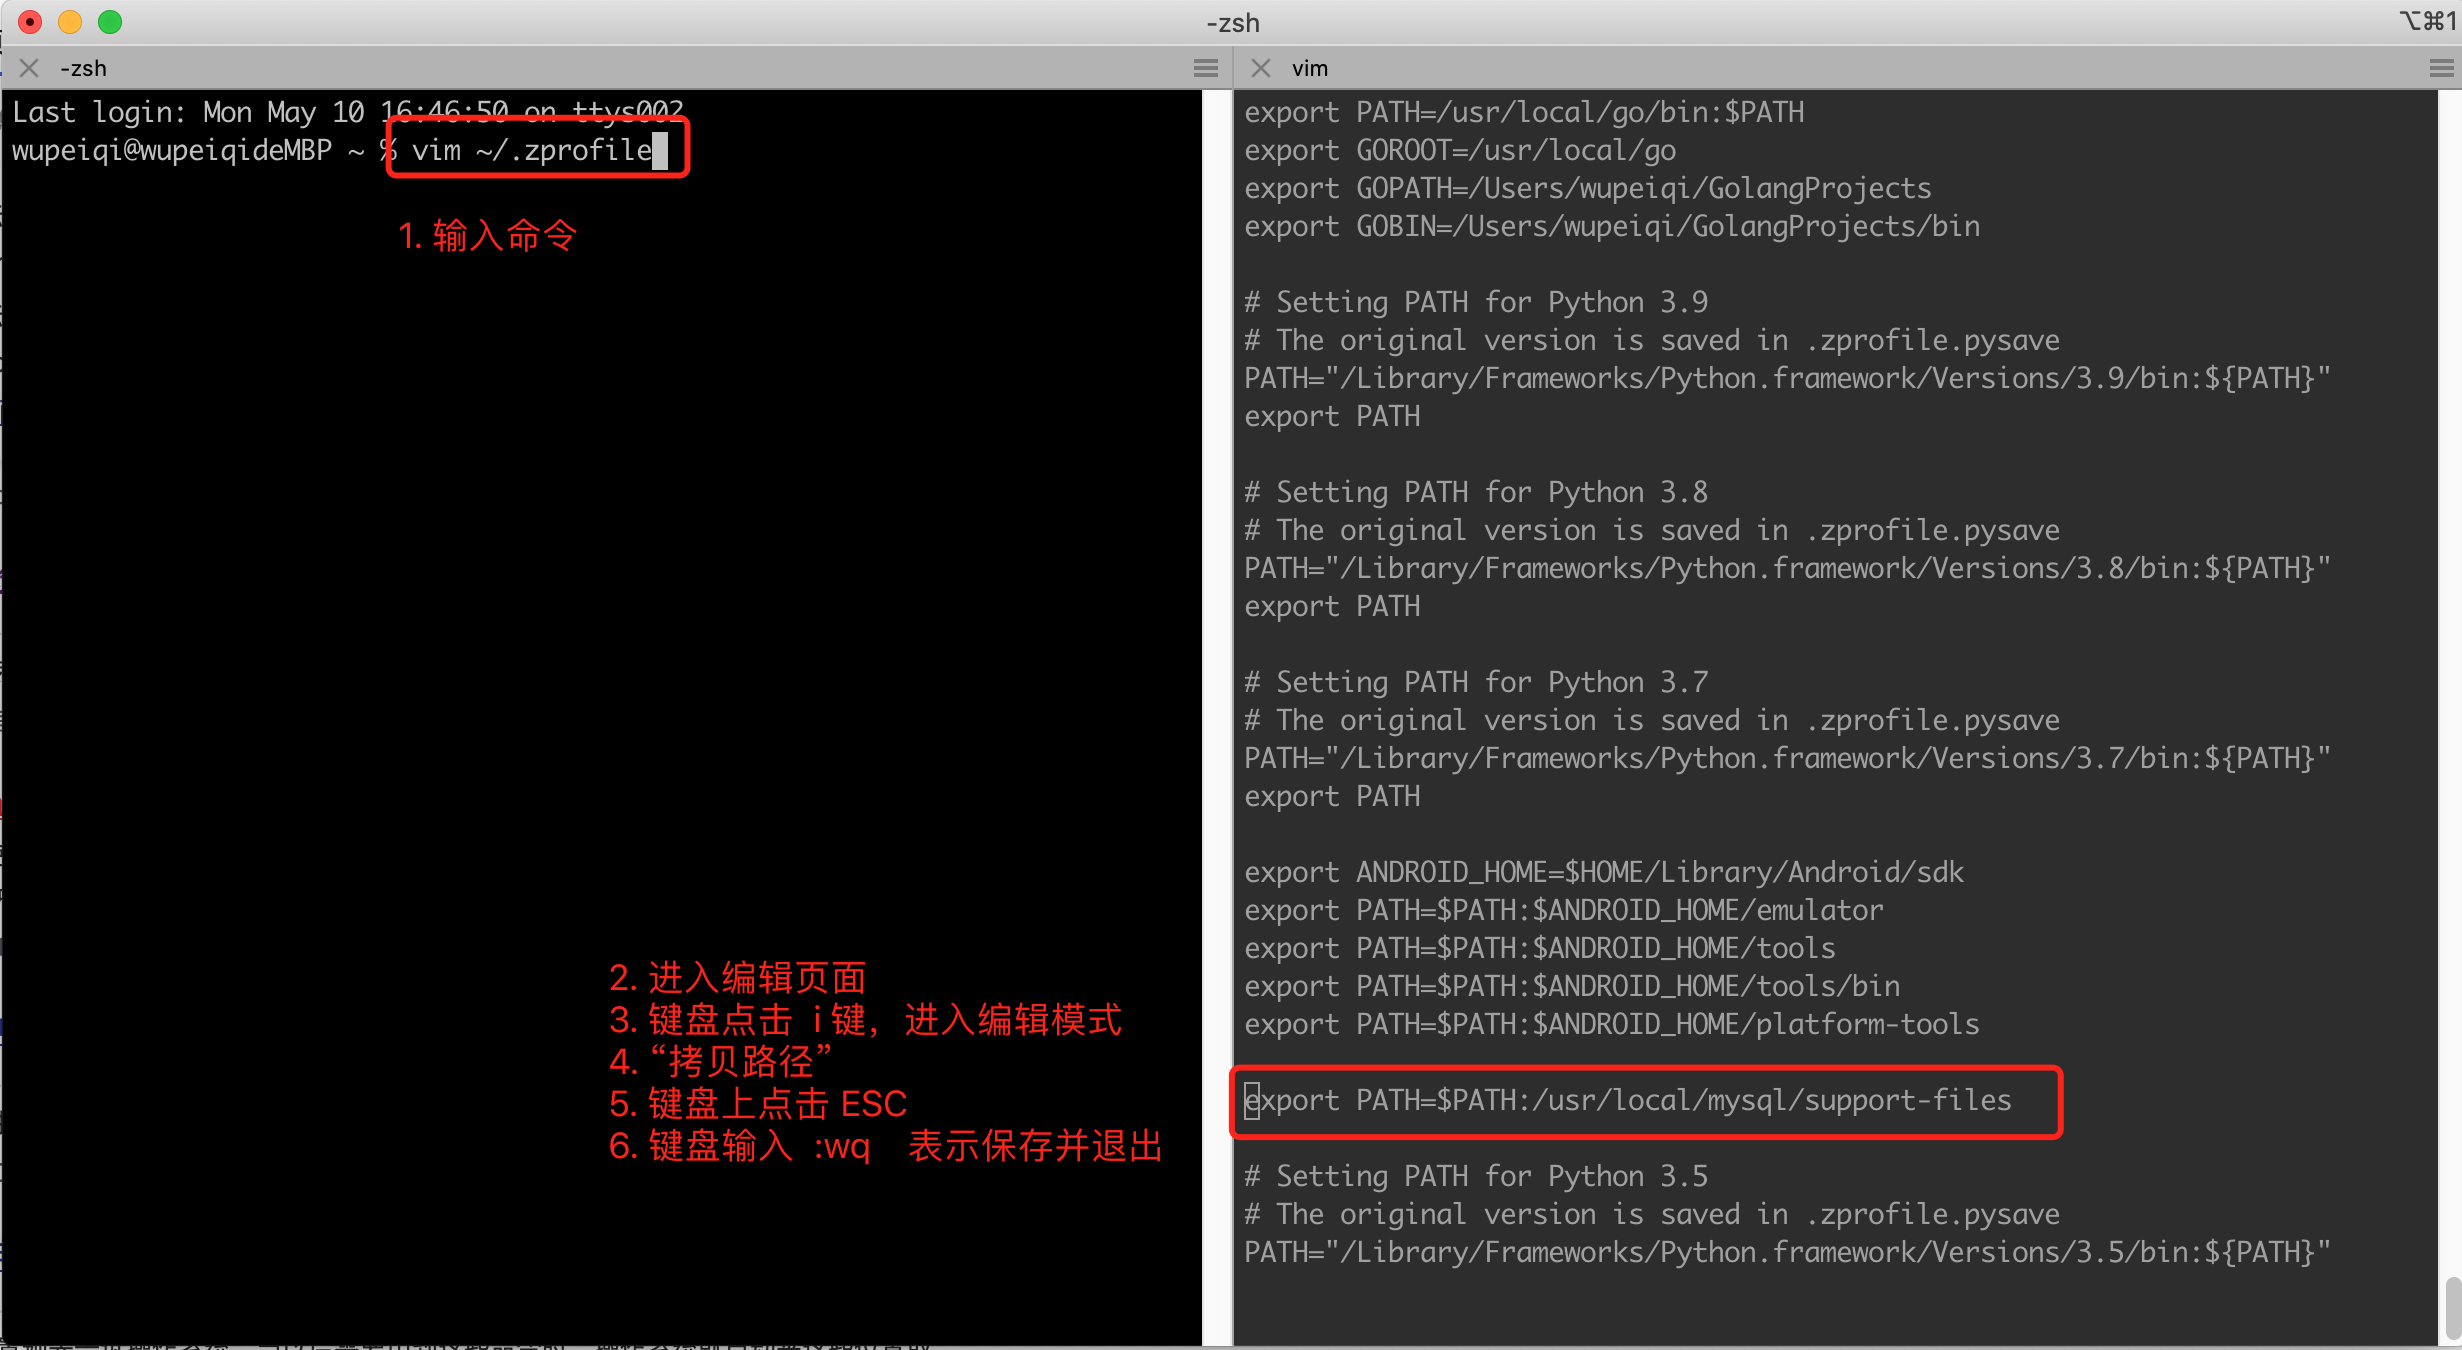
操作完成之后,再在终端执行下命令:source ~/.zprofile 让设置的环境变量立即生效。
注意:mac系统的版本如果比较老,会显示空白的 zprofile 文件,此就要去打开 bash_profile 文件。
这样设置好之后,以后就可以使用下面的命令去启动和关闭MySQL了。
sudo mysql.server start
sudo mysql.server stop- 系统偏好设置(不推荐)
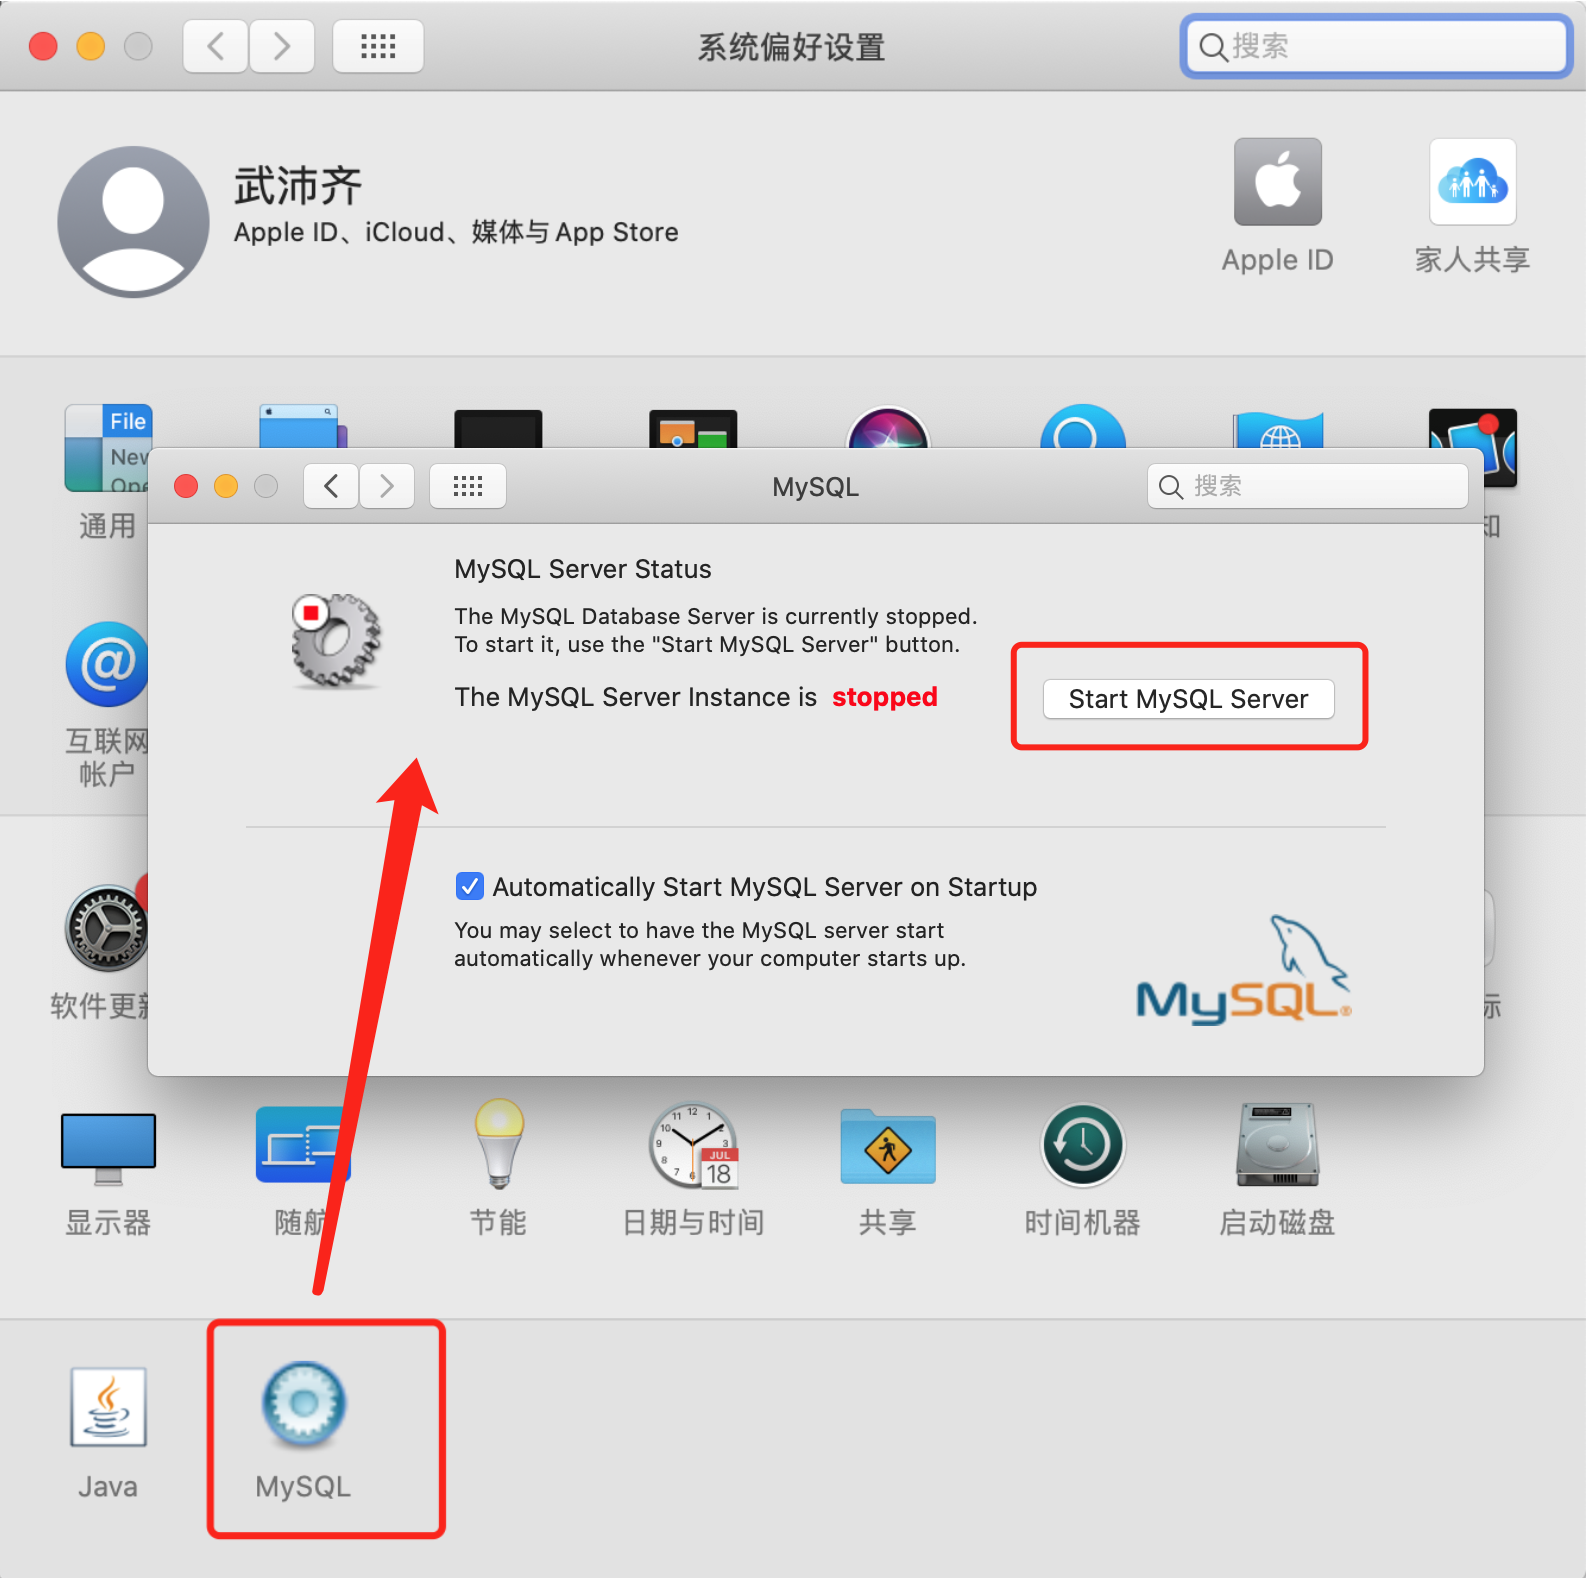
第一种mysql.server脚本的形式,内部是使用 mysqld_safe运行,可以守护我们的MySQL进程,如意外挂掉可自动重启。
第4步:测试连接MySQL
安装并启动MySQL之后,就可以连接MySQL来测试是否已正确安装并启动成功。
以后在开发时,肯定是要用Python代码来连接MySQL并且进行数据操作(后面讲)。
在安装MySQL时,其实也自动安装了一个工具(客户端),让我们快速实现连接MySQL并发送指令。
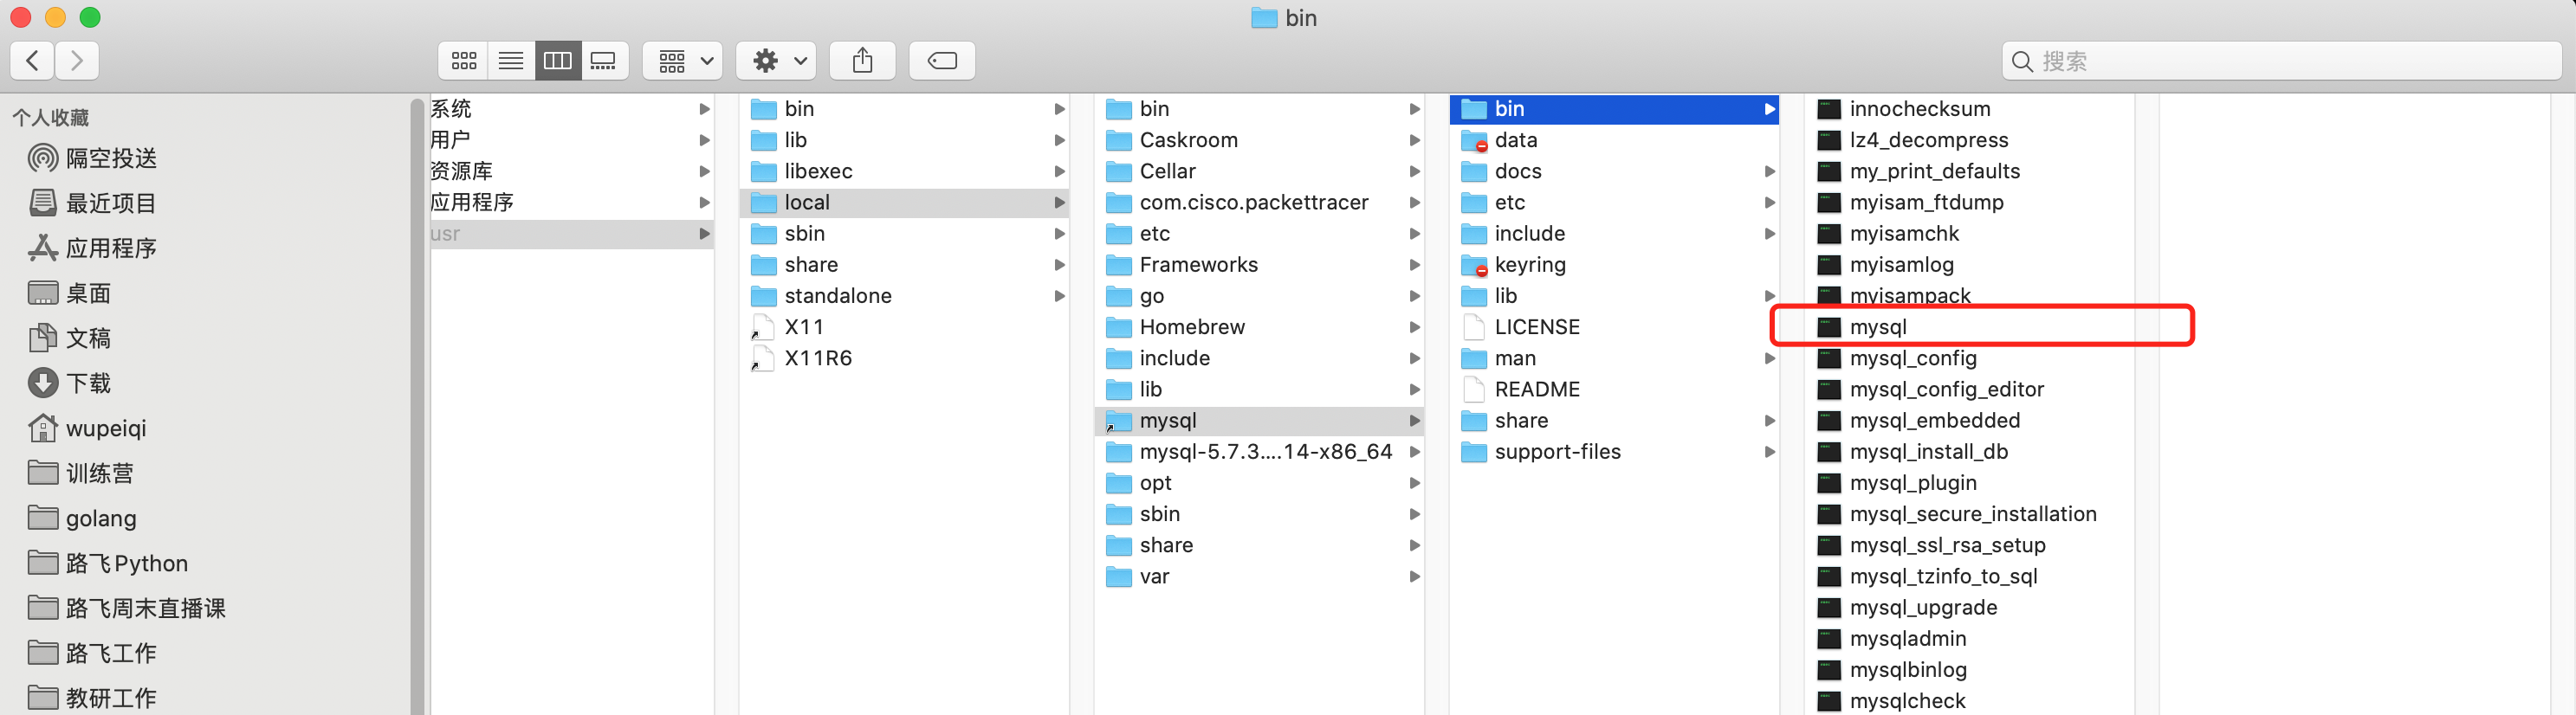
注意:/usr/local/mysql/bin也可以加入到环境变量。
至此,在Mac系统中关于MySQL的安装和配置就完成了。
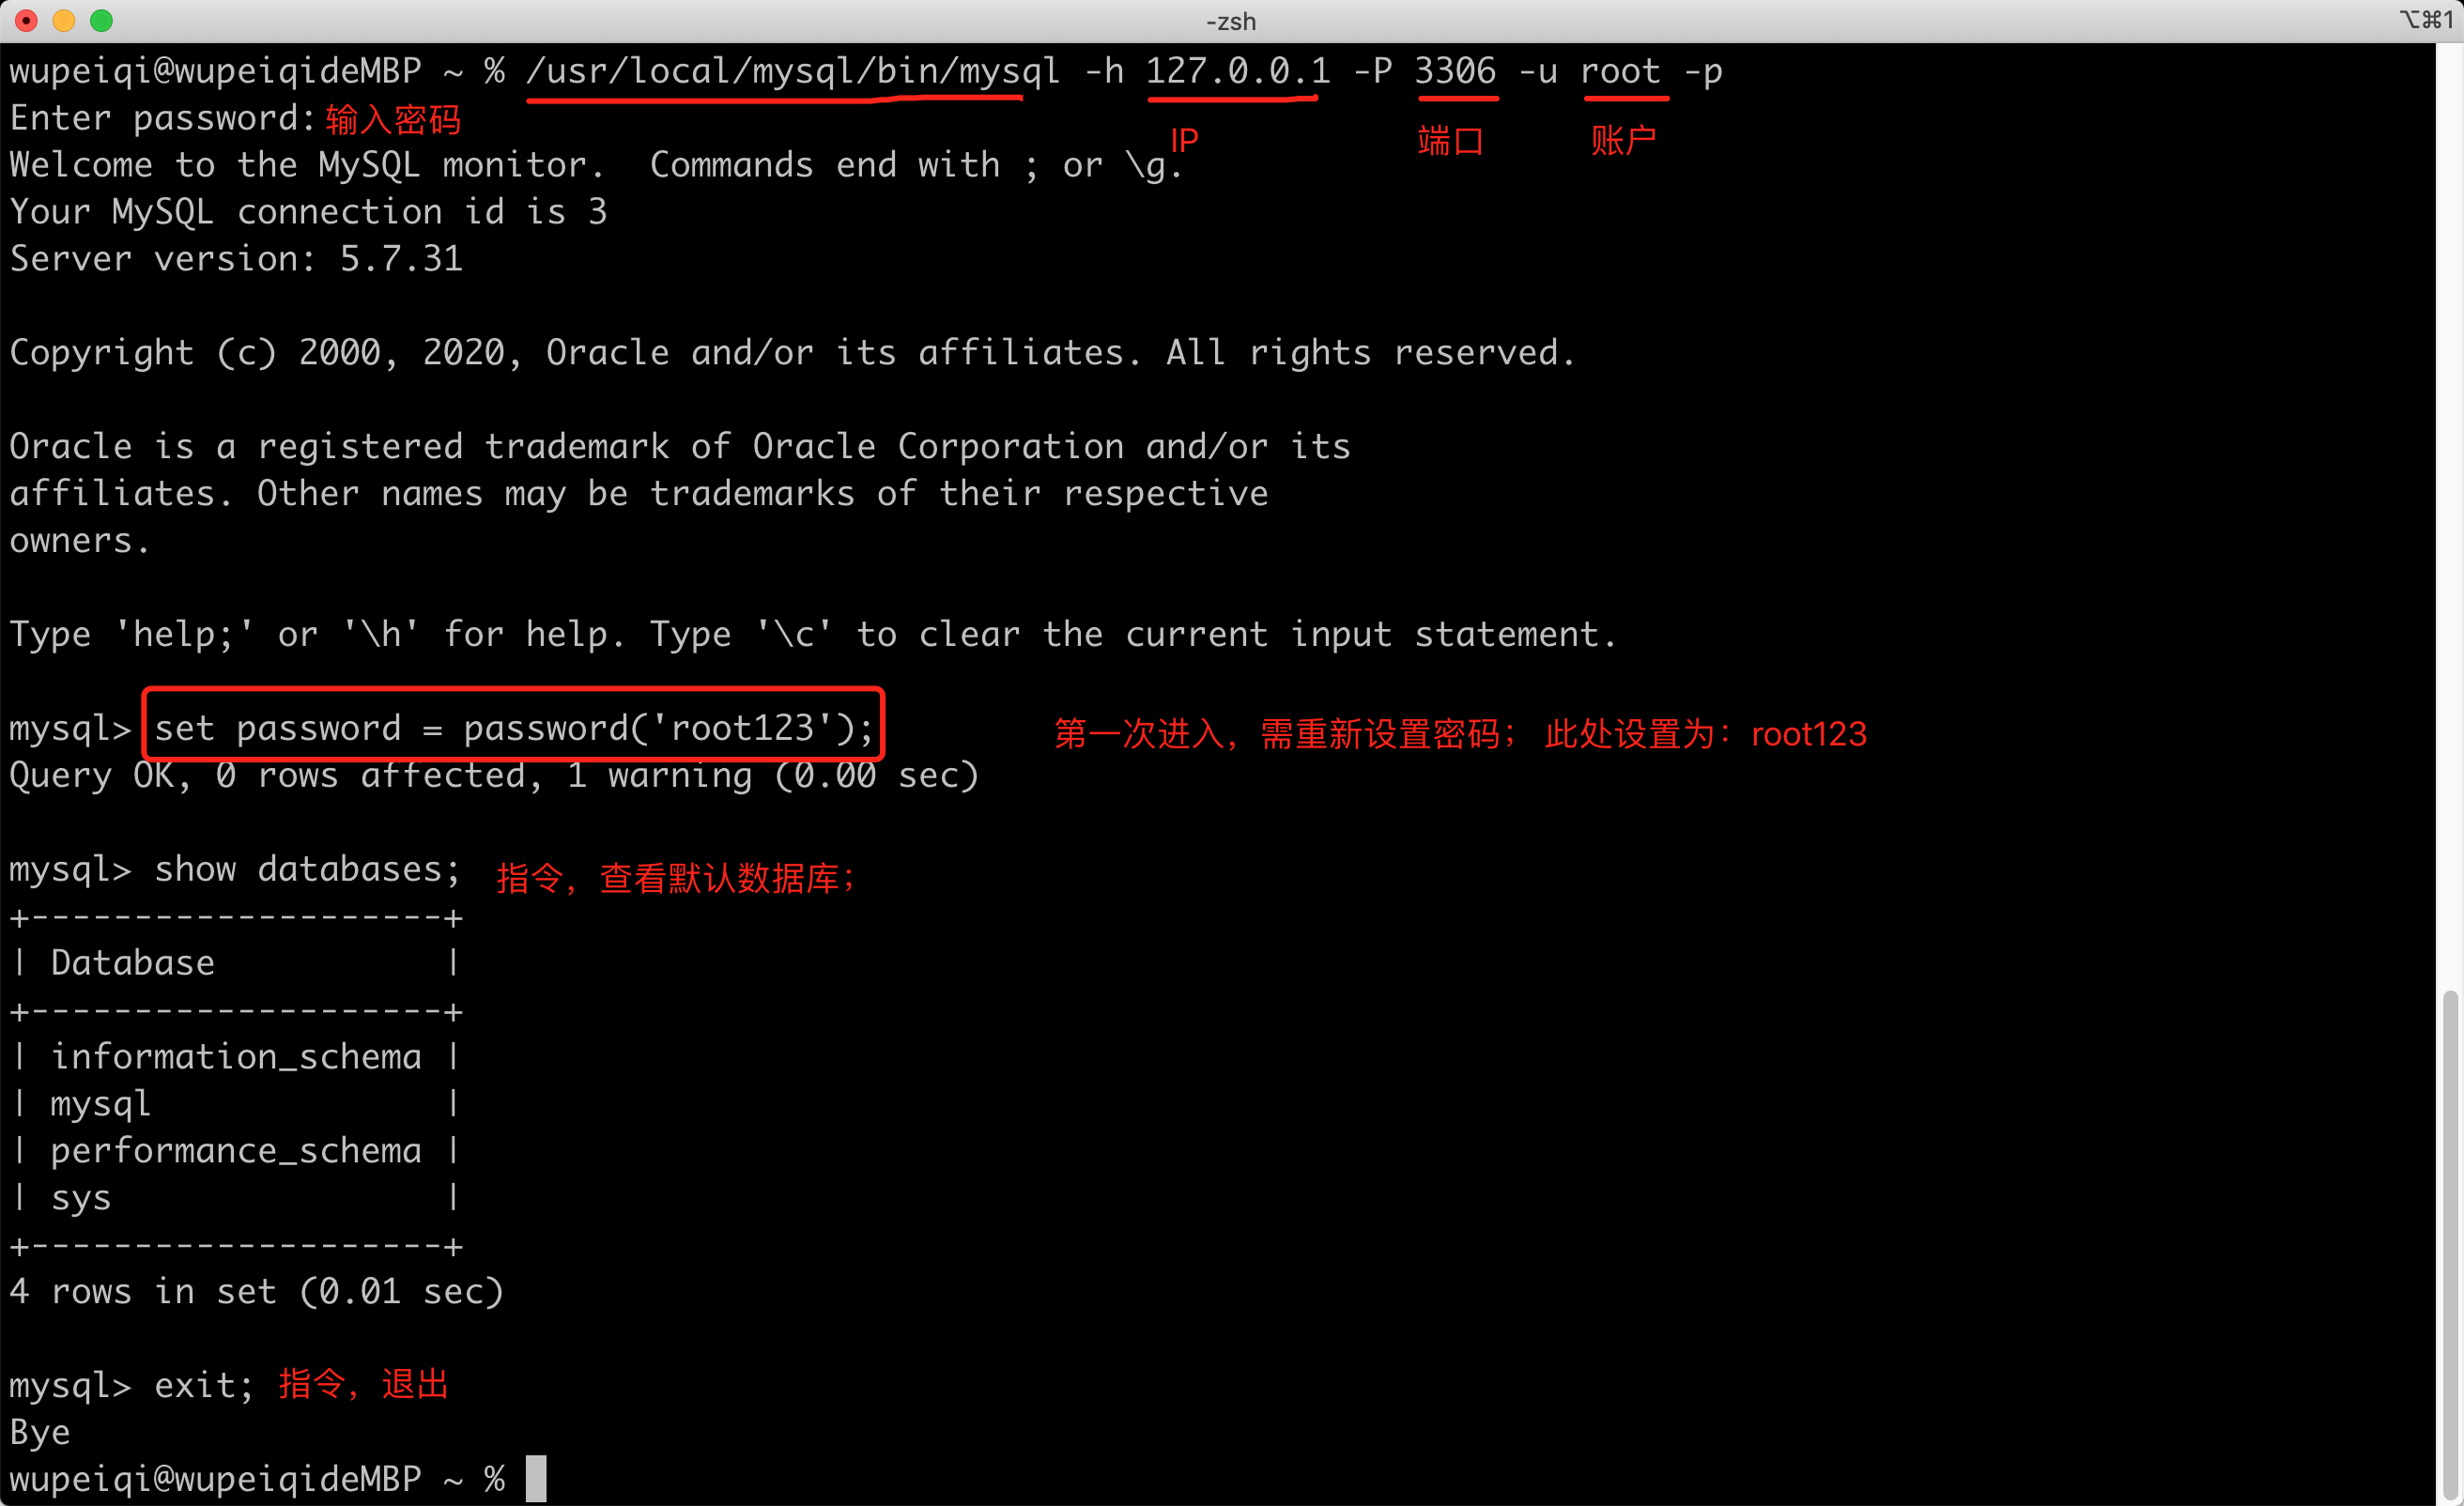
#连接sql命令
mysql -uroot -p
1.3 关于配置文件
上述的过程中,我们在配置文件中只添加了很少的配置。
其实,配置项有很多,而哪些配置项都有默认值,如果我们不配置,MySQL则自动使用默认值。
1.4 关于密码
1. 设置和修改root密码
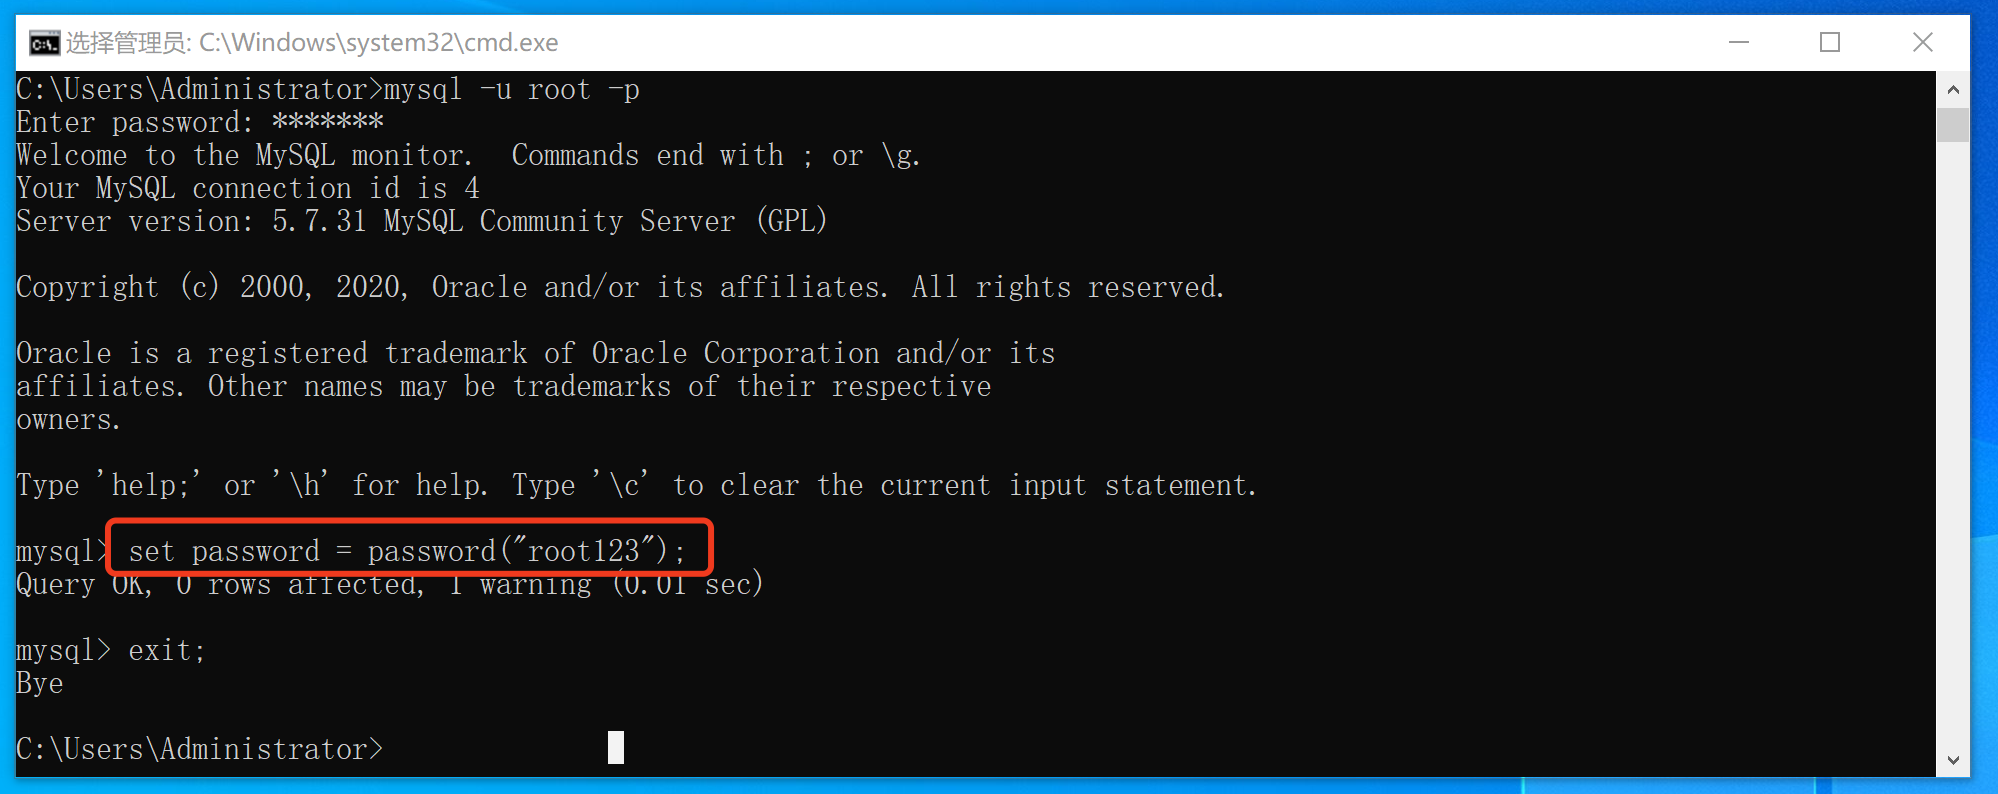
在windows系统中模块默认 root 账户是没有密码的,如果想要为账户设定密码,可以在利用root账户登录成功之后,执行:
2. 忘记root密码
如果你忘记了MySQL账户的密码。
修改配置文件,在 [mysqld] 节点下添加
skip-grant-tables=1[mysqld] ... skip-grant-tables=1 ...重启MySQL,再次登录时,不需要密码直接可以进去了
windows重启
net stop mysql57
net start mysql57
mac重启
sudo mysql.server restart
重启后,无序密码就可以进入。
>>> mysql -u root -p进入数据库后执行修改密码命令
use mysql;
update user set authentication_string = password('新密码'),password_last_changed=now() where user='root';
退出并再次修改配置文件,删除 [mysqld] 节点下的
skip-grant-tables=1[mysqld] ... # skip-grant-tables=1 ...再次重启,以后就可以使用新密码登录了。
2. 数据库 管理
安装上数据库之后,就需要开始学习指令了,通过指令让MySQL去做出一些文件操作。
如果将数据库管理系统与之前的文件管理做类比的话:
| 数据库管理系统 | 文件管理 |
|---|---|
| 数据库 | 文件夹 |
| 数据表 | 文件夹下的excel文件 |
接下来,我们先学习 数据库(文件夹)相关操作的指令。
2.1 内置客户端操作
当连接上MySQL之后,执行如下指令(一般称为SQL语句),就可以对MySQL的数据进行操作。
查看当前所有的数据库:
show databases;创建数据库:
create database 数据库名 DEFAULT CHARSET utf8 COLLATE utf8_general_ci;create database day25db; create database day25db DEFAULT CHARSET utf8 COLLATE utf8_general_ci;删除数据库:
drop database 数据库名;进入数据(进入文件):
use 数据库;
示例:
# 1.登录MySQL
wupeiqi@wupeiqideMBP ~ % /usr/local/mysql/bin/mysql -u root -p
Enter password:
Welcome to the MySQL monitor.  Commands end with ; or \g.
Your MySQL connection id is 5
Server version: 5.7.31 MySQL Community Server (GPL)

Copyright (c) 2000, 2020, Oracle and/or its affiliates. All rights reserved.

Oracle is a registered trademark of Oracle Corporation and/or its
affiliates. Other names may be trademarks of their respective
owners.

Type 'help;' or '\h' for help. Type '\c' to clear the current input statement.

# 2.查看当前数据库
mysql> show databases;
+--------------------+
| Database           |
+--------------------+
| information_schema |
| mysql              |
| performance_schema |
| sys                |
+--------------------+
4 rows in set (0.00 sec)

# 3. 创建数据库:  create database 数据库名 default charset 编码 collate 排序规则;
mysql> create database db1 default charset utf8 collate utf8_general_ci;
Query OK, 1 row affected (0.00 sec)

mysql> show databases;
+--------------------+
| Database           |
+--------------------+
| information_schema |
| db1                |
| mysql              |
| performance_schema |
| sys                |
+--------------------+
5 rows in set (0.01 sec)

# 4. 删除数据库
mysql> drop database db1;
Query OK, 0 rows affected (0.00 sec)

# 5. 查看当前所有数据库
mysql> show databases;
+--------------------+
| Database           |
+--------------------+
| information_schema |
| mysql              |
| performance_schema |
| sys                |
+--------------------+
4 rows in set (0.00 sec)

# 6. 进入数据库
mysql> use mysql;
Reading table information for completion of table and column names
You can turn off this feature to get a quicker startup with -A

Database changed
# 7. 进入mysql数据库(文件夹),查看此数据库下的所有表。
mysql> show tables;
+---------------------------+
| Tables_in_mysql           |
+---------------------------+
| columns_priv              |
| db                        |
| engine_cost               |
| event                     |
| func                      |
| general_log               |
| gtid_executed             |
| help_category             |
| help_keyword              |
| help_relation             |
| help_topic                |
| innodb_index_stats        |
| innodb_table_stats        |
| ndb_binlog_index          |
| plugin                    |
| proc                      |
| procs_priv                |
| proxies_priv              |
| server_cost               |
| servers                   |
| slave_master_info         |
| slave_relay_log_info      |
| slave_worker_info         |
| slow_log                  |
| tables_priv               |
| time_zone                 |
| time_zone_leap_second     |
| time_zone_name            |
| time_zone_transition      |
| time_zone_transition_type |
| user                      |
+---------------------------+
31 rows in set (0.00 sec)

# 8. 退出
mysql>exit;
2.2 Python代码操作
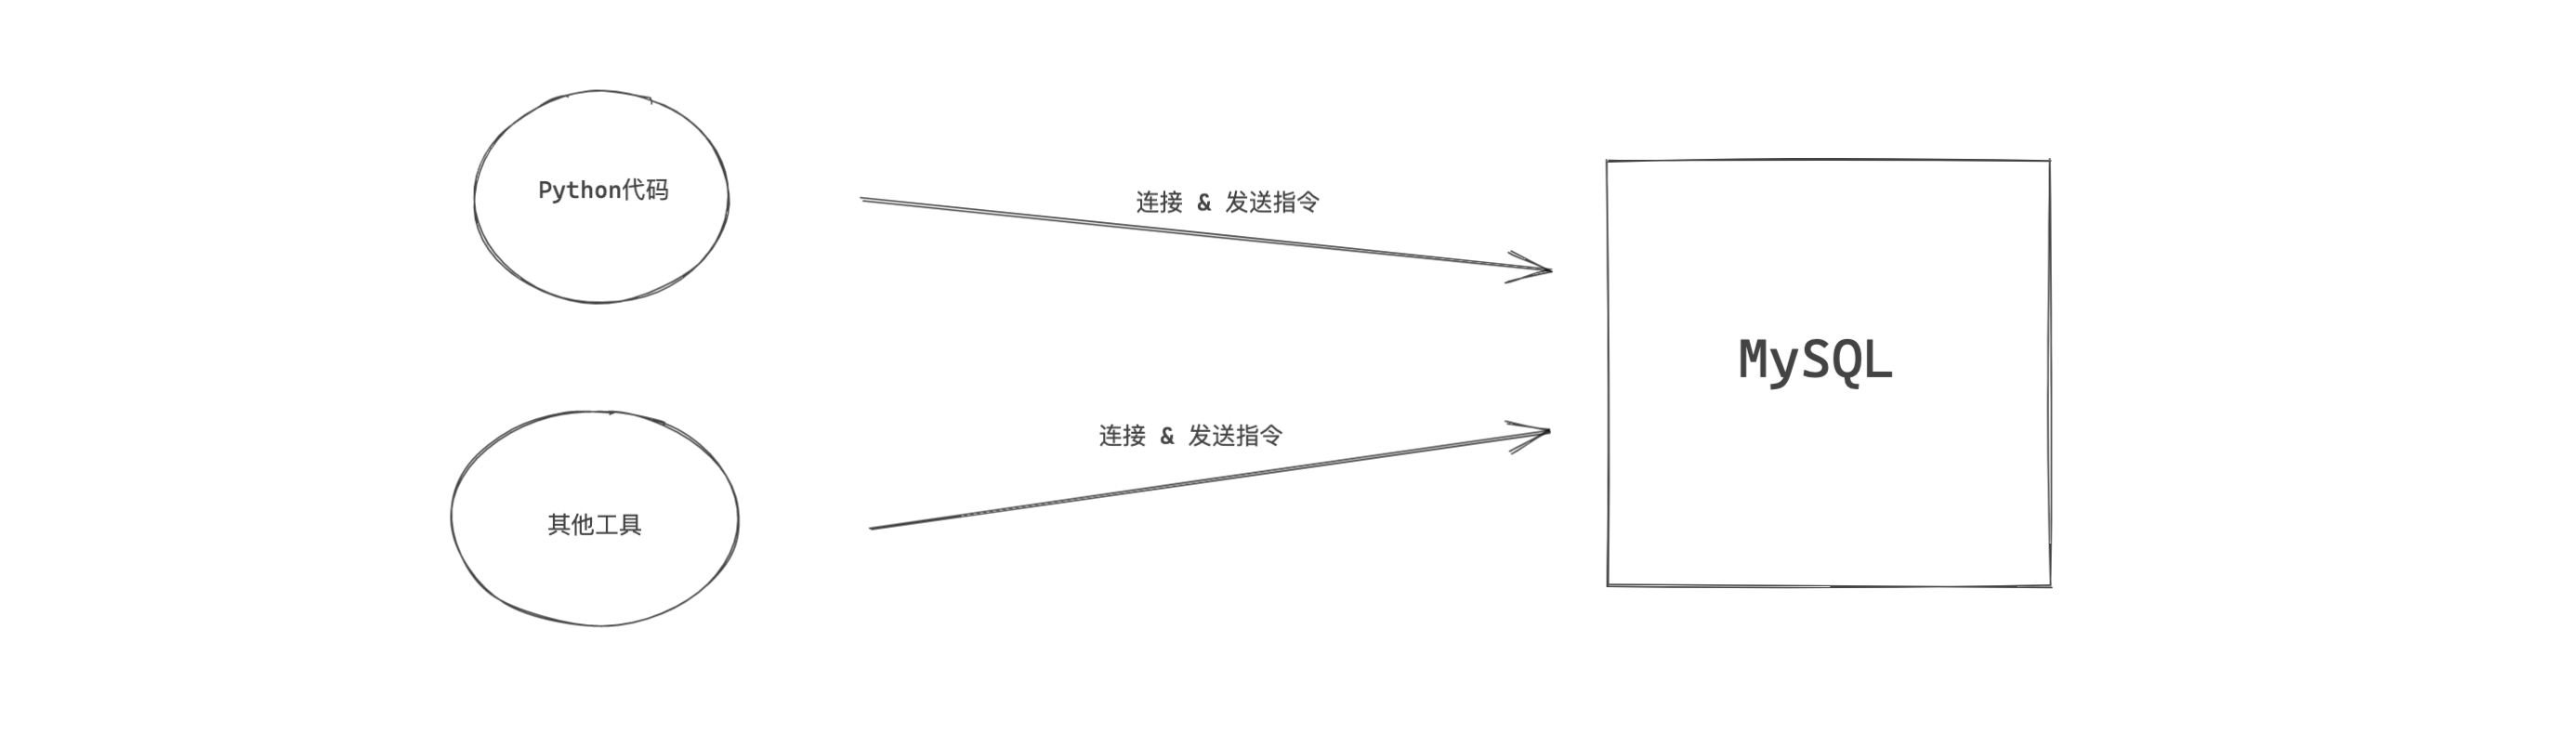
无论通过何种方式去连接MySQL,本质上发送的 指令 都是相同的,只是连接的方式和操作形式不同而已。
当连接上MySQL之后,执行如下指令,就可以对MySQL的数据进行操作。(同上述过程)
- 查看当前所有的数据库
show databases; - 创建数据库:
create database 数据库名 default charset utf8 collate utf8_general_ci; - 删除数据库:
drop database 数据库名; - 进入数据(进入文件):
use 数据库; - 查看当前数据库:
select database();
想要使用Python操作MySQL需要安装第三方模块:
pip3 install pymysql
安装完成后,就可以编写代码:
import pymysql

# 连接MySQL(socket)
conn = pymysql.connect(host='127.0.0.1', port=3306, user='root', passwd='root123', charset="utf8")
cursor = conn.cursor()

# 1. 查看数据库
# 发送指令
cursor.execute("show databases")
# 获取指令的结果
result = cursor.fetchall()
print(result) # (('information_schema',), ('mysql',), ('performance_schema',), ('sys',))

# 2. 创建数据库(新增、删除、修改)
# 发送指令
cursor.execute("create database db3 default charset utf8 collate utf8_general_ci")
conn.commit()

# 3. 查看数据库
# 发送指令
cursor.execute("show databases")
# 获取指令的结果
result = cursor.fetchall()
print(result) # (('information_schema',), ('db3',), ('mysql',), ('performance_schema',), ('sys',))

# 4. 删除数据库
# 发送指令
cursor.execute("drop database db3")
conn.commit()

# 3. 查看数据库
# 发送指令
cursor.execute("show databases")
# 获取指令的结果
result = cursor.fetchall()
print(result) # (('information_schema',), ('mysql',), ('performance_schema',), ('sys',))

# 5. 进入数据库,查看表
# 发送指令
cursor.execute("use mysql")
cursor.execute("show tables")
result = cursor.fetchall()
print(result) # (('columns_priv',), ('db',), ('engine_cost',), ('event',), ('func',), ('general_log',),....

# 关闭连接
cursor.close()
conn.close()
3. 数据表 管理
如果将数据库管理系统与之前的文件管理做类比的话:
| 数据库管理系统 | 文件管理 |
|---|---|
| 数据库 | 文件夹 |
| 数据表 | 文件夹下的文件 |
接下来,我们先学习 数据表(文件夹中的文件)相关操作的指令。
其实在数据库中创建数据库 和 创建Excel非常类似,需要指定: 表名、列名称、类类型(整型、字符串或其他)。
3.1 内置客户端操作
数据表常见操作的指令:
####进入数据库
use 数据库;,查看当前所有表:show tables;
查看表结构(!)
desc <table name>


desc course;
-- 结果如下图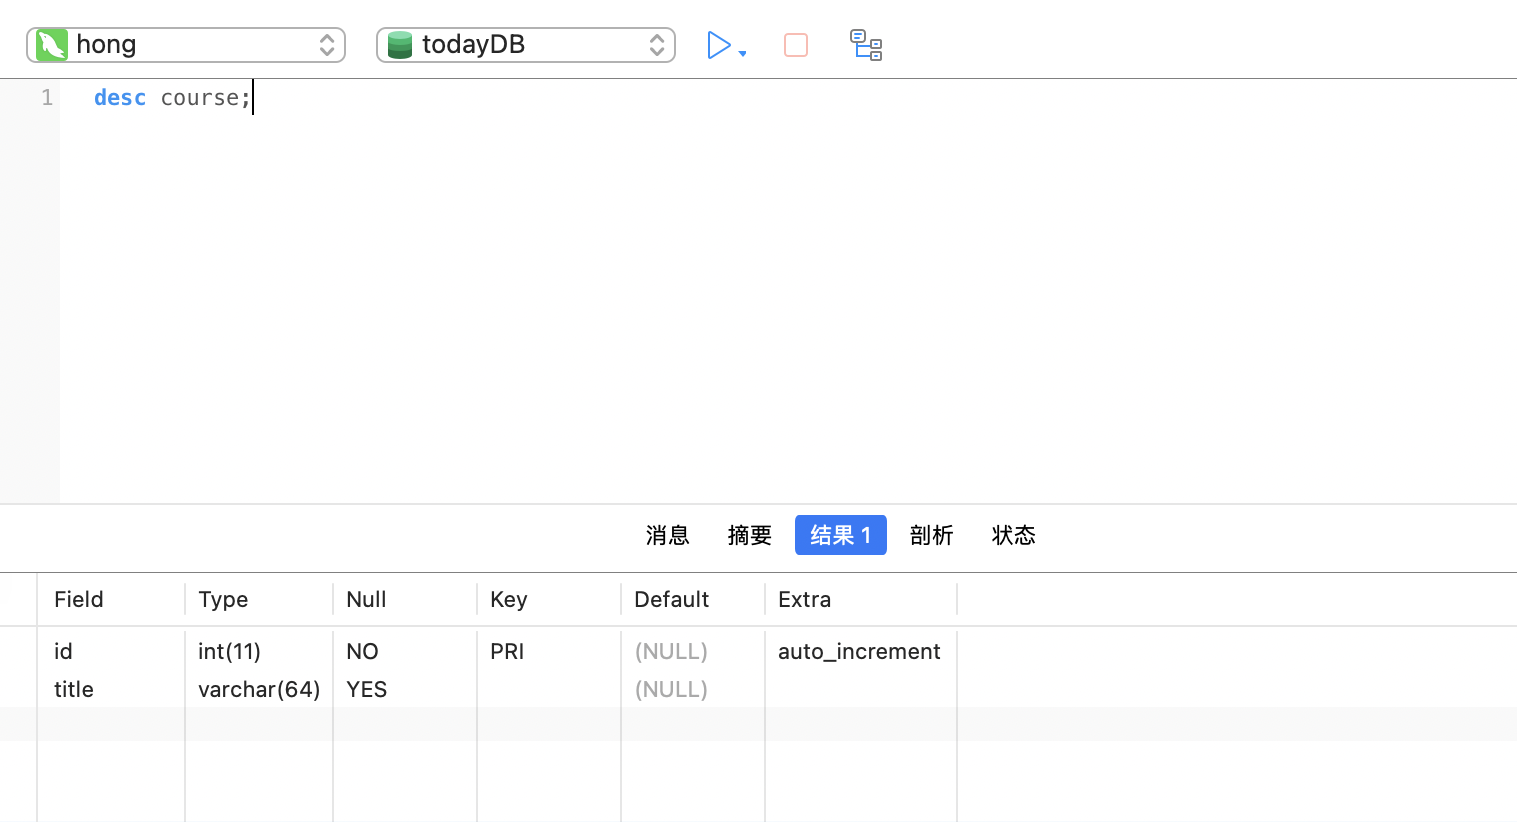
创建表结构

create table 表名(
    列名  类型,
    列名  类型,
    列名  类型
)default charset=utf8;create table tb1(
id int,
name varchar(16)
)default charset=utf8;create table tb2(
id int,
name varchar(16) not null, -- 不允许为空
email varchar(32) null, -- 允许为空(默认)
age int
)default charset=utf8;create table tb3(
id int,
name varchar(16) not null, -- 不允许为空
email varchar(32) null, -- 允许为空(默认)
age int default 3 -- 插入数据时,如果不给age列设置值,默认值:3
)default charset=utf8;create table tb4(
id int primary key, -- 主键(不允许为空、不能重复)
name varchar(16) not null, -- 不允许为空
email varchar(32) null, -- 允许为空(默认)
age int default 3 -- 插入数据时,如果不给age列设置值,默认值:3
)default charset=utf8;主键一般用于表示当前这条数据的ID编号(类似于人的身份证),需要我们自己来维护一个不重复的值,比较繁琐。所以,在数据库中一般会将主键和自增结合。
create table tb5(
	id int not null auto_increment primary key,	-- 不允许为空 & 主键 & 自增
    name varchar(16) not null,   		-- 不允许为空
    email varchar(32) null,      		-- 允许为空(默认)
    age int default 3            		-- 插入数据时,如果不给age列设置值,默认值:3
)default charset=utf8;
注意:一个表中只能有一个自增列【自增列,一般都是主键】。
删除表
drop table 表名;
清空表
delete from 表名; 或 truncate table 表名;(速度快、无法回滚撤销等)
修改表
添加列
alter table 表名 add 列名 类型;
alter table 表名 add 列名 类型 DEFAULT 默认值;
alter table 表名 add 列名 类型 not null default 默认值;
alter table 表名 add 列名 类型 not null primary key auto_increment;
删除列
alter table 表名 drop column 列名;修改列 类型
alter table 表名 modify column 列名 类型;修改列 类型 + 名称
alter table 表名 change 原列名 新列名 新类型;alter table tb change id nid int not null;
alter table tb change id id int not null default 5;
alter table tb change id id int not null primary key auto_increment;
alter table tb change id id int; -- 允许为空,删除默认值,删除自增。修改列 默认值
ALTER TABLE 表名 ALTER 列名 SET DEFAULT 1000;删除列 默认值
ALTER TABLE 表名 ALTER 列名 DROP DEFAULT;添加主键
alter table 表名 add primary key(列名);删除主键
alter table 表名 drop primary key;常见列类型
create table 表(
	id int,
    name varchar(16)
)default charset=utf8;int[(m)][unsigned][zerofill]int 表示有符号,取值范围:-2147483648 ~ 2147483647 int unsigned 表示无符号,取值范围:0 ~ 4294967295 int(5)zerofill 仅用于显示,当不满足5位时,按照左边补0,例如:00002;满足时,正常显示。sqlmysql> create table L1(id int, uid int unsigned, zid int(5) zerofill) default charset=utf8; Query OK, 0 rows affected (0.03 sec) mysql> insert into L1(id,uid,zid) values(1,2,3); Query OK, 1 row affected (0.00 sec) mysql> insert into L1(id,uid,zid) values(2147483641,4294967294,300000); Query OK, 1 row affected (0.00 sec) mysql> select * from L1; +------------+------------+--------+ | id | uid | zid | +------------+------------+--------+ | 1 | 2 | 00003 | | 2147483641 | 4294967294 | 300000 | +------------+------------+--------+ 2 rows in set (0.00 sec) mysql> insert into L1(id,uid,zid) values(214748364100,4294967294,300000); ERROR 1264 (22003): Out of range value for column 'id' at row 1 mysql>tinyint[(m)] [unsigned] [zerofill]有符号,取值范围:-128 ~ 127. 无符号,取值范围:0 ~ 255bigint[(m)][unsigned][zerofill]有符号,取值范围:-9223372036854775808 ~ 9223372036854775807 无符号,取值范围:0 ~ 18446744073709551615decimal[(m[,d])] [unsigned] [zerofill]准确的小数值,m是数字总个数(负号不算),d是小数点后个数。 m最大值为65,d最大值为30。 例如: create table L2( id int not null primary key auto_increment, salary decimal(8,2) )default charset=utf8;sqlmysql> create table L2(id int not null primary key auto_increment,salary decimal(8,2))default charset=utf8; Query OK, 0 rows affected (0.03 sec) mysql> insert into L2(salary) values(1.28); Query OK, 1 row affected (0.01 sec) mysql> insert into L2(salary) values(5.289); Query OK, 1 row affected, 1 warning (0.00 sec) mysql> insert into L2(salary) values(5.282); Query OK, 1 row affected, 1 warning (0.00 sec) mysql> insert into L2(salary) values(512132.28); Query OK, 1 row affected (0.00 sec) mysql> insert into L2(salary) values(512132.283); Query OK, 1 row affected, 1 warning (0.00 sec) mysql> select * from L2; +----+-----------+ | id | salary | +----+-----------+ | 1 | 1.28 | | 2 | 5.29 | | 3 | 5.28 | | 4 | 512132.28 | | 5 | 512132.28 | +----+-----------+ 5 rows in set (0.00 sec) mysql> insert into L2(salary) values(5121321.283); ERROR 1264 (22003): Out of range value for column 'salary' at row 1 mysql>FLOAT[(M,D)] [UNSIGNED] [ZEROFILL]单精度浮点数,非准确小数值,m是数字总个数,d是小数点后个数。DOUBLE[(M,D)] [UNSIGNED] [ZEROFILL]双精度浮点数(非准确小数值),m是数字总个数,d是小数点后个数。char(m)定长字符串,m代表字符串的长度,最多可容纳255个字符。 定长的体现:即使内容长度小于m,也会占用m长度。例如:char(5),数据是:yes,底层也会占用5个字符;如果超出m长度限制(默认MySQL是严格模式,所以会报错)。 如果在配置文件中加入如下配置, sql-mode="NO_AUTO_CREATE_USER,NO_ENGINE_SUBSTITUTION" 保存并重启,此时MySQL则是非严格模式,此时超过长度则自动截断(不报错)。。 注意:默认底层存储是固定的长度(不够则用空格补齐),但是查询数据时,会自动将空白去除。 如果想要保留空白,在sql-mode中加入 PAD_CHAR_TO_FULL_LENGTH 即可。 查看模式sql-mode,执行命令:show variables like 'sql_mode'; 一般适用于:固定长度的内容。 create table L3( id int not null primary key auto_increment, name varchar(5), depart char(3) )default charset=utf8; insert into L3(name,depart) values("alexsb","sbalex");varchar(m)变长字符串,m代表字符串的长度,最多可容纳65535个字节。 变长的体现:内容小于m时,会按照真实数据长度存储;如果超出m长度限制((默认MySQL是严格模式,所以会报错)。 如果在配置文件中加入如下配置, sql-mode="NO_AUTO_CREATE_USER,NO_ENGINE_SUBSTITUTION" 保存并重启,此时MySQL则是非严格模式,此时超过长度则自动截断(不报错)。 例如: create table L3( id int not null primary key auto_increment, name varchar(5), depart char(3) )default charset=utf8;sqlmysql> create table L3(id int not null primary key auto_increment,name varchar(5),depart char(3))default charset=utf8; Query OK, 0 rows affected (0.03 sec) -- 插入多行 mysql> insert into L3(name,depart) values("wu","WU"),("wupei","ALS"); Query OK, 2 rows affected (0.00 sec) Records: 2 Duplicates: 0 Warnings: 0 mysql> select * from L3; +----+-------+--------+ | id | name | depart | +----+-------+--------+ | 1 | wu | WU | | 2 | wupei | ALS | +----+-------+--------+ 2 rows in set (0.00 sec) -- 非严格模式下,不会报错。 mysql> insert into L3(name,depart) values("wupeiqi","ALS"); ERROR 1406 (22001): Data too long for column 'name' at row 1 mysql> insert into L3(name,depart) values("wupei","ALSB"); ERROR 1406 (22001): Data too long for column 'depart' at row 1 mysql> -- 如果 sql-mode 中加入了 PAD_CHAR_TO_FULL_LENGTH ,则查询时char时空白会保留。 mysql> select name,length(name),depart,length(depart) from L3; +-------+--------------+--------+----------------+ | name | length(name) | depart | length(depart) | +-------+--------------+--------+----------------+ | wu | 2 | WU | 3 | | wupei | 5 | ALS | 3 | +-------+--------------+--------+----------------+ 4 rows in set (0.00 sec) mysql>texttext数据类型用于保存变长的大字符串,可以组多到65535 (2**16 − 1)个字符。 一般情况下,长文本会用text类型。例如:文章、新闻等。sqlcreate table L4( id int not null primary key auto_increment, title varchar(128), content text )default charset=utf8;mediumtextA TEXT column with a maximum length of 16,777,215 (2**24 − 1) characters.longtextA TEXT column with a maximum length of 4,294,967,295 or 4GB (2**32 − 1)datetimeYYYY-MM-DD HH:MM:SS(1000-01-01 00:00:00/9999-12-31 23:59:59)timestampYYYY-MM-DD HH:MM:SS(1970-01-01 00:00:00/2037年)对于TIMESTAMP,它把客户端插入的时间从当前时区转化为UTC(世界标准时间)进行存储,查询时,将其又转化为客户端当前时区进行返回。 对于DATETIME,不做任何改变,原样输入和输出。sqlmysql> create table L5( -> id int not null primary key auto_increment, -> dt datetime, -> tt timestamp -> )default charset=utf8; Query OK, 0 rows affected (0.03 sec) mysql> insert into L5(dt,tt) values("2025-11-11 11:11:44", "2025-11-11 11:11:44"); mysql> select * from L5; +----+---------------------+---------------------+ | id | dt | tt | +----+---------------------+---------------------+ | 1 | 2025-11-11 11:11:44 | 2025-11-11 11:11:44 | +----+---------------------+---------------------+ 1 row in set (0.00 sec) mysql> show variables like '%time_zone%'; +------------------+--------+ | Variable_name | Value | +------------------+--------+ | system_time_zone | CST | | time_zone | SYSTEM | +------------------+--------+ 2 rows in set (0.00 sec) -- “CST”指的是MySQL所在主机的系统时间,是中国标准时间的缩写,China Standard Time UT+8:00 mysql> set time_zone='+0:00'; Query OK, 0 rows affected (0.00 sec) mysql> show variables like '%time_zone%'; +------------------+--------+ | Variable_name | Value | +------------------+--------+ | system_time_zone | CST | | time_zone | +00:00 | +------------------+--------+ 2 rows in set (0.01 sec) mysql> select * from L5; +----+---------------------+---------------------+ | id | dt | tt | +----+---------------------+---------------------+ | 1 | 2025-11-11 11:11:44 | 2025-11-11 03:11:44 | +----+---------------------+---------------------+ 1 row in set (0.00 sec)dateYYYY-MM-DD(1000-01-01/9999-12-31)timeHH:MM:SS('-838:59:59'/'838:59:59')
MySQL还有很多其他的数据类型,例如:set、enum、TinyBlob、Blob、MediumBlob、LongBlob 等,详细见官方文档:https://dev.mysql.com/doc/refman/5.7/en/data-types.html
上述就是关于数据表的一些基本操作。
3.2 MySQL代码操作
基于Python去连接MySQL之后,想要进行数据表的管理的话,发送的指令其实都是相同的,例如:
import pymysql

# 连接MySQL
conn = pymysql.connect(host='127.0.0.1', port=3306, user='root', passwd='root123', charset="utf8")
cursor = conn.cursor()

# 1. 创建数据库
"""
cursor.execute("create database db4 default charset utf8 collate utf8_general_ci")
conn.commit()
"""

# 2. 进入数据库、查看数据表
"""
cursor.execute("use db4")
cursor.execute("show tables")
result = cursor.fetchall()
print(result)
"""

# 3. 进入数据库创建表
cursor.execute("use db4")
sql = """
create table L4(
    id int not null primary key auto_increment,
    title varchar(128),
    content text,
    ctime datetime
)default charset=utf8;
"""
cursor.execute(sql)
conn.commit()

# 4. 查看数据库中的表
"""
cursor.execute("show tables")
result = cursor.fetchall()
print(result)
"""

# 5. 其他 drop table... 略过


# 关闭连接
cursor.close()
conn.close()
4.数据行
当数据库和数据表创建完成之后,就需要对数据表中的内容进行:增、删、改、查了。
4.1 内置客户端操作
数据行操作的相关SQL语句(指令)如下:
新增数据
insert into 表名 (列名,列名,列名) values(对应列的值,对应列的值,对应列的值);sqlinsert into tb1(name,password) values('武沛齐','123123'); insert into tb1(name,password) values('武沛齐','123123'),('alex','123'); insert into tb1 values('武沛齐','123123'),('alex','123'); -- 如果表中只有2列删除数据
sqldelete from 表名; delete from 表名 where 条件;sqldelete from tb1; delete from tb1 where name="wupeiqi"; delete from tb1 where name="wupeiqi" and password="123"; delete from tb1 where id>9;修改数据
sqlupdate 表名 set 列名=值; update 表名 set 列名=值 where 条件;sqlupdate tb1 set name="wupeiqi"; update tb1 set name="wupeiqi" where id=1; update tb1 set age=age+1; -- 整型 update tb1 set age=age+1 where id=2; update L3 set name=concat(name,"db"); update L3 set name=concat(name,"123") where id=2; -- concat一个函数,可以拼接字符串查询数据
sqlselect * from 表名; select 列名,列名,列名 from 表名; select 列名,列名 as 别名,列名 from 表名; select * from 表名 where 条件;sqlselect * from tb1; select id,name,age from tb1; select id,name as N,age, from tb1; select id,name as N,age, 111 from tb1; select * from tb1 where id = 1; select * from tb1 where id > 1; select * from tb1 where id != 1; select * from tb1 where name="wupeiqi" and password="123";
4.2 Python代码操作
增,删,改需要
coommit()差需要fetch
fetchone()fetchall()
import pymysql

# 连接MySQL,自动执行 use userdb; -- 进入数据库
conn = pymysql.connect(host='127.0.0.1', port=3306, user='root', passwd='root123', charset="utf8", db='userdb')
cursor = conn.cursor()


# 1.新增(需commit)
"""
cursor.execute("insert into tb1(name,password) values('武沛齐','123123')")
conn.commit()
"""

# 2.删除(需commit)
"""
cursor.execute("delete from tb1 where id=1")
conn.commit()
"""

# 3.修改(需commit)
"""
cursor.execute("update tb1 set name='xx' where id=1")
conn.commit()
"""

# 4.查询
"""
cursor.execute("select * from tb where id>10")
data = cursor.fetchone() # cursor.fetchall()
print(data)
"""

# 关闭连接
cursor.close()
conn.close()
其实在真正做项目开发时,流程如下:
- 第一步:根据项目的功能来设计相应的 数据库 & 表结构(不会经常变动,在项目设计之初就确定好了)。
- 第二步:操作表结构中的数据,已达到实现业务逻辑的目的。
例如:实现一个 用户管理系统。
先使用MySQL自带的客户端创建相关 数据库和表结构(相当于先创建好Excel结构)。
create database usersdb default charset utf8 collate utf8_general_ci;create table users(
id int not null primary key auto_increment,
name varchar(32),
password varchar(64)
)default charset=utf8;再在程序中执行编写相应的功能实现 注册、登录 等功能。
import pymysql


def register():
    print("用户注册")

    user = input("请输入用户名:") # alex
    password = input("请输入密码:") # sb

    # 连接指定数据
    conn = pymysql.connect(host='127.0.0.1', port=3306, user='root', passwd='root123', charset="utf8", db="usersdb")
    cursor = conn.cursor()

    # 执行SQL语句(有SQL注入风险,稍后讲解)
    # sql = 'insert into users(name,password)values("alex","sb")'
    sql = 'insert into users(name,password) values("{}","{}")'.format(user, password)

    cursor.execute(sql)
    conn.commit()

    # 关闭数据库连接
    cursor.close()
    conn.close()

    print("注册成功,用户名:{},密码:{}".format(user, password))


def login():
    print("用户登录")

    user = input("请输入用户名:")
    password = input("请输入密码:")

    # 连接指定数据
    conn = pymysql.connect(host='127.0.0.1', port=3306, user='root', passwd='root123', charset="utf8", db="usersdb")
    cursor = conn.cursor()

    # 执行SQL语句(有SQL注入风险,稍后讲解)
    # sql = select * from users where name='wupeiqi' and password='123'
    sql = "select * from users where name='{}' and password='{}'".format(user, password)
    cursor.execute(sql)

    result = cursor.fetchone() # 去向mysql获取结果
    # None
    # (1,wupeiqi,123)


    # 关闭数据库连接
    cursor.close()
    conn.close()

    if result:
        print("登录成功", result)
    else:
        print("登录失败")


def run():
    choice = input("1.注册;2.登录")
    if choice == '1':
        register()
    elif choice == '2':
        login()
    else:
        print("输入错误")


if __name__ == '__main__':
    run()
So,你会发现, 在项目开发时,数据库 & 数据表 的操作其实就做那么一次,最最常写的还是 对数据行 的操作。
5.关于SQL注入
假如,你开发了一个用户认证的系统,应该用户登录成功后才能正确的返回相应的用户结果。
import pymysql

# 输入用户名和密码
user = input("请输入用户名:") # ' or 1=1 --
pwd = input("请输入密码:") # 123


conn = pymysql.connect(host='127.0.0.1', port=3306, user='root', passwd='root123', charset="utf8",db='usersdb')
cursor = conn.cursor()

# 基于字符串格式化来 拼接SQL语句
# sql = "select * from users where name='alex' and password='123'"
# sql = "select * from users where name='' or 1=1 -- ' and password='123'"
sql = "select * from users where name='{}' and password='{}'".format(user, pwd)
cursor.execute(sql)

result = cursor.fetchone()
print(result) # None,不是None

cursor.close()
conn.close()
如果用户在输入user时,输入了: ' or 1=1 -- ,这样即使用户输入的密码不存在,也会可以通过验证。
为什么呢?
因为在SQL拼接时,拼接后的结果是:
select * from users where name='' or 1=1 -- ' and password='123'注意:在MySQL中 -- 表示注释。
那么,在Python开发中 如何来避免SQL注入呢?
切记,SQL语句不要在使用python的字符串格式化,而是使用pymysql的execute方法。
import pymysql

# 输入用户名和密码
user = input("请输入用户名:")
pwd = input("请输入密码:")

conn = pymysql.connect(host='127.0.0.1', port=3306, user='root', passwd='root123', charset="utf8", db='userdb')

cursor = conn.cursor()

cursor.execute("select * from users where name=%s and password=%s", [user, pwd])
# 或
# cursor.execute("select * from users where name=%(n1)s and password=%(n2)s", {"n1": user, 'n2': pwd})

result = cursor.fetchone()
print(result)

cursor.close()
conn.close()
总结
除了 【第5步 用户授权】以外,现在使用的是默认root账户(拥有最大权限),上述所有的过程已讲解完毕。
本节内容大家需要掌握:
- 安装和启动MySQL
- SQL语句:
- 数据库操作
- 表操作
- 数据行操作
- 基于Python操作MySQL
- 注意SQL注入的问题
作业
根据要求 创建表 结构并编写相应的SQL语句(基于MySQL自带客户端操作)
列名 类型 备注 id int 不为空 & 自增 & 主键 name varchar(32) 不为空 password varchar(64) 不为空 gender char(1) 不为空,支持:男、女 email varchar(64) 可以为空 amount decimal(10,2) 不为空 & 默认值为 0 ctime datetime 新增时的时间
提示:可基于datetime模块实现根据上述表的要求创建相应的数据和表结构(注意编码)。
任意插入5条数据。
将
id>3的所有人的性别改为 男。查询余额
amount>1000的所有用户。让每个人的余额在自己原的基础上 +1000 。
删除性别为男的所有数据。
通过Python代码实现上述除了第一个以外的操作。
插入5条数据时,ctime那一列不要自己写“2021-11-11.。。” 而是使用datatime模块生成当前时间。
编写脚本实现将 csv 文件的内容录入到 MySQL 数据库中。 要求:自己创建一个自增列作为主键(不要用csv文件中的第一列作为主键)。
1715046,河北大学取消考试学生紧急离校,老师:回不了家的到老师家过年,https://video.pearvideo.com/mp4/adshort/20210105/cont-1715046-15562045_adpkg-ad_hd.mp4
1715020,重庆两口子因琐事吵架,男子怒将自家车推进涪江,https://video.pearvideo.com/mp4/adshort/20210105/cont-1715020-15561817_adpkg-ad_hd.mp4
1715031,成都九峰山因雪景引游客暴增,致垃圾遍地野猴觅食,https://video.pearvideo.com/mp4/adshort/20210105/cont-1715031-15561980_adpkg-ad_hd.mp4
1715014,女子子宫摘除32年后CT报告称未见异常,医生:贴的模版忘删了,https://video.pearvideo.com/mp4/adshort/20210105/cont-1715014-15561686_adpkg-ad_hd.mp4
1715025,监控画面曝光!甘肃天水一公交车与救护车相撞后坠桥,https://video.pearvideo.com/mp4/adshort/20210105/cont-1715025-15561875_adpkg-ad_hd.mp4
1715010,男子称退伍后发现被贷款100万:征信逾期数十次,非自己签名,https://video.pearvideo.com/mp4/adshort/20210105/cont-1715010-15561845_adpkg-ad_hd.mp4
1715007,东北老交警零下43度执勤落下老寒腿:穿2斤重棉裤,已习以为常,https://video.pearvideo.com/mp4/adshort/20210105/cont-1715007-15561958_adpkg-ad_hd.mp4
1715011,女教师公寓熟睡被同事弟弟连砍数刀:全身刀疤,不敢告诉父母,https://video.pearvideo.com/mp4/adshort/20210105/cont-1715011-15561664_adpkg-ad_hd.mp4
1714970,网曝江西一村庄现两千平违建,房主回应:建给村里当文化中心,https://video.pearvideo.com/mp4/adshort/20210105/cont-1714970-15561752_adpkg-ad_hd.mp4
1715006,河南一新建足球场内惊现坟墓,官方:会尽快迁坟,https://video.pearvideo.com/mp4/adshort/20210105/cont-1715006-15561679_adpkg-ad_hd.mp4
1715009,老师收到毕业24年学生送的定制台历:他高考失利,我开导过,https://video.pearvideo.com/mp4/adshort/20210105/cont-1715009-15561658_adpkg-ad_hd.mp4
1715000,尚德机构回应未兑现宝马奖励:名单仍在确认中,会负责到底,https://video.pearvideo.com/mp4/adshort/20210105/cont-1715000-15561545_adpkg-ad_hd.mp4
1714993,沈阳重点管控区日常产90吨生活垃圾,重点疫点垃圾由专人运走,https://video.pearvideo.com/mp4/adshort/20210105/cont-1714993-15561434_adpkg-ad_hd.mp4
1714995,消费者称遭移动外呼10088套路换套餐,客服致歉:口径有问题,https://video.pearvideo.com/mp4/adshort/20210105/cont-1714995-1427-174135_adpkg-ad_hd.mp4
1714979,泪流满面!武警相隔两千公里与妻子隔屏举行婚礼,https://video.pearvideo.com/mp4/adshort/20210105/cont-1714979-15561542_adpkg-ad_hd.mp4
1714992,村民结婚两男子拄拐上门要钱:给少了不走,反问"咋拿得出手",https://video.pearvideo.com/mp4/adshort/20210105/cont-1714992-15561429_adpkg-ad_hd.mp4
1714457,36年嫌疑人:儿女被骂“杀人犯的孩子”,不想把骂名带进棺材,https://video.pearvideo.com/mp4/adshort/20210105/cont-1714457-1491-170515_adpkg-ad_hd.mp4
1714981,男子偷手机被发现挣脱失主逃跑,执勤辅警狂追八百米擒获,https://video.pearvideo.com/mp4/adshort/20210105/cont-1714981-99-172939_adpkg-ad_hd.mp4
1714977,八旬老太捡拾垃圾成瘾,堆满楼道院子漫进邻居家,https://video.pearvideo.com/mp4/adshort/20210105/cont-1714977-15561306_adpkg-ad_hd.mp4
1714972,昆明一楼盘消防喷淋离地仅2米1,业主吐槽:直接当喷头用,https://video.pearvideo.com/mp4/adshort/20210105/cont-1714972-15561247_adpkg-ad_hd.mp4
1714973,居民家浓烟弥漫邻居敲门不应,民警赶来一看是屋主在熏腊肉,https://video.pearvideo.com/mp4/adshort/20210105/cont-1714973-15561249_adpkg-ad_hd.mp4
1714966,石家庄有超市停业,学校紧急放假,学生:下午考试被临时取消,https://video.pearvideo.com/mp4/adshort/20210105/cont-1714966-15561248_adpkg-ad_hd.mp4
1714902,杭州地铁7号线施工大揭秘:940天完成近40公里地铁线,https://video.pearvideo.com/mp4/adshort/20210105/cont-1714902-15561394_adpkg-ad_hd.mp4
1714928,沈阳已设置重点管控区域,大连志愿者挨家挨户配送生活物资,https://video.pearvideo.com/mp4/adshort/20210105/cont-1714928-15561018_adpkg-ad_hd.mp4
1714950,女孩考第一溺亡双胞胎姐姐不吃不喝,家属诉求:给予心理疏导,https://video.pearvideo.com/mp4/adshort/20210105/cont-1714950-15561100_adpkg-ad_hd.mp4
1714924,70万1针特效药降价,2岁患儿母亲哽咽:会拼全力救孩子,https://video.pearvideo.com/mp4/adshort/20210105/cont-1714924-58-162201_adpkg-ad_hd.mp4
1714930,贵州大叔嫁女陪嫁28万现金和一套房:儿子结婚只花了十几万,https://video.pearvideo.com/mp4/adshort/20210105/cont-1714930-15561017_adpkg-ad_hd.mp4
1714927,张家口云顶滑雪场通报一滑雪者摔倒身亡:警方已介入,https://video.pearvideo.com/mp4/adshort/20210105/cont-1714927-15560963_adpkg-ad_hd.mp4
1714926,邢台全面进入战时状态,小区进出需要健康码,https://video.pearvideo.com/mp4/adshort/20210105/cont-1714926-15560829_adpkg-ad_hd.mp4
1714918,石家庄多个小区采取封闭管理:发现阳性检测者,全员核酸检测,https://video.pearvideo.com/mp4/adshort/20210105/cont-1714918-15560835_adpkg-ad_hd.mp4
1714693,兰大女生当兵2年后重返校园:学会自律,珍惜在校时光,https://video.pearvideo.com/mp4/adshort/20210105/cont-1714693-15560791_adpkg-ad_hd.mp4
1714920,猴哥尝到投喂甜头赖老太家不走,逗鸡毁菜气到村民报警,https://video.pearvideo.com/mp4/adshort/20210105/cont-1714920-15560793_adpkg-ad_hd.mp4
1714916,沈阳确诊出车司机搭载的抚顺3名乘客全部找到,核酸均为阴性,https://video.pearvideo.com/mp4/adshort/20210105/cont-1714916-15560758_adpkg-ad_hd.mp4
1714894,轿车被48米建筑垃圾围堵三个月,车主无法用车叫苦不迭,https://video.pearvideo.com/mp4/adshort/20210105/cont-1714894-15560731_adpkg-ad_hd.mp4
1714861,考第一被质疑后溺亡女孩同学:她自尊心强,曾说被怀疑作弊,https://video.pearvideo.com/mp4/adshort/20210105/cont-1714861-15560701_adpkg-ad_hd.mp4
1714886,东北汉子冲进火场救人被熏成黑脸:差几秒,我就倒在里面了,https://video.pearvideo.com/mp4/adshort/20210105/cont-1714886-15560659_adpkg-ad_hd.mp4
1714908,探访石家庄疫情高风险地区:部分村庄封村,外村人一律不让进,https://video.pearvideo.com/mp4/adshort/20210105/cont-1714908-15560638_adpkg-ad_hd.mp4
1714906,“北京时间”产生于西安,科学家解读选址考量因素,https://video.pearvideo.com/mp4/adshort/20210105/cont-1714906-15560549_adpkg-ad_hd.mp4
1714907,16人聚餐吃了800元无人结账,老板询问反遭怼:多大点事儿,https://video.pearvideo.com/mp4/adshort/20210105/cont-1714907-15560637_adpkg-ad_hd.mp4
1714892,重庆一地铁站出口建在坡顶,居民:期待未来的变化,https://video.pearvideo.com/mp4/adshort/20210105/cont-1714892-15560550_adpkg-ad_hd.mp4
1714900,河北南宫一小区发现高度疑似密接人员,小区全面封闭只进不出,https://video.pearvideo.com/mp4/adshort/20210105/cont-1714900-15560548_adpkg-ad_hd.mp4
1714901,杭州运河边8平米小书摊开了13年,店主兼职拉货补贴,https://video.pearvideo.com/mp4/adshort/20210105/cont-1714901-15560544_adpkg-ad_hd.mp4
1714877,河南商丘鹦鹉卖家被追刑责,养殖户:不敢卖不敢放,放也犯法,https://video.pearvideo.com/mp4/adshort/20210105/cont-1714877-15560499_adpkg-ad_hd.mp4
1714895,石家庄小果庄村1天增加8例确诊病例,为全国唯一高风险地区,https://video.pearvideo.com/mp4/adshort/20210105/cont-1714895-15560459_adpkg-ad_hd.mp4
1714801,48岁女教师重新高考学法律:直接进入老年生活是种损失,https://video.pearvideo.com/mp4/adshort/20210105/cont-1714801-15560352_adpkg-ad_hd.mp4
1714873,不认失散聋哑儿夫妻已接走儿子,养父:两验DNA,归属没说清,https://video.pearvideo.com/mp4/adshort/20210105/cont-1714873-15560356_adpkg-ad_hd.mp4
1714846,7岁男童煤气中毒脑死亡,父母含泪为其捐器官救同龄人,https://video.pearvideo.com/mp4/adshort/20210105/cont-1714846-15560326_adpkg-ad_hd.mp4
1714875,连夜出发!衡水110名护士紧急集结支援中风险地区,https://video.pearvideo.com/mp4/adshort/20210105/cont-1714875-15560268_adpkg-ad_hd.mp4
1713843,打满全场丨院感专家李素英回忆援鄂:90后00后医护最让我感动,https://video.pearvideo.com/mp4/adshort/20210104/cont-1713843-15559433_adpkg-ad_hd.mp4
1714869,河北新增14例确诊30例无症状,石家庄一村庄调整为高风险地区,https://video.pearvideo.com/mp4/adshort/20210105/cont-1714869-15560218_adpkg-ad_hd.mp4
1714862,应急部披露襄汾饭店坍塌致29死细节:8次违规扩建,监管不严,https://video.pearvideo.com/mp4/adshort/20210105/cont-1714862-15560157_adpkg-ad_hd.mp4
必备SQL和表关系及授权
课程目标:掌握开发中最常见的SQL语句和表关系及授权相关知识点。
课程概要:
- 必备SQL(8个必备)
- 表关系
- 授权
必备SQL语句
上一节讲解了最基础SQL语句:增删改查,其实在日常的开发中还有很多必备的SQL语句。
这一部分的SQL语句都是围绕着对 表中的数据进行操作的。
提示:今天的所有操作我都只会在 MySQL自带的客户端工具上进行操作。
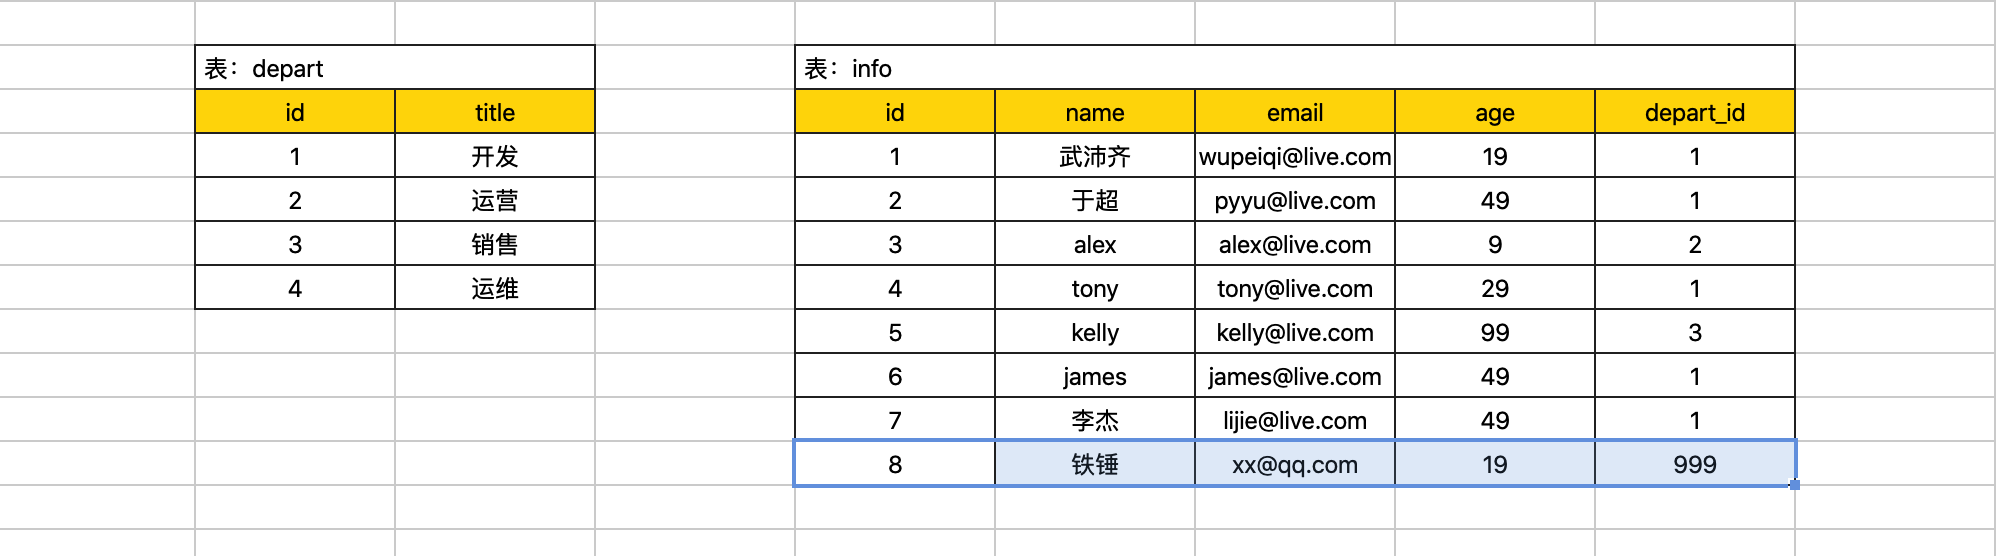
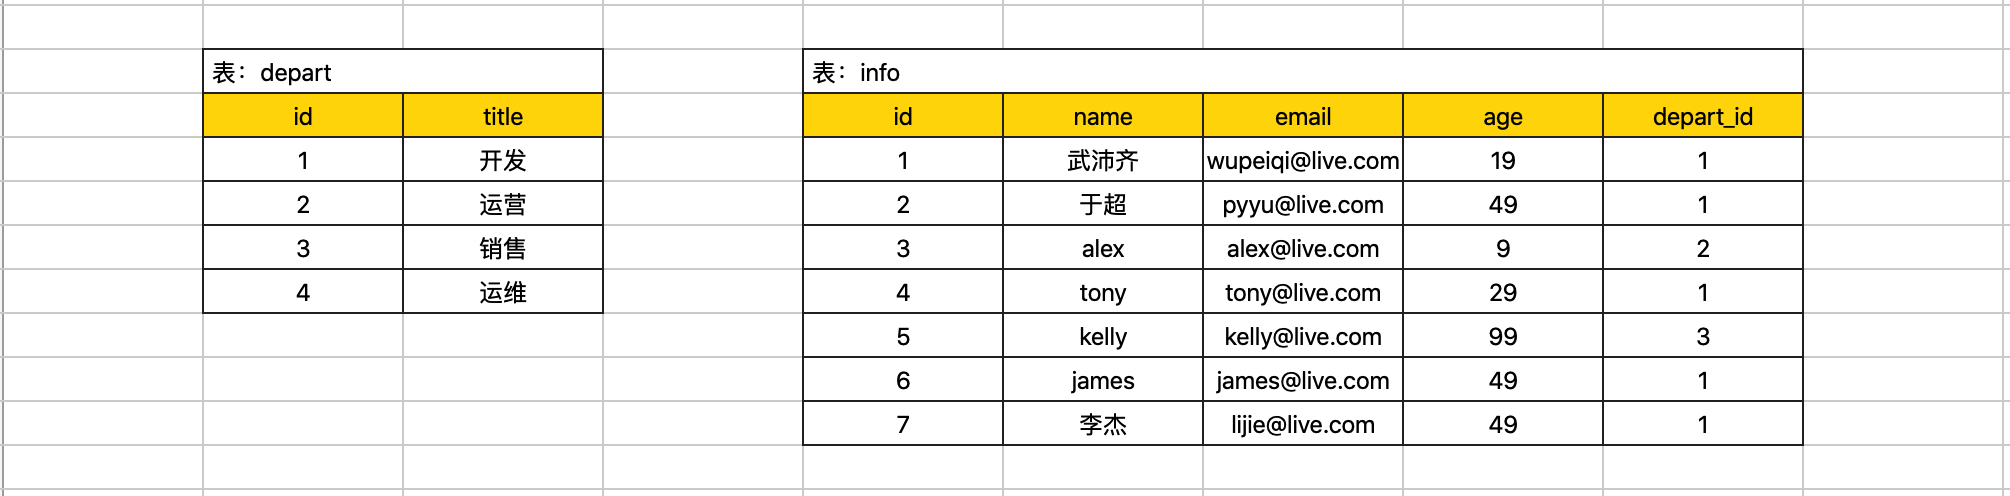
例如:现在创建如下两张表。
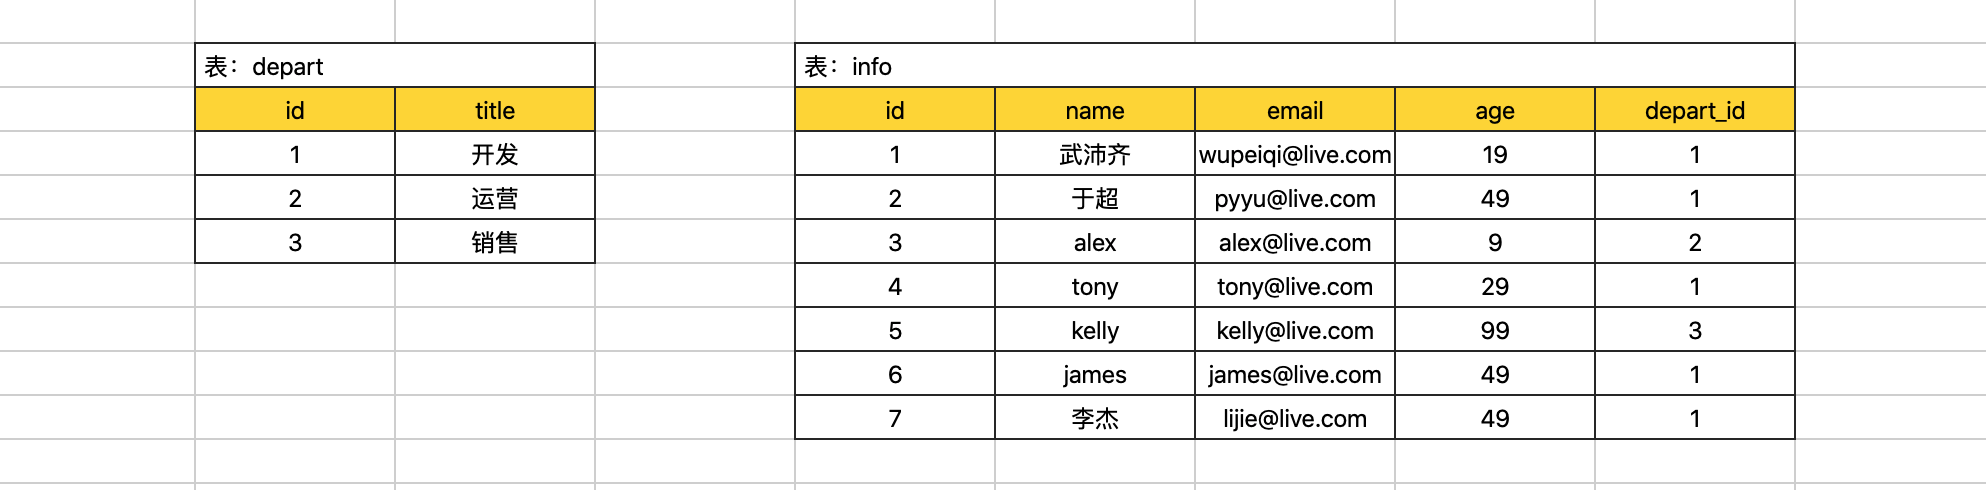
create database day26db default charset utf8 collate utf8_general_ci;create table depart(
id int not null auto_increment primary key,
title varchar(16) not null
)default charset=utf8;
create table info(
id int not null auto_increment primary key,
name varchar(16) not null,
email varchar(32) not null,
age int,
depart_id int
)default charset=utf8;insert into depart(title) values("开发"),("运营"),("销售");
insert into info(name,email,age,depart_id) values("武沛齐","wupeiqi@live.com",19,1);
insert into info(name,email,age,depart_id) values("于超","pyyu@live.com",49,1);
insert into info(name,email,age,depart_id) values("alex","alex@live.com",9,2);
insert into info(name,email,age,depart_id) values("tony","tony@live.com",29,1);
insert into info(name,email,age,depart_id) values("kelly","kelly@live.com",99,3);
insert into info(name,email,age,depart_id) values("james","james@live.com",49,1);
insert into info(name,email,age,depart_id) values("李杰","lijie@live.com",49,1);条件(where)
根据条件搜索结果。
select * from info where age > 30;
select * from info where id > 1;
select * from info where id = 1;
select * from info where id >= 1;
select * from info where id != 1;
select * from info where id between 2 and 4;   -- id大于等于2、且小于等于4

select * from info where name = '武沛齐' and age = 19;
select * from info where name = 'alex' or age = 49;
select * from info where (name = '李杰' or email="pyyu@live.com")  and age=49;

select * from info where id in (1,4,6);
select * from info where id not in (1,4,6);
select * from info where id in (select id from depart);
# select * from info where id in (1,2,3);

# exists() 返回True 或 False
select * from info where exists (select * from depart where id=5);
select * from info where not exists (select * from depart where id=5);

#as的用法要会用!!!
select * from (select * from info where id>2) as T where age > 10;select * from info where info.id > 10;
select * from info where id > 10;sql的正则表达
-- 波浪号后面加正则表达式
select * from customer
where status_cd ~ '^[A-F]'
通配符( % 和 _ )
一般用于模糊搜索。
%         代表n个字符
_         代表1个字符
like      语法
select * from info where name like "%沛%";
select * from info where name like "%沛";
select * from info where email like "%@live.com";
select * from info where name like "武%齐";
select * from info where name like "k%y";
select * from info where email like "wupeiqi%";


select * from info where email like "_@live.com";
select * from info where email like "_upeiqi@live.com";
select * from info where email like "__peiqi@live.com";
select * from info where email like "__peiqi_live.co_";
注意:数量少,数据量大的搜索。
映射(as,条件判断)
想要获取的列。
select * from info;

select id, name				from info;
select id, name as NM 		from info;
select id, name as NM, 123  from info;
注意:少些select * ,自己需求。

select
	id,
	name,
	666 as num,
	( select max(id) from depart ) as mid, -- max/min/sum
	( select min(id) from depart) as nid, -- max/min/sum
	age
from info;select
id,
name,
( select title from depart where depart.id=info.depart_id) as x1
from info;
# 注意:效率很低
select
id,
name,
( select title from depart where depart.id=info.depart_id) as x1,
( select title from depart where depart.id=info.id) as x2
from info;#条件判断
select
id,
name,
case depart_id when 1 then "第1部门" end v1
from info;
select
id,
name,
case depart_id when 1 then "第1部门" else "其他" end v2
from info;
select
id,
name,
case depart_id when 1 then "第1部门" end v1,
case depart_id when 1 then "第1部门" else "其他" end v2,
case depart_id when 1 then "第1部门" when 2 then "第2部门" else "其他" end v3,
case when age<18 then "少年" end v4,
case when age<18 then "少年" else "油腻男" end v5,
case when age<18 then "少年" when age<30 then "青年" else "油腻男" end v6
from info;排序(order by)
select * from info order by age desc; -- 倒序
select * from info order by age asc;  -- 顺序

select * from info order by id desc;
select * from info order by id asc;
select * from info order by age asc,id desc; -- 优先按照age从小到大;如果age相同则按照id从大到小。


select * from info where id>10 order by age asc,id desc;
select * from info where id>6 or name like "%y" order by age asc,id desc;
取部分(limit)
一般要用于获取部分数据。
#感觉limit不和order by一起用的话没啥意义

select * from info limit 5;   										-- 获取前5条数据
select * from info order by id desc limit 3;						-- 先排序,再获取前3条数据
select * from info where id > 4 order by id desc limit 3;			-- 先排序,再获取前3条数据


select * from info limit 3 offset 2;	-- 从位置2开始,向后获取前3数据
数据库表中:1000条数据。
- 第一页:
select * from info limit 10 offset 0; - 第二页:
select * from info limit 10 offset 10; - 第三页:
select * from info limit 10 offset 20; - 第四页:
select * from info limit 10 offset 30;
分组(group by)
分组必聚合,不然分组没意义,聚合的条件不是where,而是having!!!
select age,max(id),min(id),count(id),sum(id),avg(id) from info group by age;select age,count(1) from info group by age;select depart_id,count(id) from info group by depart_id;#聚合条件是having!!!
select depart_id,count(id) from info group by depart_id having count(id) > 2;select count(id) from info;
select max(id) from info;select age,max(id),min(id),sum(id),count(id) from info group by age;select age,name from info group by age; -- 不建议
select * from info where id in (select max(id) from info group by age);select age,count(id) from info group by age having count(id) > 2;
select age,count(id) from info where id > 4 group by age having count(id) > 2; -- 聚合条件放在having后面到目前为止SQL执行顺序:
where
group by
having
order by
limitselect age,count(id) from info where id > 2 group by age having count(id) > 1 order by age desc limit 1;
- 要查询的表info
- 条件 id>2
- 根据age分组
- 对分组后的数据再根据聚合条件过滤 count(id)>1
- 根据age从大到小排序
- 获取第1条join连表
inner join 取交集
- join 是 inner join 的简写,取交集。所以不存在字段为None
left join 是 left outer join 的简写,取并集。
- 以左边表为准,左边表的数据全部都在
- 右边的表的字段如果不存在就为None
full outer join,取并集。
- 全部数据都必须在,没有的字段就显示None
sql-- レシート明細データ(receipt)から、売上日数の多い顧客の上位10件を抽出したデータと、売上金額合計の多い顧客の上位10件を抽出したデータをそれぞれ作成し、さらにその2つを完全外部結合せよ。ただし、非会員(顧客IDが"Z"から始まるもの)は除外すること。 with come_days_table as ( select customer_id, count(distinct sales_ymd) as come_days from receipt where customer_id not like 'Z%' group by customer_id order by come_days desc limit 10 ), amount_table as ( select customer_id, sum(amount) as sum_amount from receipt where customer_id not like 'Z%' group by customer_id order by sum_amount desc limit 10 ) select coalesce(c.customer_id,a.customer_id), c.come_days, a.sum_amount from come_days_table c full outer JOIN amount_table a on c.customer_id = a.customer_id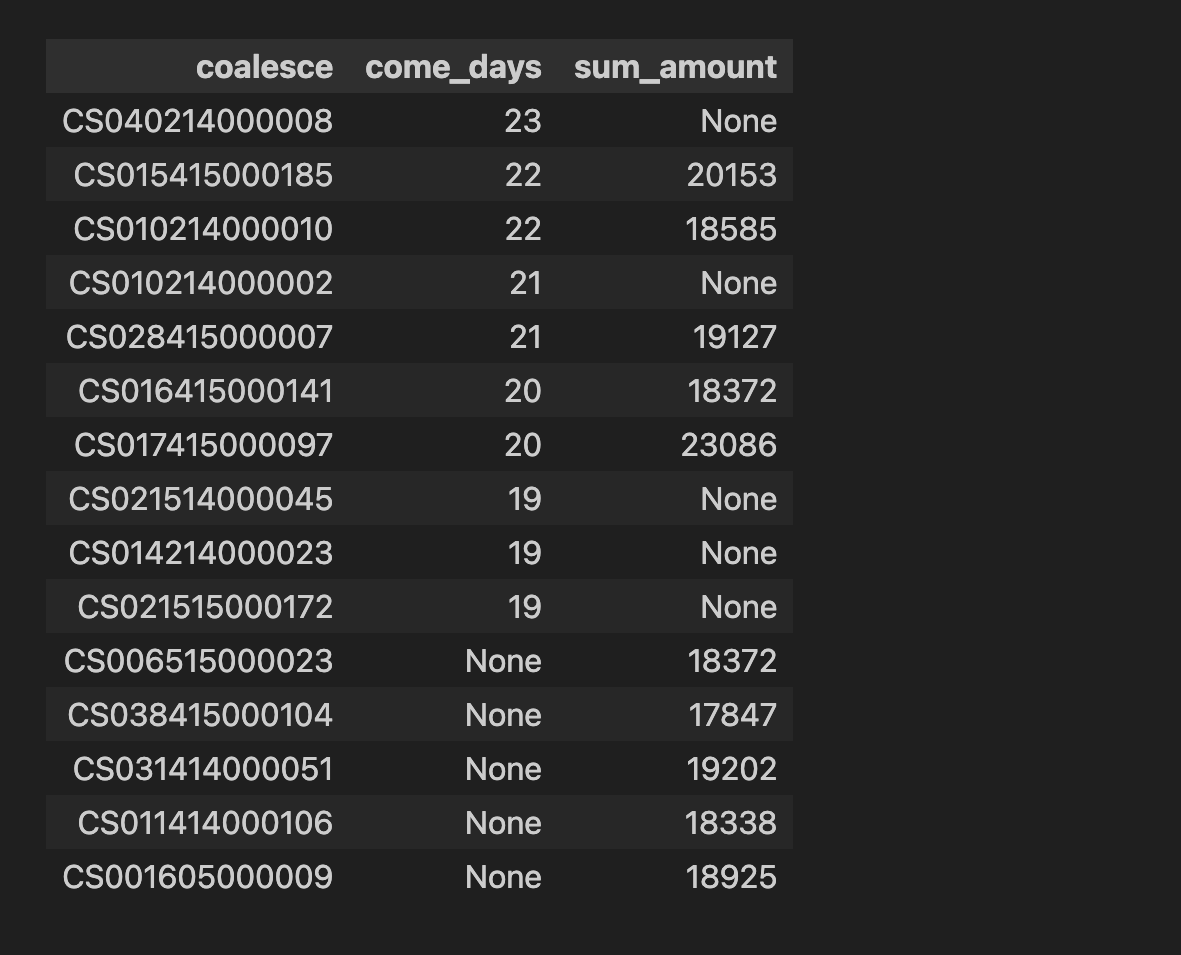
Cross join
- 它返回连接操作的两个表的笛卡尔积。换句话说,它将第一个表的每一行与第二个表的每一行进行组合,生成的结果包含了两个表中所有可能的组合。
多个表可以连接起来进行查询。
left join
展示用户信息&部门名称:
主表 left outer join 从表 on 主表.x = 从表.idselect * from info left outer join depart on info.depart_id = depart.id;select info.id,info.name,info.email,depart.title from info left outer join depart on info.depart_id = depart.id;从表 right outer join 主表 on 主表.x = 从表.idselect info.id,info.name,info.email,depart.title from info right outer join depart on info.depart_id = depart.id;为了更加直接的查看效果,我们分别在 depart 表 和 info 中额外插入一条数据。
insert into depart(title) values("运维");这样一来主从表就有区别:
info主表,就以info数据为主,depart为辅。
sqlselect info.id,info.name,info.email,depart.title from info left outer join depart on info.depart_id = depart.id;depart主表,,就以depart数据为主,info为辅。
sqlselect info.id,info.name,info.email,depart.title from info right outer join depart on info.depart_id = depart.id;
select * from info left outer join depart on ....
select * from depart left outer join info on ....简写:select * from depart left join info on ....
-- 内连接:    表  inner join 表  on 条件
select * from info inner join depart on info.depart_id=depart.id;

+----+-----------+------------------+------+-----------+----+--------+
| id | name      | email            | age  | depart_id | id | title  |
+----+-----------+------------------+------+-----------+----+--------+
|  1 | 武沛齐    | wupeiqi@live.com |   19 |         1 |  1 | 开发   |
|  2 | 于超      | pyyu@live.com    |   49 |         1 |  1 | 开发   |
|  3 | alex      | alex@live.com    |    9 |         2 |  2 | 运营   |
|  4 | tony      | tony@live.com    |   29 |         1 |  1 | 开发   |
|  5 | kelly     | kelly@live.com   |   99 |         3 |  3 | 销售   |
|  6 | james     | james@live.com   |   49 |         1 |  1 | 开发   |
|  7 | 李杰      | lijie@live.com   |   49 |         1 |  1 | 开发   |
+----+-----------+------------------+------+-----------+----+--------+
到目前为止SQL执行顺序:
join
on
where
group by
having
order by
limit写在最后:多张表也可以连接。
join (比left join简单)
- field 之前不用写表名
- 只有on的位置需要写明表名
select mdate,teamname from eteam join game
on game.team1 = eteam.id
where coach = 'Fernando Santos';

-- 其中mdate,teamname分别来自两张不同的表
1.8 联合,上下连表(union)
concat(axis=0)的意思
select id,title from depart
union
select id,name from info;


select id,title from depart
union
select email,name from info;
-- 列数需相同select id from depart
union
select id from info;
-- 自动去重select id from depart
union all
select id from info;
-- 保留所有Distinct 的用法
DISTINCT 用于从查询结果中去除重复的行,以确保结果集中每一行都是唯一的。
SELECT DISTINCT column1, column2 FROM table_name;ALL
我們可以用ALL 這個詞對一個列表進行>=或>或<或<=充當比較。例如,你可以用此查詢找到世界上最大的國家(以人口計算):
select name from world
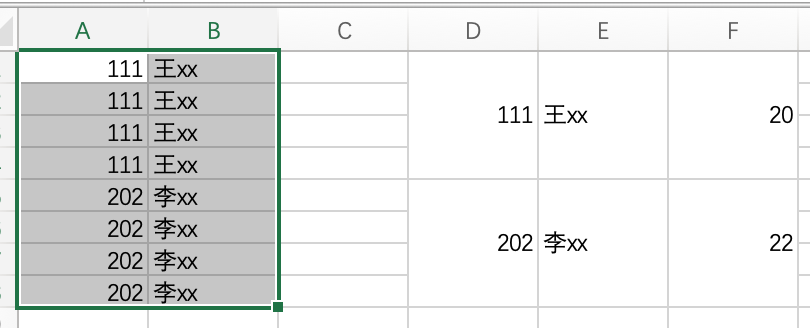
where population >= all(select population from world );group_concat() 函数(暂时不太会用)
- 聚合函数
- 相当于excel的合并单元格
- 分组必聚合,聚合就是要把同组数据搞到一行
- 搞到一行有两种方式:
- 压缩成一行:avg(),max()之类的
- 合并单元格成一行:把多行相同的合并成一行,如下图。group_concat()就是这原理。
coalesce()
COALESCE函数是SQL中的一个函数,它返回其参数中的第一个非空表达式。它通常用于处理查询中的空值,通过替换它们为默认值或备选表达式来实现。
SELECT COALESCE(列名, '默认值') AS 别名
FROM 表名;

select coalesce(mobile,'13010101010') from teacher;
小结
到目前为止,你已经掌握了如下相关指令(SQL语句):
- 数据库
- 数据表
- 数据行
- 增加
- 删除
- 修改
- 查询(各种变着花样的查询)
表关系
在开发项目时,需要根据业务需求去创建很多的表结构,以此来实现业务逻辑,一般表结构有三类:
单表,单独一张表就可以将信息保存。
一对多,需要两张表来存储信息,且两张表存在
一对多或多对一关系。多对多,需要三张表来存储信息,两张单表 + 关系表,创造出两个单表之间
多对多关系。

在上述的表:一对多的 info.depart_id字段、多对多的 boy_girl.boy_id 、girl_id 直接用整型存储就可以,因为他们只要存储关联表的主键ID即可。
在开发中往往还会为他们添加一个 外键约束,保证某一个列的值必须是其他表中的特定列已存在的值,例如:info.depart_id的值必须是 depart.id中已存在的值。
一对多示例:
create table depart(
	id int not null auto_increment primary key,
    title varchar(16) not null
)default charset=utf8;


create table info(
	id int not null auto_increment primary key,
    name varchar(16) not null,
    email varchar(32) not null,
    age int,
    depart_id int not null,
    constraint fk_info_depart foreign key (depart_id) references depart(id)
)default charset=utf8;
如果表结构已创建好了,额外想要增加外键:
alter table info add constraint fk_info_depart foreign key info(depart_id) references depart(id);删除外键:
alter table info drop foreign key fk_info_depart;多对多示例:

create table boy(
	id int not null auto_increment primary key,
    name varchar(16) not null
)default charset=utf8;

create table girl(
	id int not null auto_increment primary key,
    name varchar(16) not null
)default charset=utf8;


create table boy_girl(
	id int not null auto_increment primary key,
    boy_id int not null,
    girl_id int not null,
    constraint fk_boy_girl_boy foreign key boy_girl(boy_id) references boy(id),
    constraint fk_boy_girl_girl foreign key boy_girl(girl_id) references girl(id)
)default charset=utf8;
如果表结构已创建好了,额外想要增加外键:
alter table boy_girl add constraint fk_boy_girl_boy foreign key boy_girl(boy_id) references boy(id);
alter table boy_girl add constraint fk_boy_girl_girl foreign key boy_girl(girl_id) references girl(id);
删除外键:
alter table info drop foreign key fk_boy_girl_boy;
alter table info drop foreign key fk_boy_girl_girl;
在以后项目开发时,设计表结构及其关系的是一个非常重要的技能。一般项目开始开发的步骤:
- 需求调研
- 设计数据库表结构(根据需求)
- 项目开发(写代码)
大量的工作应该放在前2个步骤,前期的设计完成之后,后续的功能代码开发就比较简单了。
案例:简易版路飞学城
create database luffy default charset utf8 collate utf8_general_ci;

use luffy;create table info(
id int not null auto_increment primary key,
username varchar(16) not null,
mobile char(11) not null,
password varchar(64) not null
)default charset=utf8;create table course(
id int not null auto_increment primary key,
title varchar(16) not null
)default charset=utf8;
create table module(
id int not null auto_increment primary key,
title varchar(16) not null,
course_id int not null,
constraint fk_module_course foreign key (course_id) references course(id)
)default charset=utf8;
create table day(
id int not null auto_increment primary key,
title varchar(16) not null,
module_id int not null,
constraint fk_day_module foreign key (module_id) references module(id)
)default charset=utf8;
create table video(
id int not null auto_increment primary key,
title varchar(16) not null,
day_id int not null,
constraint fk_video_day foreign key (day_id) references day(id)
)default charset=utf8;create table module_record(
id int not null auto_increment primary key,
user_id int not null,
module_id int not null,
constraint fk_user_id foreign key module_record(user_id) references info(id),
constraint fk_module_id foreign key module_record(module_id) references module(id)
)default charset=utf8;授权
之前我们无论是基于Python代码 or 自带客户端 去连接MySQL时,均使用的是 root 账户,拥有对MySQL数据库操作的所有权限。
如果有多个程序的数据库都放在同一个MySQL中,如果程序都用root账户就存在风险了。
这种情况怎么办呢?
在MySQL中支持创建账户,并给账户分配权限,例如:只拥有数据库A操作的权限、只拥有数据库B中某些表的权限、只拥有数据库B中某些表的读权限等。
用户管理
在MySQL的默认数据库 mysql 中的 user 表中存储着所有的账户信息(含账户、权限等)。
select user,authentication_string,host from mysql.user;mysql> show databases;
+--------------------+
| Database |
+--------------------+
| information_schema |
| day26 |
| mysql |
| performance_schema |
| sys |
+--------------------+
10 rows in set (0.00 sec)
mysql> select user,authentication_string,host from mysql.user;
+----------------------------------+-------------------------------------------+-------------------------------+
| user | authentication_string | host |
+----------------------------------+-------------------------------------------+-------------------------------+
| root | *FAAFFE644E901CFAFAEC7562415E5FAEC243B8B2 | localhost |
| mysql.session | *THISISNOTAVALIDPASSWORDTHATCANBEUSEDHERE | localhost |
| mysql.sys | *THISISNOTAVALIDPASSWORDTHATCANBEUSEDHERE | localhost |
+----------------------------------+-------------------------------------------+-------------------------------+
3 rows in set (0.00 sec)创建和删除用户
create user '用户名'@'连接者的IP地址' identified by '密码';sqlcreate user wupeiqi1@127.0.0.1 identified by 'root123'; drop user wupeiqi1@127.0.0.1; create user wupeiqi2@'127.0.0.%' identified by 'root123'; drop user wupeiqi2@'127.0.0.%'; create user wupeiqi3@'%' identified by 'root123'; drop user wupeiqi3@'%'; create user 'wupeiqi4'@'%' identified by 'root123'; drop user 'wupeiqi4'@'%';修改用户
rename user '用户名'@'IP地址' to '新用户名'@'IP地址';sqlrename user wupeiqi1@127.0.0.1 to wupeiqi1@localhost; rename user 'wupeiqi1'@'127.0.0.1' to 'wupeiqi1'@'localhost';修改密码
set password for '用户名'@'IP地址' = Password('新密码')sqlset password for 'wupeiqi4'@'%' = Password('123123');
授权管理
创建好用户之后,就可以为用户进行授权了。
授权
grant 权限 on 数据库.表 to '用户'@'IP地址'sqlgrant all privileges on *.* TO 'wupeiqi'@'localhost'; -- 用户wupeiqi拥有所有数据库的所有权限 grant all privileges on day26.* TO 'wupeiqi'@'localhost'; -- 用户wupeiqi拥有数据库day26的所有权限 grant all privileges on day26.info TO 'wupeiqi'@'localhost'; -- 用户wupeiqi拥有数据库day26中info表的所有权限 grant select on day26.info TO 'wupeiqi'@'localhost'; -- 用户wupeiqi拥有数据库day26中info表的查询权限 grant select,insert on day26.* TO 'wupeiqi'@'localhost'; -- 用户wupeiqi拥有数据库day26所有表的查询和插入权限 grant all privileges on day26db.* to 'wupeiqi4'@'%'; 注意:flush privileges; -- 将数据读取到内存中,从而立即生效。对于权限
all privileges 除grant外的所有权限 select 仅查权限 select,insert 查和插入权限 ... usage 无访问权限 alter 使用alter table alter routine 使用alter procedure和drop procedure create 使用create table create routine 使用create procedure create temporary tables 使用create temporary tables create user 使用create user、drop user、rename user和revoke all privileges create view 使用create view delete 使用delete drop 使用drop table execute 使用call和存储过程 file 使用select into outfile 和 load data infile grant option 使用grant 和 revoke index 使用index insert 使用insert lock tables 使用lock table process 使用show full processlist select 使用select show databases 使用show databases show view 使用show view update 使用update reload 使用flush shutdown 使用mysqladmin shutdown(关闭MySQL) super 使用change master、kill、logs、purge、master和set global。还允许mysqladmin调试登陆 replication client 服务器位置的访问 replication slave 由复制从属使用对于数据库和表
数据库名.*            数据库中的所有
数据库名.表名          指定数据库中的某张表
数据库名.存储过程名     指定数据库中的存储过程
*.*                  所有数据库
查看授权
show grants for '用户'@'IP地址'sqlshow grants for 'wupeiqi'@'localhost'; show grants for 'wupeiqi4'@'%';取消授权
revoke 权限 on 数据库.表 from '用户'@'IP地址'sqlrevoke ALL PRIVILEGES on day26.* from 'wupeiqi'@'localhost'; revoke ALL PRIVILEGES on day26db.* from 'wupeiqi4'@'%'; 注意:flush privileges; -- 将数据读取到内存中,从而立即生效。
一般情况下,在很多的 正规 公司,数据库都是由 DBA 来统一进行管理,DBA为每个项目的数据库创建用户,并赋予相关的权限。
索引

课程目标:了解MySQL中索引、函数、存储过程、函数、触发器、视图等知识点。
课程概要:
- 索引
- 函数
- 存储过程
- 视图
- 触发器
索引
在数据库中索引最核心的作用是:加速查找。 例如:在含有300w条数据的表中查询,无索引需要700秒,而利用索引可能仅需1秒。
索引的基本作用
- 加速查找数据
- 约束数据形式
mysql> select * from big where password="81f98021-6927-433a-8f0d-0f5ac274f96e";
+----+---------+---------------+--------------------------------------+------+
| id | name    | email         | password                             | age  |
+----+---------+---------------+--------------------------------------+------+
| 11 | wu-13-1 | w-13-1@qq.com | 81f98021-6927-433a-8f0d-0f5ac274f96e |    9 |
+----+---------+---------------+--------------------------------------+------+
1 row in set (0.70 sec)

mysql> select * from big where id=11;
+----+---------+---------------+--------------------------------------+------+
| id | name    | email         | password                             | age  |
+----+---------+---------------+--------------------------------------+------+
| 11 | wu-13-1 | w-13-1@qq.com | 81f98021-6927-433a-8f0d-0f5ac274f96e |    9 |
+----+---------+---------------+--------------------------------------+------+
1 row in set (0.00 sec)

mysql> select * from big where name="wu-13-1";
+----+---------+---------------+--------------------------------------+------+
| id | name    | email         | password                             | age  |
+----+---------+---------------+--------------------------------------+------+
| 11 | wu-13-1 | w-13-1@qq.com | 81f98021-6927-433a-8f0d-0f5ac274f96e |    9 |
+----+---------+---------------+--------------------------------------+------+
1 row in set (0.00 sec)
在开发过程中会为哪些 经常会被搜索的列 创建索引,以提高程序的响应速度。例如:查询手机号、邮箱、用户名等。
索引原理(B+Tree)
为什么加上索引之后速度能有这么大的提升呢? 因为索引的底层是基于B+Tree的数据结构存储的。


很明显,如果有了索引结构的查询效率比表中逐行查询的速度要快很多且数据量越大越明显。
B+Tree结构连接:https://www.cs.usfca.edu/~galles/visualization/BPlusTree.html
b+tree最顶点的数是怎么决定的

索引优缺点
- 优点:查询速度快。
- 比如在64个数据中查询只要4次就可以找到,2**4=64。
- 但不加索引就挨个查,需要64次。
- 缺点:增加,删除,修改数据时就会变慢,因为b+tree的结构要整个改变
- 所以只在频繁查询的列加索引,不经常查询的列加索引就有影响性能了。
索引和引擎
数据库的索引是基于上述B+Tree的数据结构实现,但在创建数据库表时,如果指定不同的引擎,底层使用的B+Tree结构的原理有些不同。
myisam引擎,非聚簇索引(数据 和 索引结构 分开存储)
innodb引擎,聚簇索引(数据 和 主键索引结构存储在一起)
非聚簇索引(mysiam引擎)
create table 表名(
    id int not null auto_increment primary key,
    name varchar(32) not null,
    age int
)engine=myisam default charset=utf8;
聚簇索引(innodb引擎)
基本用这个,支持事务、行级锁、外键之类的功能
create table 表名(
    id int not null auto_increment primary key,
    name varchar(32) not null,
    age int
)engine=innodb default charset=utf8;
为id创建的索引
为name这列创建的索引(辅助索引),name最后指向主键id再,通过主键id找到对应数据。
在MySQL文件存储中的体现:
root@192 userdb # pwd
/usr/local/mysql/data/userdb     #MySQL中存储用户数据库的数据文件目录的路径
root@192 userdb # ls -l
total 1412928
 #innodb引擎相关的表文件
-rw-r-----  1 _mysql  _mysql       8684 May 15 22:51 big.frm,表结构。
-rw-r-----  1 _mysql  _mysql  717225984 May 15 22:51 big.ibd,数据和索引结构。
-rw-r-----  1 _mysql  _mysql       8588 May 16 11:38 goods.frm
-rw-r-----  1 _mysql  _mysql      98304 May 16 11:39 goods.ibd
 #myisam引擎相关的表文件
-rw-r-----  1 _mysql  _mysql       8586 May 26 10:57 t2.frm,表结构
-rw-r-----  1 _mysql  _mysql          0 May 26 10:57 t2.MYD,数据
-rw-r-----  1 _mysql  _mysql       1024 May 26 10:57 t2.MYI,索引结构
上述 聚簇索引 和 非聚簇索引 底层均利用了B+Tree结构结构,只不过内部数据存储有些不同罢了。
在企业开发中一般都会使用 innodb 引擎(内部支持事务、行级锁、外键等特点),在MySQL5.5版本之后默认引擎也是innodb。
mysql> show create table users \G;
*************************** 1. row ***************************
       Table: users
Create Table: CREATE TABLE `users` (
  `id` int(11) NOT NULL AUTO_INCREMENT,
  `name` varchar(32) DEFAULT NULL,
  `password` varchar(64) DEFAULT NULL,
  `ctime` datetime DEFAULT NULL,
  `age` int(11) DEFAULT '5',
  PRIMARY KEY (`id`)
) ENGINE=InnoDB AUTO_INCREMENT=11 DEFAULT CHARSET=utf8
1 row in set (0.00 sec)

ERROR:
No query specified

mysql> show index from users \G;
*************************** 1. row ***************************
        Table: users
   Non_unique: 0
     Key_name: PRIMARY
 Seq_in_index: 1
  Column_name: id
    Collation: A
  Cardinality: 3
     Sub_part: NULL
       Packed: NULL
         Null:
   Index_type: BTREE   -- 虽然显示BTree,但底层数据结构基于B+Tree。
      Comment:
Index_comment:
1 row in set (0.00 sec)

ERROR:
No query specified

mysql>
innodb引擎,一般创建的索引:聚簇索引。
常见索引
在innodb引擎下,索引底层都是基于B+Tree数据结构存储(聚簇索引)。

在开发过程中常见的索引类型有3种:
- 主键索引:加速查找、不能为空、不能重复。
- 主键索引就俩作用:
- 加速查找
- 约束插入的数据不能为空、不能重复。
- 一个表只能有一个主键索引
- 多列有主键时,叫联合主键索引
- 唯一索引:加速查找、不能重复。
- 如果希望某一列的值是唯一的,就给他加唯一索引
- 一个表可以有多个唯一索引
- 多列有唯一索引时, 叫联合唯一索引
- 普通索引:加速查找。
- 只想加速查找,不需要约束时用普通索引
- 多列有普通索引时,叫联合索引
如何创建索引
单列创建和多列创建两种情况
主键索引和联合主键索引
添加索引
创建表结构前
-- 单列创建,省略写法
create table 表名(
    id int not null auto_increment primary key,   -- 主键
    name varchar(32) not null
);

-- 单列创建,完整写法
create table 表名(
    id int not null auto_increment,
    name varchar(32) not null,
    primary key(id)
);

-- 多列创建,称为联合主键(不常用且myisam引擎支持)
create table 表名(
    id int not null auto_increment,
    name varchar(32) not null,
    primary key(列1,列2)        -- 就这里多写俩列名字,贼简单
);
创建表结构后
-- 表结构创建好之后添加主键
alter table 表名 add primary key(列名);-- 表结构创建好之后删除主键
alter table 表名 drop primary key;注意:删除索引时可能会报错,自增列必须定义为键。
ERROR 1075 (42000): Incorrect table definition; there can be only one auto column and it must be defined as a key报错原因:
如果你想要一个自增列(auto-increment),它必须被定义为表的键。
现在把键删了,自增还存在,就会报上述错误。
解决方案:把自增也删掉。
sqlalter table 表 change id id int not null;
唯一索引和联合唯一索引
添加索引
创建表结构前
create table 表名(
    id int not null auto_increment primary key,
    name varchar(32) not null,
    email varchar(64) not null,
    unique ix_name (name),       -- 唯一索引,注意和联合唯一索引的区别,在下面写着
    unique ix_email (email),
);

create table 表名(
    id int not null auto_increment,
    name varchar(32) not null,
    unique (列1,列2)               -- 如果有多列,称为联合唯一索引。
);
创建表结构后
create unique index 索引名 on 表名(列名);drop unique index 索引名 on 表名;唯一索引和联合唯一索引的区别
- 唯一索引就是,对应列里的值不能重复。
- 联合唯一索引,对应的两个或多个列的组合值不能重复。比如手机和名字的联合唯一索引,名字或手机可以在列中出现重复值,但名字+手机就不能有重复值。
- 正确示例
| name | mobile |
|---|---|
| dahong | 13019164130 |
| dahong | 15212122561 |
- 错误示例
| name | mobile |
|---|---|
| dahong | 13019164130 |
| dahong | 13019164130 |
索引和联合索引
添加索引
创建表结构前
create table 表名(
    id int not null auto_increment primary key,
    name varchar(32) not null,
    email varchar(64) not null,
    index ix_email (email),
    index ix_name (name),
);

create table 表名(
    id int not null auto_increment primary key,
    name varchar(32) not null,
    email varchar(64) not null,
    index ix_email (name,email)     -- 如果有多列,称为联合索引。
);
创建表结构后
create index 索引名 on 表名(列名);drop index 索引名 on 表名;在项目开发的设计表结构的环节,大家需要根据业务需求的特点来决定是否创建相应的索引。
查看当前表的所有索引
show index from <table_name>
索引作业
案例:博客系统
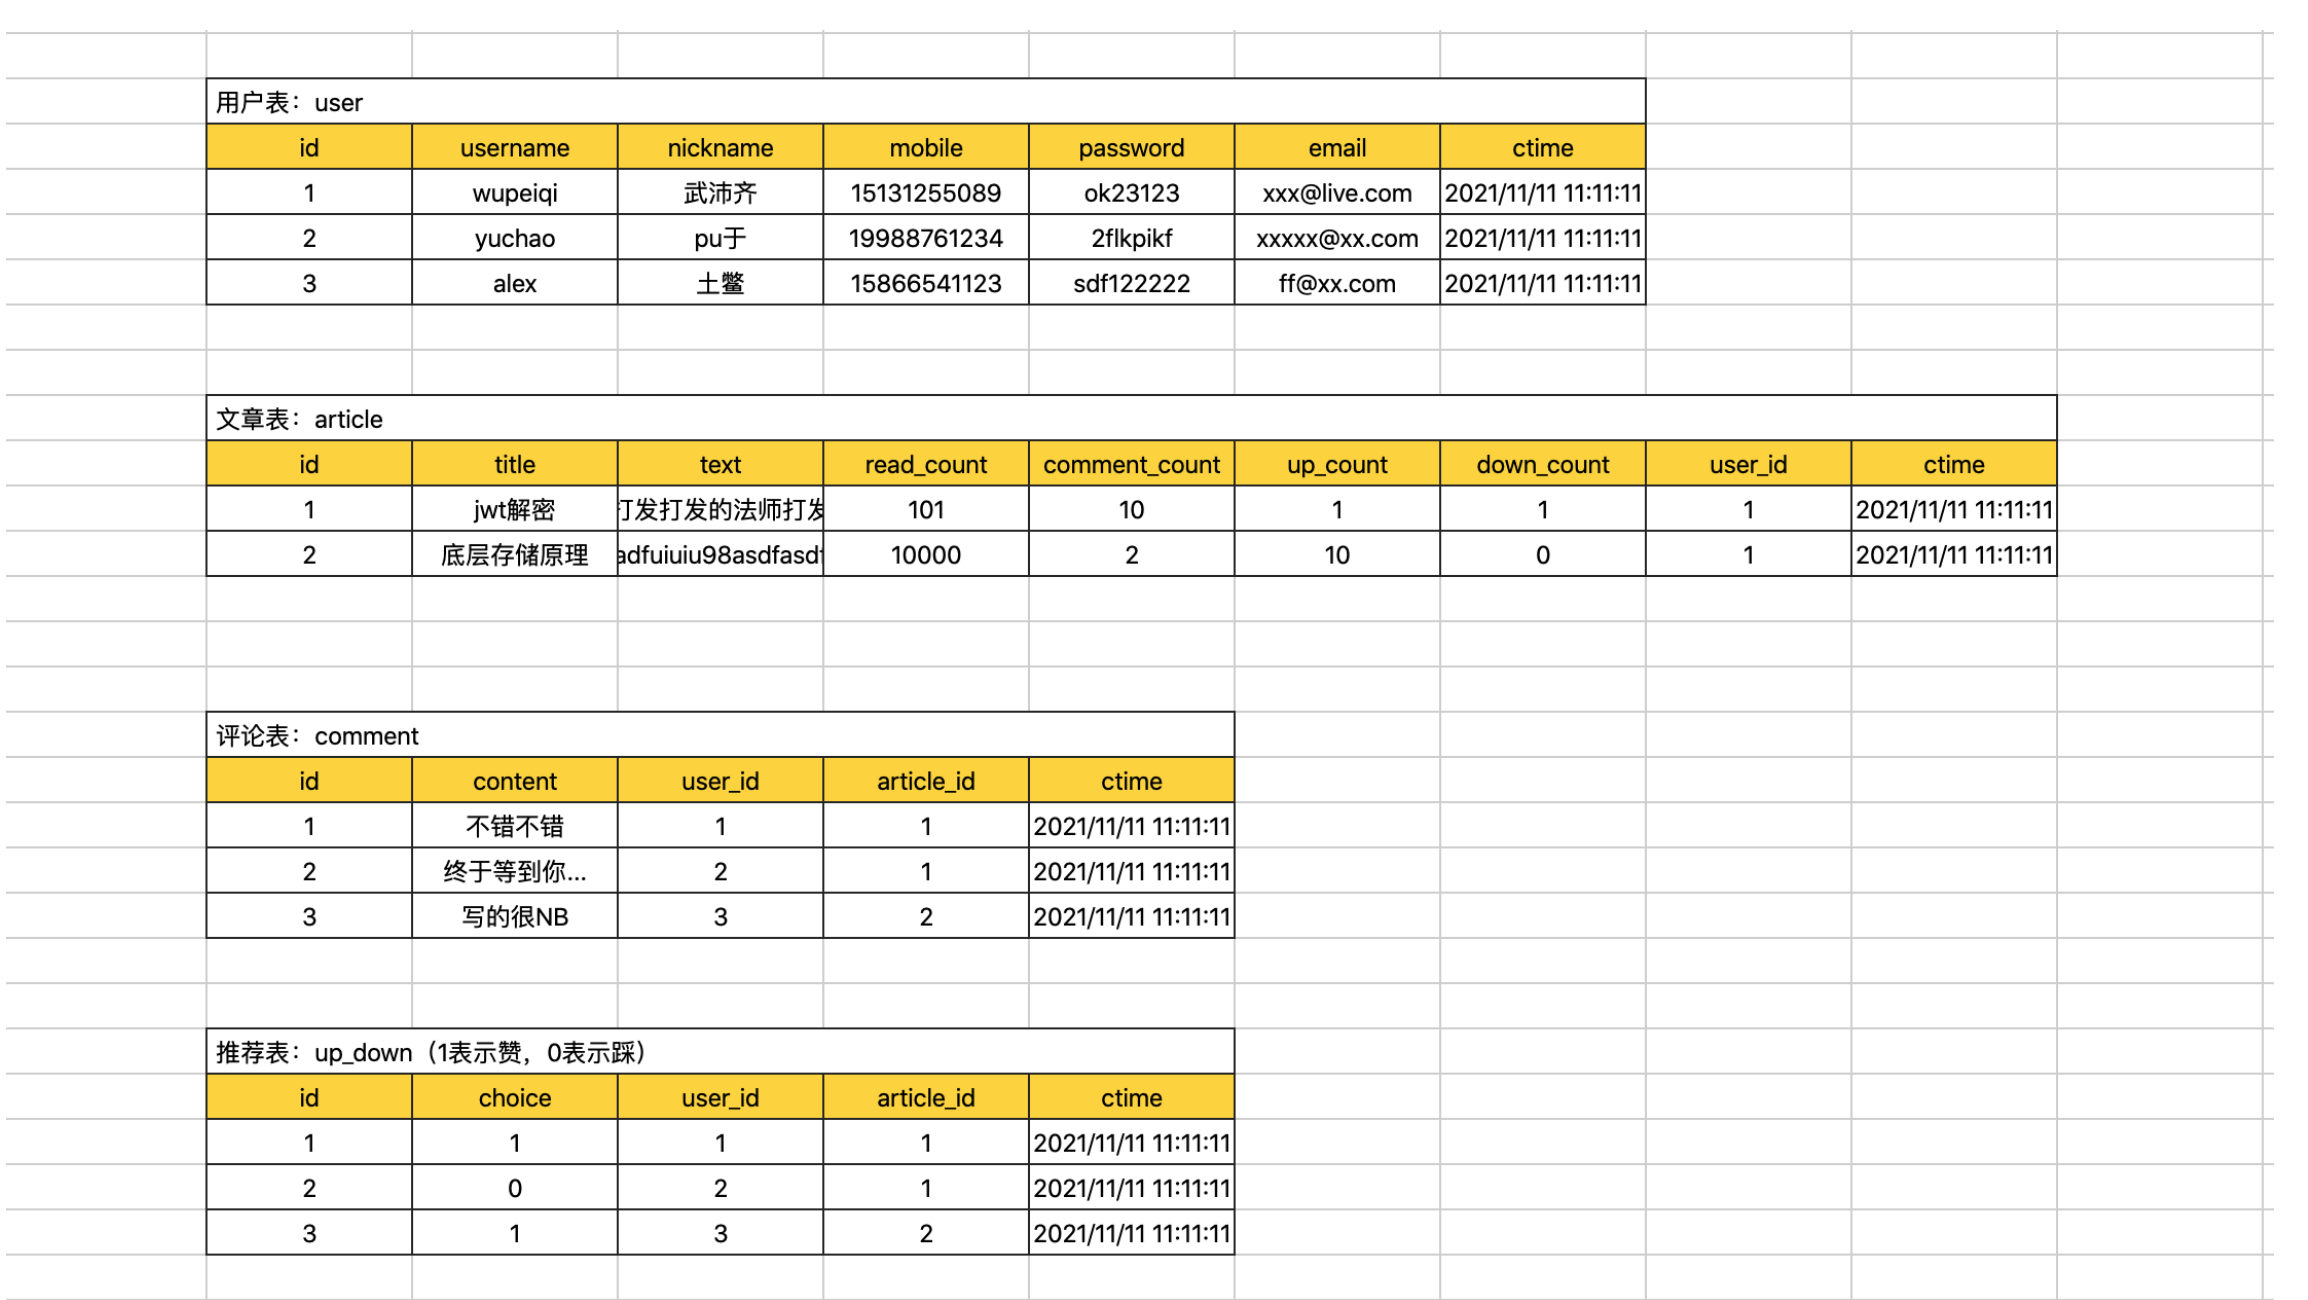
- 每张表id列都创建 自增 + 主键。
- 用户表
- 用户名 + 密码 创建联合索引。
- 手机号,创建唯一索引。
- 邮箱,创建唯一索引。
- 推荐表
- user_id和article_id创建联合唯一索引。
查询时一定要命中索引
在表中创建索引后,查询时一定要命中索引。
在数据库的表中创建索引之后优缺点如下:
- 优点:查找速度快、约束(唯一、主键、联合唯一)
- 缺点:插入、删除、更新速度比较慢,因为每次操作都需要调整整个B+Tree的数据结构关系。
所以,在表中不要无节制的去创建索引啊。。。
在开发中,我们会对表中经常被搜索的列创建索引,从而提高程序的响应速度。
CREATE TABLE `big` (
    `id` int(11) NOT NULL AUTO_INCREMENT,
    `name` varchar(32) DEFAULT NULL,
    `email` varchar(64) DEFAULT NULL,
    `password` varchar(64) DEFAULT NULL,
    `age` int(11) DEFAULT NULL,
    PRIMARY KEY (`id`),                       -- 主键索引
    UNIQUE KEY `big_unique_email` (`email`),  -- 唯一索引
    index `ix_name_pwd` (`name`,`password`)     -- 联合索引
) ENGINE=InnoDB DEFAULT CHARSET=utf8
一般情况下,我们针对只要通过索引列去搜搜都可以 命中 索引(通过索引结构加速查找)。
select * from big where id = 5;
select * from big where id > 5;
select * from big where email = "wupeiqi@live.com";
select * from big where name = "武沛齐";
select * from big where name = "kelly" and password="ffsijfs";
...
但是,还是会有一些特殊的情况,让我们无法命中索引(即使创建了索引),这也是需要大家在开发中要注意的。
类型不一致
sqlselect * from big where name = 123; -- 未命中 select * from big where email = 123; -- 未命中 特殊的主键: select * from big where id = "123"; -- 命中使用不等于
sqlselect * from big where name != "武沛齐"; -- 未命中 select * from big where email != "wupeiqi@live.com"; -- 未命中 特殊的主键: select * from big where id != 123; -- 命中or,当or条件中有未建立索引的列才失效。
sqlselect * from big where id = 123 or password="xx"; -- 未命中 select * from big where name = "wupeiqi" or password="xx"; -- 未命中 特别的: select * from big where id = 10 or password="xx" and name="xx"; -- 命中排序,当根据索引排序时候,选择的映射如果不是索引,则不走索引。
sqlselect * from big order by name asc; -- 未命中 select * from big order by name desc; -- 未命中 特别的主键: select * from big order by id desc; -- 命中like,模糊匹配时。
sqlselect * from big where name like "%u-12-19999"; -- 未命中 select * from big where name like "_u-12-19999"; -- 未命中 select * from big where name like "wu-%-10"; -- 未命中 特别的: select * from big where name like "wu-1111-%"; -- 命中 select * from big where name like "wuw-%"; -- 命中使用函数
sqlselect * from big where reverse(name) = "wupeiqi"; -- 未命中 特别的: select * from big where name = reverse("wupeiqi"); -- 命中最左前缀,如果是联合索引,要遵循最左前缀原则。
sql如果联合索引为:(name,password) name and password -- 命中 name -- 命中 password -- 未命中 name or password -- 未命中
常见的无法命中索引的情况就是上述的示例。
对于大家来说会现在的最大的问题是,记不住,哪怎么办呢?接下来看执行计划。
我一整个大疑问
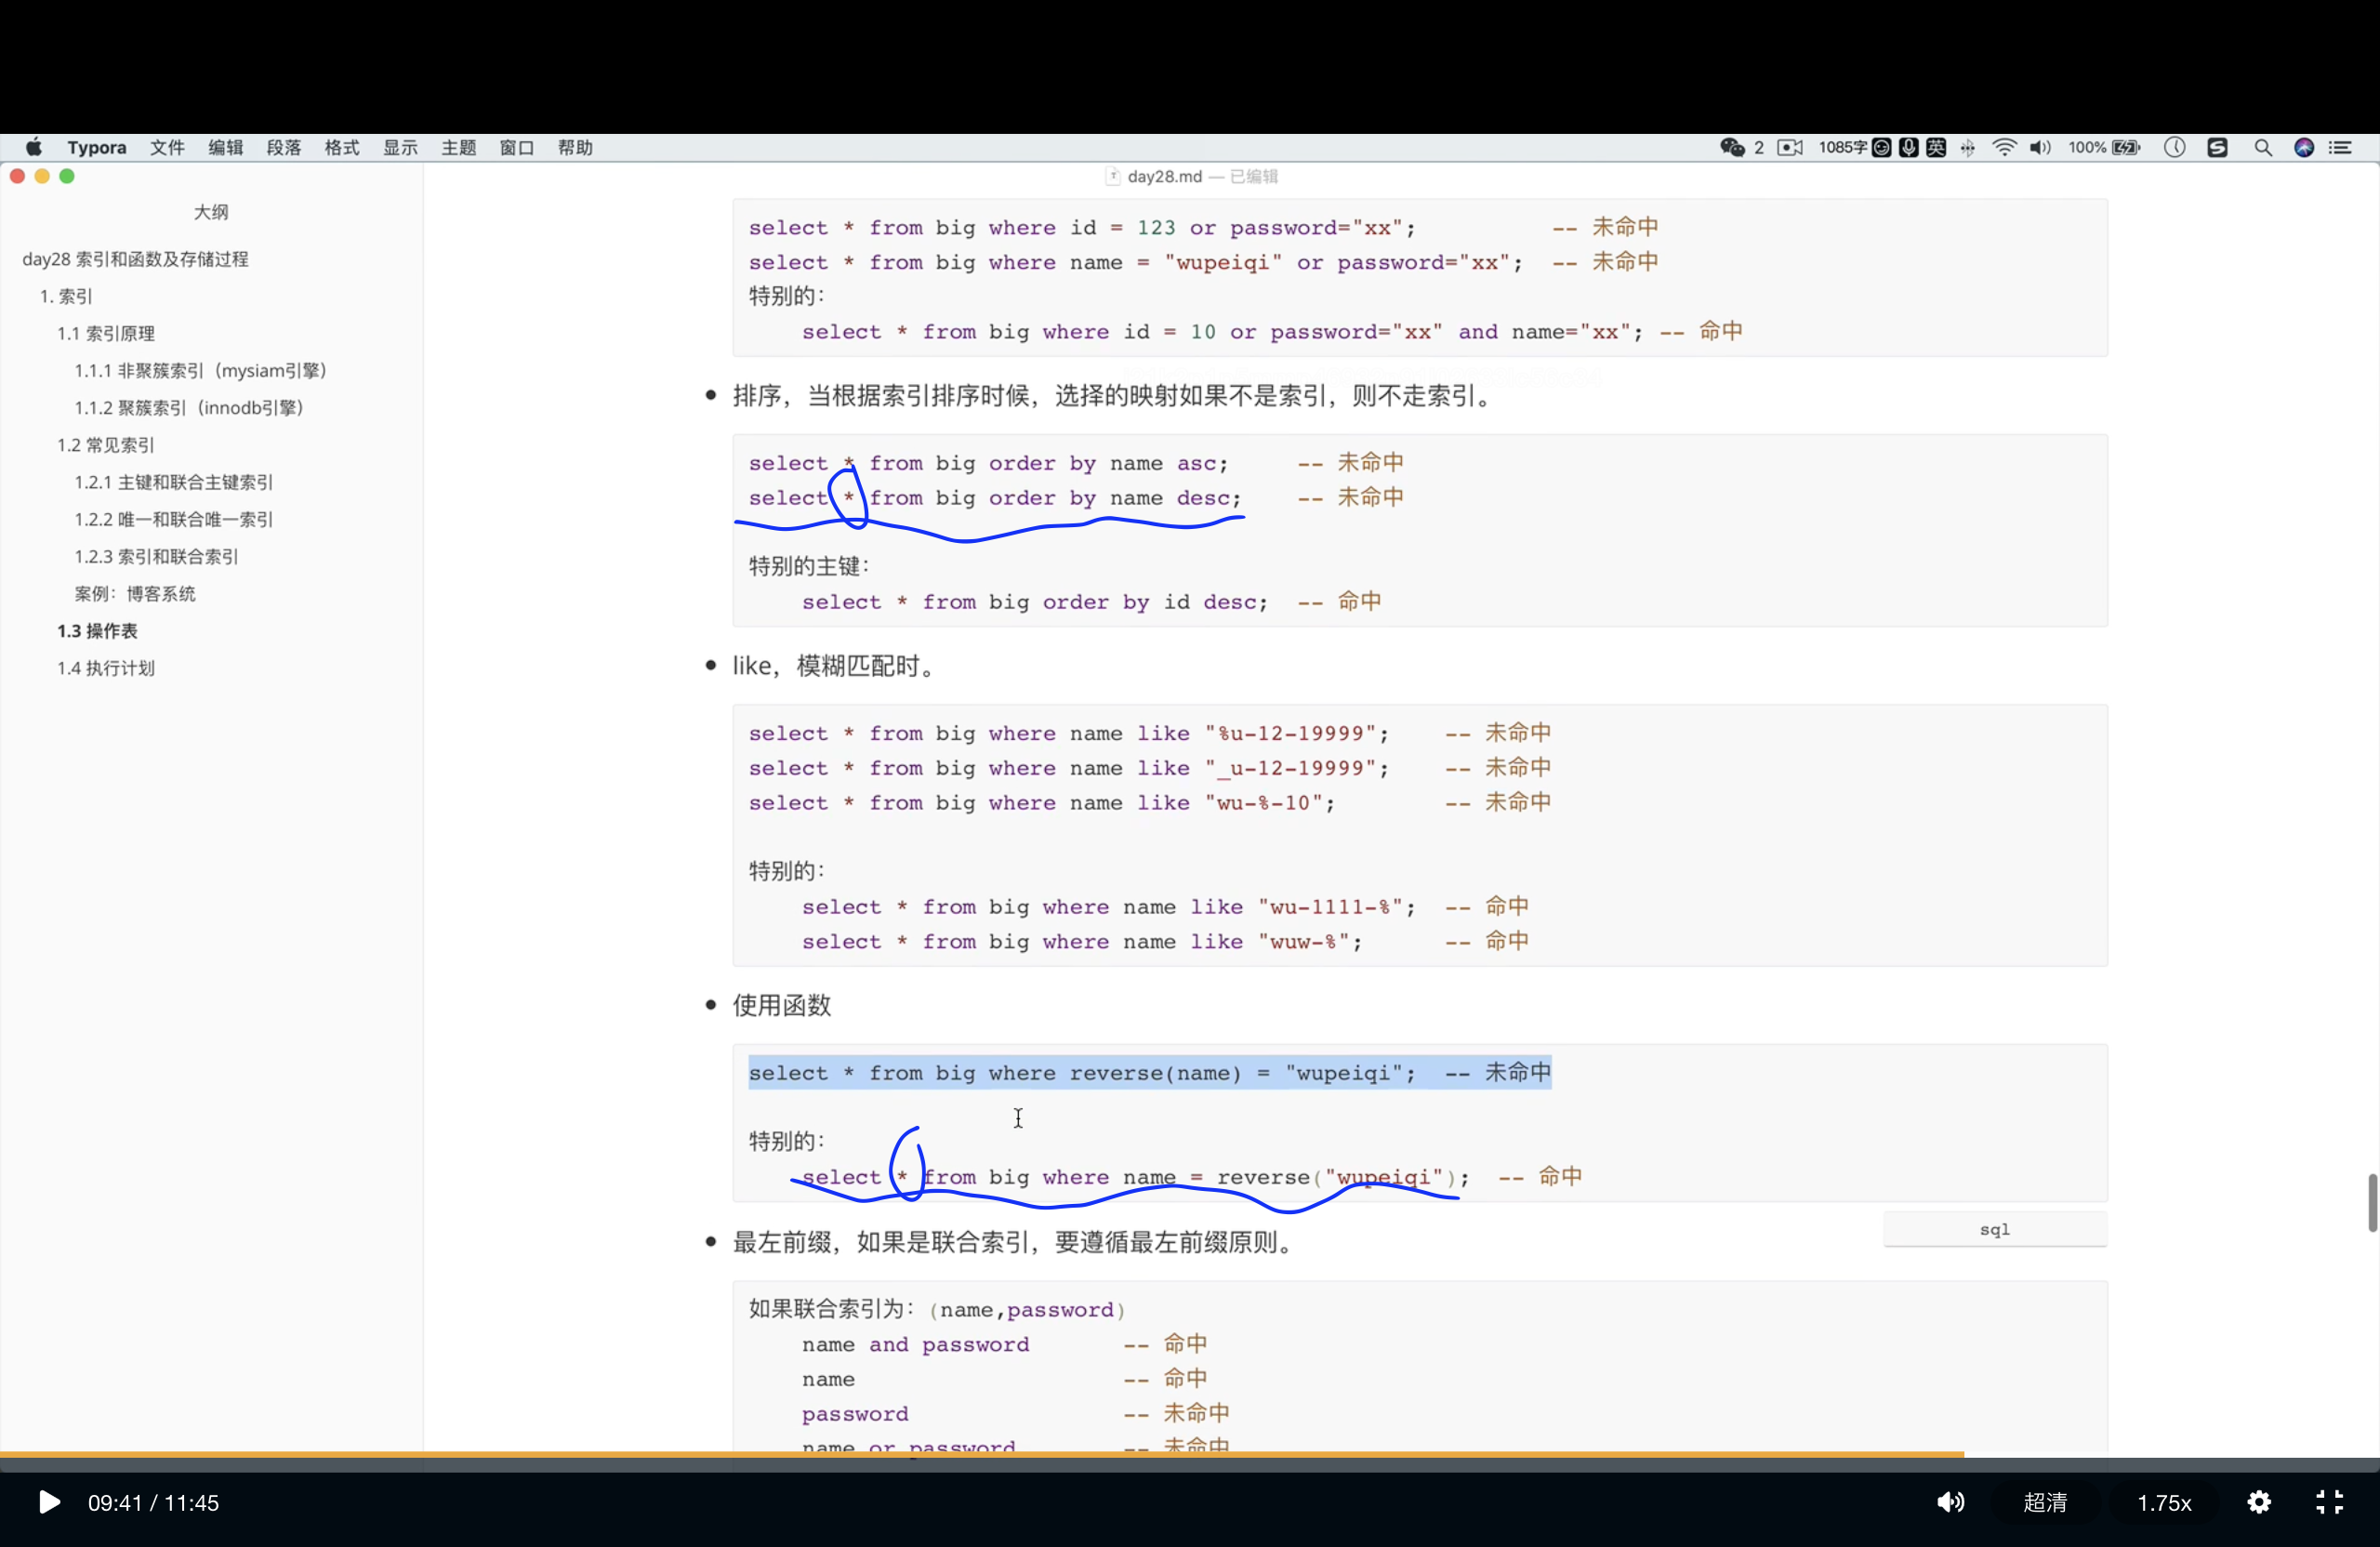
- 画蓝线那两行,都给name列设置了普通索引,用于加速查询
- 但是第一行order by name 就没命中索引
- 第二行 where name = xxx就命中了
- 原因:explain计划,下一节会讲
- 菩提老开的笔记:https://www.cnblogs.com/Neeo/articles/13644285.html
- 菩提老开的解释:


elplain计划(咋看查询速度快慢)
MySQL中提供了执行计划,让你能够预判SQL的执行(只能给到一定的参考,不一定完全能预判准确)。
explain + SQL语句;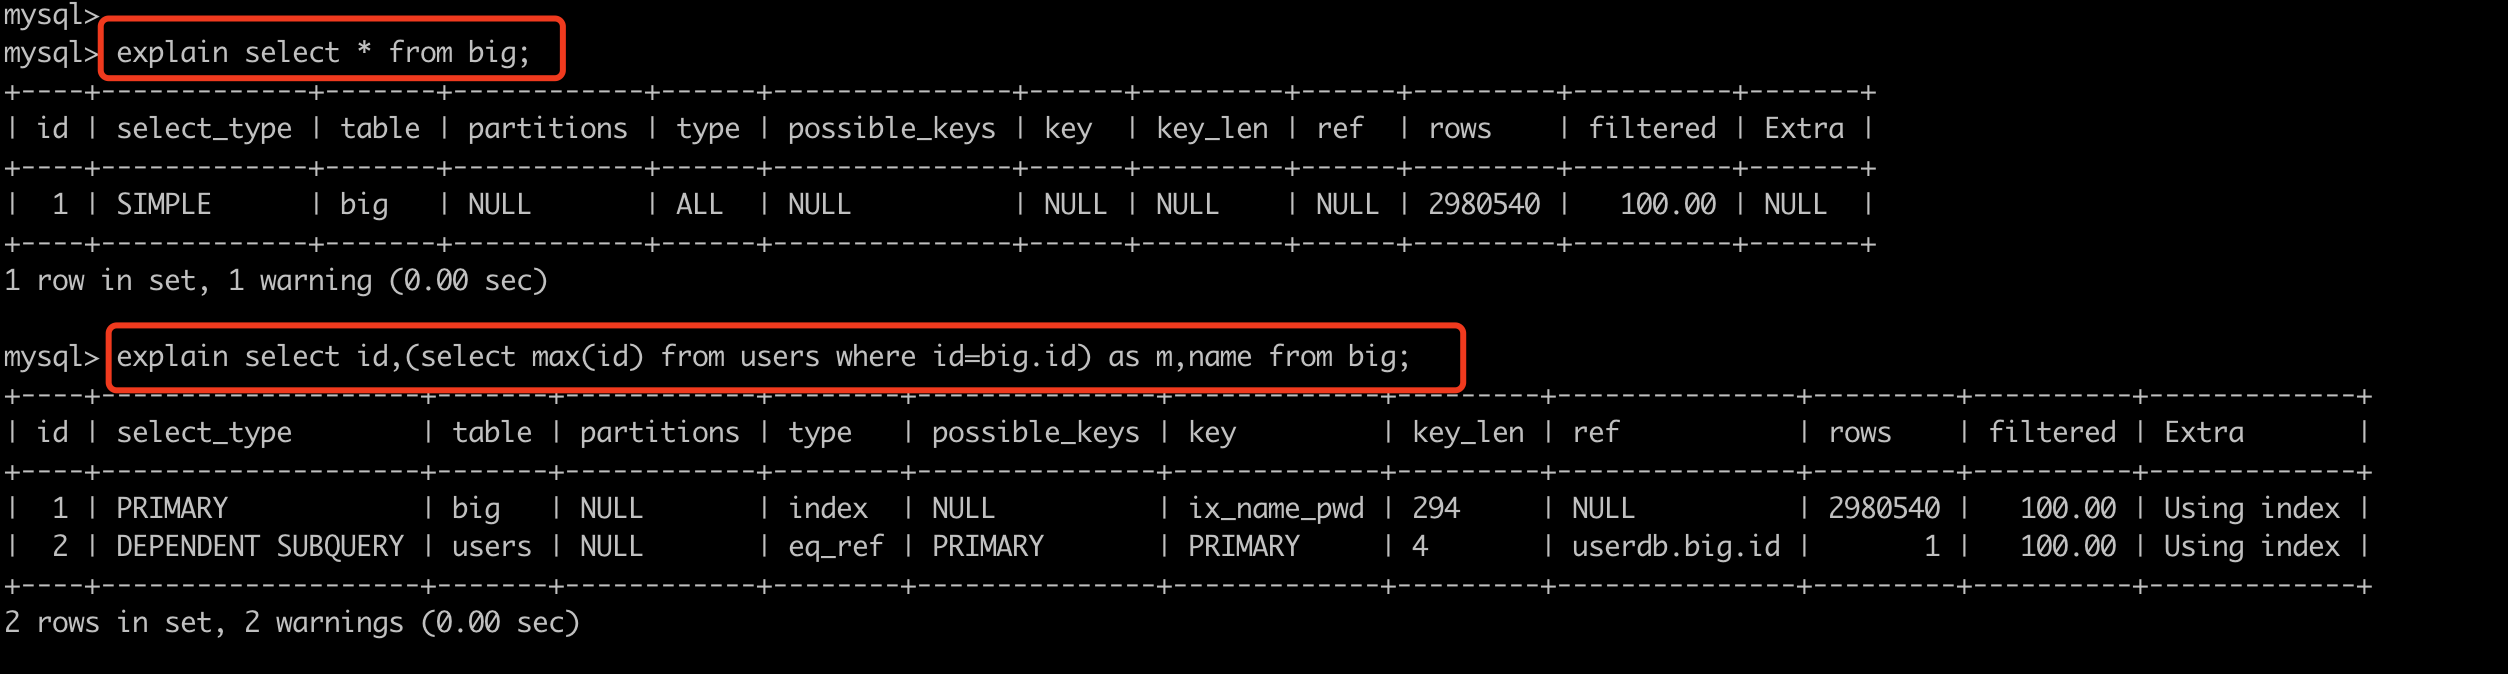
其中比较重要的是 type,他他SQL性能比较重要的标志,性能从低到高依次:all < index < range < index_merge < ref_or_null < ref < eq_ref < system/const ,(range以上都还可以)
ALL,全表扫描,数据表从头到尾找一遍。(一般未命中索引,都是会执行权标扫描)
sqlselect * from big; 特别的:如果有limit,则找到之后就不在继续向下扫描. select * from big limit 1;INDEX,全索引扫描,对索引从头到尾找一遍
sqlexplain select id from big; explain select name from big;RANGE,对索引列进行范围查找
sqlexplain select * from big where id > 10; explain select * from big where id in (11,22,33); explain select * from big where id between 10 and 20; explain select * from big where name > "wupeiqi" ;INDEX_MERGE,合并索引,使用多个单列索引搜索
sqlexplain select * from big where id = 10 or name="武沛齐";REF,根据 索引 直接去查找(非键)。
sqlselect * from big where name = '武沛齐';EQ_REF,连表操作时常见。
sqlexplain select big.name,users.id from big left join users on big.age = users.id;CONST,常量,表最多有一个匹配行,因为仅有一行,在这行的列值可被优化器剩余部分认为是常数,const表很快。
sqlexplain select * from big where id=11; -- 主键 explain select * from big where email="w-11-0@qq.com"; -- 唯一索引SYSTEM,系统,表仅有一行(=系统表)。这是const联接类型的一个特例。
sqlexplain select * from (select * from big where id=1 limit 1) as A;
其他列:
id,查询顺序标识

z,查询类型
    SIMPLE          简单查询
    PRIMARY         最外层查询
    SUBQUERY        映射为子查询
    DERIVED         子查询
    UNION           联合
    UNION RESULT    使用联合的结果
    ...

table,正在访问的表名

partitions,涉及的分区(MySQL支持将数据划分到不同的idb文件中,详单与数据的拆分)。 一个特别大的文件拆分成多个小文件(分区)。

possible_keys,查询涉及到的字段上若存在索引,则该索引将被列出,即:可能使用的索引。
key,显示MySQL在查询中实际使用的索引,若没有使用索引,显示为NULL。例如:有索引但未命中,则possible_keys显示、key则显示NULL。

key_len,表示索引字段的最大可能长度。(类型字节长度 + 变长2 + 可空1),例如:key_len=195,类型varchar(64),195=64*3+2+1

ref,连表时显示的关联信息。例如:A和B连表,显示连表的字段信息。

rows,估计读取的数据行数(只是预估值)
	explain select * from big where password ="025dfdeb-d803-425d-9834-445758885d1c";
	explain select * from big where password ="025dfdeb-d803-425d-9834-445758885d1c" limit 1;
filtered,返回结果的行占需要读到的行的百分比。
	explain select * from big where id=1;  -- 100,只读了一个1行,返回结果也是1行。
	explain select * from big where password="27d8ba90-edd0-4a2f-9aaf-99c9d607c3b3";  -- 10,读取了10行,返回了1行。
	注意:密码27d8ba90-edd0-4a2f-9aaf-99c9d607c3b3在第10行

extra,该列包含MySQL解决查询的详细信息。
    “Using index”
    此值表示mysql将使用覆盖索引,以避免访问表。不要把覆盖索引和index访问类型弄混了。
    “Using where”
    这意味着mysql服务器将在存储引擎检索行后再进行过滤,许多where条件里涉及索引中的列,当(并且如果)它读取索引时,就能被存储引擎检验,因此不是所有带where子句的查询都会显示“Using where”。有时“Using where”的出现就是一个暗示:查询可受益于不同的索引。
    “Using temporary”
    这意味着mysql在对查询结果排序时会使用一个临时表。
    “Using filesort”
    这意味着mysql会对结果使用一个外部索引排序,而不是按索引次序从表里读取行。mysql有两种文件排序算法,这两种排序方式都可以在内存或者磁盘上完成,explain不会告诉你mysql将使用哪一种文件排序,也不会告诉你排序会在内存里还是磁盘上完成。
    “Range checked for each record(index map: N)”
    这个意味着没有好用的索引,新的索引将在联接的每一行上重新估算,N是显示在possible_keys列中索引的位图,并且是冗余的。
小结
上述索引相关的内容讲的比较多,大家在开发过程中重点应该掌握的是:
- 根据情况创建合适的索引(加速查找)。
- 有索引,则查询时要命中索引。